
Attic Access Panel Handles and Hatch Dogs
Obliczymy ostateczną cenę na podstawie wybranego pliku. Sprawdzisz ją i zaakceptujesz przed płatnością.
Zapisane na tym urządzeniu.
Informacje o modelu
- Źródło
- Printables
- Kategoria
- Other House Equipment
- Licencja
- Creative Commons — Attribution — Noncommercial — Share Alike
These are handles and “hatch dogs" which were designed for an insulated access panel for attic access in a network closet. The panel is about 2" so I used some 60mm M5 hex head bolts to secure them. There are several additional (longer) cleats included, to accommodate different situations (from +3mm to +15mm in increments of 3mm). There is also a shorter handle included (which I did not use, but it may be useful in some cases).
If you use or make these, it is at your own risk.
The handles and other parts are not designed to support a lot of weight. The parts should not be relied upon for any load bearing or water tight applications. Please don't use these parts anywhere where they will be relied on for life or health.
Required Parts:
- 2 x M5 Hex bolts for each handle (the lengths will depend on the thickness of the panel)
- 2 x M5 Hex bolts for each hatch dog (the lengths will depend on the thickness of the panel)
- 1 x M5 Hex bolt between 45-60mm (the length will depend on which cleat is used)
- 1 x 10x3 cylinder magnet for each hatch dog
- 1 x 6x3 cylinder magnet for each hatch dog
- 1x M5 nut for each hatch dog knob
- M5 lock nuts and washers to secure the mounting bolts through the hatch
- Superglue (for the magnets)
Printing:
I included a 4 plate 3MF profile from BambuStudio, which has the same settings I used. The pads should be printed in TPU. I printed these parts in PETG with 4 walls and 25% rectilinear infill.
Assembly:
The basic hatch dog requires a M5x45mm hex bolt, to hold the center cleat. If you use a longer cleat, a longer bolt will be required. The other M5 hex bolt lengths will depend on the thickness of the hatch. I suggest printing one hatch dog base, and then use that to determine which cleat is needed (and then what length bolt is needed). As a guide though, the bases of the hatch dogs are 8.4mm thick, and the minimum distance between the shortest cleat (with the pad installed), and the hatch is 17mm.
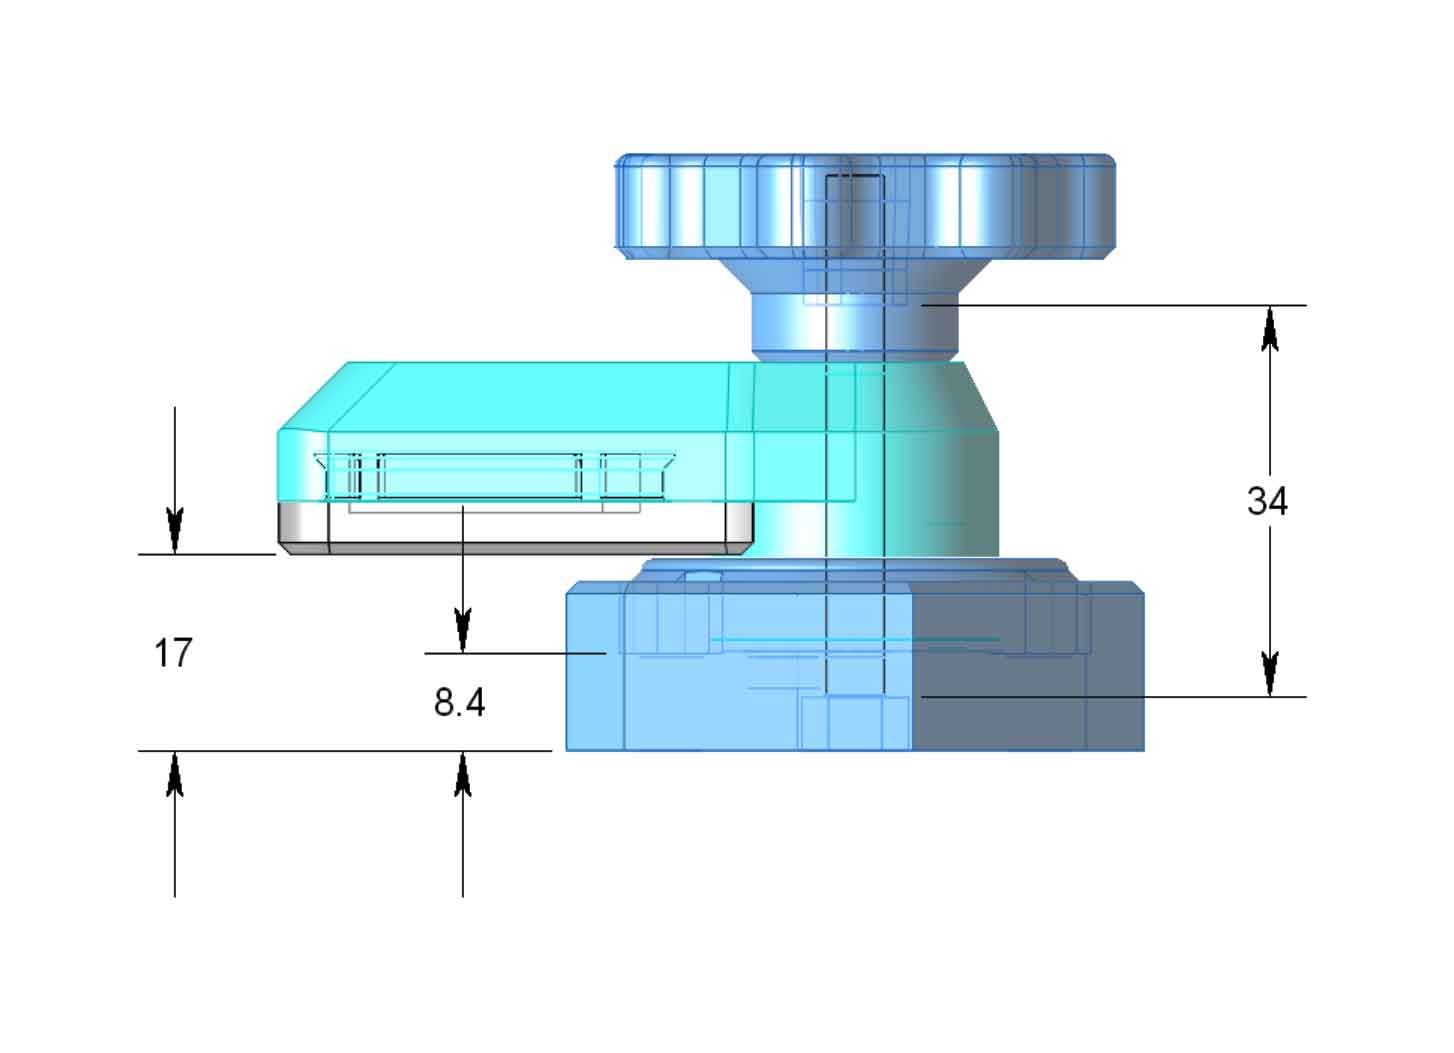
The parts have pockets to fit M5 hex bolts, but the fit will be snug, and you may need to pre-install the bolts by snugging down a M5 nut on them first (to seat them in the parts).
Before installing the hatch dogs, the magnets should be inserted into the base and cleats. The base uses a 6x3 cylinder magnet, and the cleat uses a 10x3 cylinder magnet. Observe the polarity, since they need to attract once installed. I used superglue to secure the magnets.
Next install the M5 hex head center bolt in the hatch dog bases. The head needs to sit just below the base, so the base will sit flush. Make sure the bolt used will be long enough once the cleat and knob are attached. When installing the hatch dog bases, take note of the magnet locations. The magnets should be on the side nearest the edge of the hatch, which will allow the cleats to be held out of the way when they are in the open position.
Install one regular M5 nut in the knob. It can help to add some superglue to it to hold it in position. The nut can be seated by drawing it into the knob using another M5 bolt, prior to the final assembly.
Stack the cleat on the hatch dog base, and then cap it with the knob.
The rest of the assembly will depend on the use case, but post in the comments if you have questions.
Other Stuff:
This will also be posted on my MakerWorld account. If you remix this elsewhere, please post a comment, so I can check it out.
If you find these models useful, please post a like or a comment with some pics of your prints.
You can find the other things I'm working on at my blog here. You can also follow me here on Printables or MakerWorld, to see what new stuff I post. If you would like to support my work, you can Buy Me A Coffee using this link:
https://www.buymeacoffee.com/mystoopidstuff
Thanks for looking!
Tags
Changelog:
10/25/2024: Uploaded to Printables.