
1 / 3
DIY Nanoleaf Lines NO SOLDERING (Control over effects not available, Arduino)
Zamów wydruk tego modelu
Obliczymy ostateczną cenę na podstawie wybranego pliku. Sprawdzisz ją i zaakceptujesz przed płatnością.
Zapisane na tym urządzeniu.

This project is super Cool! Nanoleaf Lines but at a fraction of the cost. and there is NO SOLDERING involvedParts…
- Ocena
- 0 / 5
- Polubienia
- 2
- Pobrania
- 17
- Wydruki
- 0
- Wyświetlenia
- 207
- Oceny
- 0
Aktualizacja u źródła:
Informacje o modelu
- Źródło
- Printables
- Kategoria
- Other Ideas
- Licencja
- Creative Commons — Attribution
This project is super Cool! Nanoleaf Lines but at a fraction of the cost. and there is NO SOLDERING involved
Parts List
- BTF-Lighting WS2812B Eco 300LED 5M: US | UK | CA | DE | FR
- Aluminium Led Diffuser Channel Shallow w. Mily Cover: US | UK | CA | DE | FR
- 3D Printed Connector Piece (in Files)
- Nano Gel Tape(Try to find in Hardware Store): US | UK | CA | DE | FR
- Cable Channel (Try to find in Hardware Store): US | UK | CA | DE | FR
- IKEA KUGGIS Cable Box: US | UK | CA | DE | FR
- Arduino Uno R3: US | UK | CA | DE | FR
- 400 tie Point Breadboard MB-102: US | UK | CA | DE | FR
- Dupont Wires Assorted Kit: US | UK | CA | DE | FR
- (OPTIONAL) Hook-up Wires 28AWG: US | UK | CA | DE | FR
- 100uf-1000uf Capacitor: US | UK | CA | DE | FR
- 220-440 ohm Resistor: US | UK | CA | DE | FR
- Terminal Block (ONLY FOR NORMAL SIZE PSU): US | UK | CA | DE | FR
- 5V Power Supply (Amps = LEDs x 0,06) --------- Normal Size (Up to 10A): US | UK | CA | DE | FR --------- Full Size (Up to 50A): US | UK | CA | DE | FR
- Power Supply Cable --------- For Normal Size: US | UK | CA | DE | FR --------- For Full Size: US | UK | CA | DE | FR
I also recommend a Low ESR for making sure, the power supply does not fail
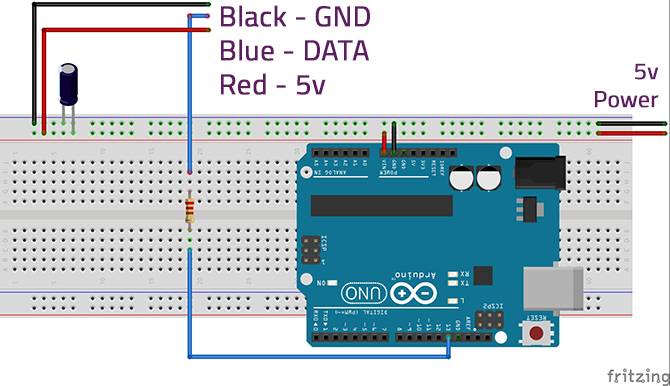
Circuit Setup
Animations
CODE
View in Files
HOW TO SET UP
- Cut your LED Profiles to Size with any Saw
- Click a Connector Piece to a LED Profile and feed the LED Strip through the Connector Piece and repeat until design is done
- Connect components together by looking at Circuit setup and put in cable box
- Install Cable Channels on the wall without Covers
- Connect Hook-Up Wires or M-F Dupont Cables to Extension Cables
- Put Cables in Cable Channel
- Put Nano Gel Tape on Connector Pieces, and Install on the wall
- Connect Night Strip to Hook-up Wires
- Put Cable Channel Covers On
- Plug In Power Cable
Project Should Light Up App-controlled version coming very soon
A WLED Version is coming very soon
Category: DIY