
Home Office Status Light
Obliczymy ostateczną cenę na podstawie wybranego pliku. Sprawdzisz ją i zaakceptujesz przed płatnością.
Zapisane na tym urządzeniu.

A programmable LED status sign to hang outside of your home office
- Ocena
- 0 / 5
- Polubienia
- 34
- Pobrania
- 48
- Wydruki
- 0
- Wyświetlenia
- 735
- Oceny
- 0
Aktualizacja u źródła:
Informacje o modelu
- Źródło
- Printables
- Kategoria
- Office
- Licencja
- Creative Commons — Attribution — Noncommercial — Share Alike
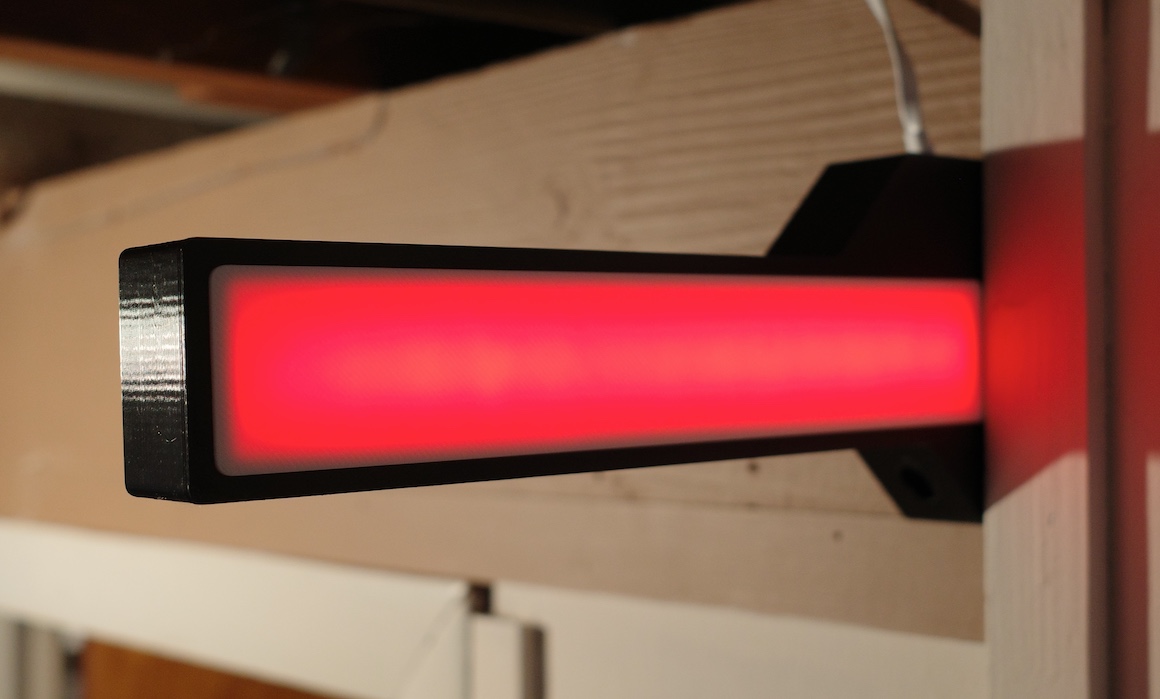 What is this?
I primarily work from home, and my kids love nothing more than stomping down the stairs to interrupt me in the middle of meetings. I built this LED sign I could hang outside my office door to let my kids know if I'm busy or not, so now instead of stomping down the stairs to interrupt me they stand at the top of the stairs and interrupt me!
Huge Caveat
I am not an electronics engineer, nor do I know how to code, so you can blame Copilot for any bugs. It's working great for me, however!
BoM
| Component | Purpose | Notes |
| Sign Body (Printed) | Hold the LED strip, ESP, and connect the whole thing to the wall | Printed in black PETG |
| Sign Diffuser (Printed) | Diffuses the LED light | Printed solid in white PLA |
| Wemos D1 Mini ESP8266 | Controlling the sign/hosting the web server | Other ESP boards would likely work, but I used what I had on hand |
| LED Strip | Lights! | I used a scrap length of WS2812B LEDs, but any individually-addressable strip should work, cut to length (for my strip, 14 LEDs was the right number) |
| MicroUSB Cable | Connecting the ESP to power | I bought a very long cheap USB cable and string it through my drop ceiling to an outlet |
| Wire | For soldering the ESP board to the LED Strip |
Assembly
- Solder the LED strip to the 5V, GND, and D4 pins of the ESP8266.
- Using Arduino IDE, flash the ESP with the sign control code (office_sign_sketch.c) and test to make sure your LED strip lights up and responds to mode change commands. In order to flash the ESP, you will need to install the required sketch dependencies.
- Feed the LED strip into the channel on the sign body and stick it down. I found the included adhesive did not stick great to the printed plastic and supplemented it with a few drops of super glue.
- Press-fit the diffuser. You can glue this if you want, but I found it was not necessary to do so and wanted the option to open it up if I need to replace the LED strip.
- Stuff the ESP into the sign body and feed the USB plug in through the hole in the top of the sign.
- Screw or otherwise affix the sign to the wall. Voila!
Controlling the Sign
The first time you boot up the sign, it will serve a wifi access point called “OfficeSignAP." Connect to the sign's wifi network and visit 192.168.4.1 in the browser to connect the sign to your home wifi.
Once the sign is connected to wifi, you can visit the IP address your router assigned to the office sign in the browser to change the lighting mode. The webpage will display all the currently-programmed lighting options, as well as the current mode and an animated illustration of the current LED display.
You can also change the sign mode by hitting an endpoint in your browser, which allows to change the mode using automations or, as I am doing, by hitting a button on my Stream Deck. Just visit “http://<yoursignIP>/set?mode=<x>” where <x> is the number of the mode you'd like to activate. Here's how I have it set up in Stream Desk Config: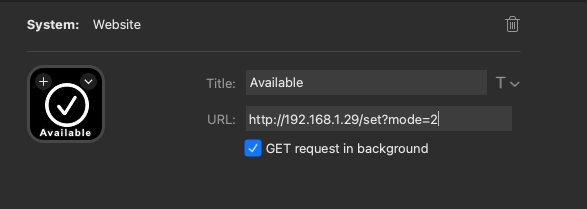
| Mode Name | Description | Mode ID |
| Off | LED is off | 0 |
| Idle | A warm amber light slowly pulses | 1 |
| Idle Scroll | An amber light scrolls back and forth across the strip | 8 |
| Available | A solid green light | 2 |
| Do Not Disturb | A pulsing red light | 6 |
| Party | Random colors wipe back and forth across the strip | 5 |
| Fire | This doesn't work great. Simulated fire, way too complicated | 7 |
| Night Light | A very dim warm light | 4 |
Final Notes
This was a fun project and a good way to test Copilot once I got access. If you actually know how to code and want to use this hardware design to make a better version, please feel free! I wanted to try and implement some sort of countdown timer for meetings to let my family know about when to expect me to go available, but it got to complicated for my puny brain. Definitely interested to see what other people come up with!