
Moxon Vise Kit
Obliczymy ostateczną cenę na podstawie wybranego pliku. Sprawdzisz ją i zaakceptujesz przed płatnością.
Zapisane na tym urządzeniu.

Just add screws + wood to make your own Moxon Vice!
- Ocena
- 0 / 5
- Polubienia
- 5
- Pobrania
- 32
- Wydruki
- 0
- Wyświetlenia
- 239
- Oceny
- 0
Aktualizacja u źródła:
Informacje o modelu
- Źródło
- Printables
- Kategoria
- Tools
- Licencja
- Creative Commons — Attribution
This vise is designed to be used with some common metal parts that are easily available from most hardware stores.
Additional hardware needed:
Most hardware stores (Lowes, Menards, Home Depot) will have all of these items for significantly cheaper than the links below. The McMaster-Carr links are helpful because they provide detailed specs and 3d models for everything, so you can double check that you're buying the correct thing.
I also included affiliate links to an option for each item*, but most of the items are included in a package of WAY more than you need. I personally like to have a supply of extras, but I understand that most people won't want that.
*I will earn a small commission if you make a purchase with my links. No pressure, of course!
| Qty | Item | Affiliate Link | McMaster-Carr |
| 2 | ¾" Threaded Rod | https://amzn.to/41LqIBd (2 pack) | https://www.mcmaster.com/90034A064/ |
| 4 | ¾" Nut | https://amzn.to/4iFltKi (6 pack) | https://www.mcmaster.com/97149A350/ |
| 2 | bearing | https://amzn.to/3Fm4bDD (20 pack) | |
| 2 | grub screw | https://amzn.to/4hyUijf (60 piece assorted) | https://www.mcmaster.com/92015A128/ |
| 2 | m4 screw | https://amzn.to/4iiC46W (20 pack) | https://www.mcmaster.com/97654A373/ |
| 2 | m4 washer | https://amzn.to/3FBCAyj (100 piece assorted) | https://www.mcmaster.com/93475A230/ |
| 1 | epoxy | https://amzn.to/43FDrbi | |
| 1 | 1" Forstner bit | https://amzn.to/3XNG3QC |
Printing Instructions
Everything printed in PLA
| Bearing Housing | 0.2mm layer height 80% infill Tree supports (80% overhang) | Print upside-down (with protrusion facing upwards) |
| Crank Wheel | Print upside down (hexagon facing upwards) | |
| Handle | Print sideways with supports (pointy end parallel to build plate). This orientation ensures the handle will not break along layer lines | |
| Bushing | 0.2 mm layer height 100% infill | Print with opening facing upwards |
Assembly Instructions
Step 1 - Assemble the wheel
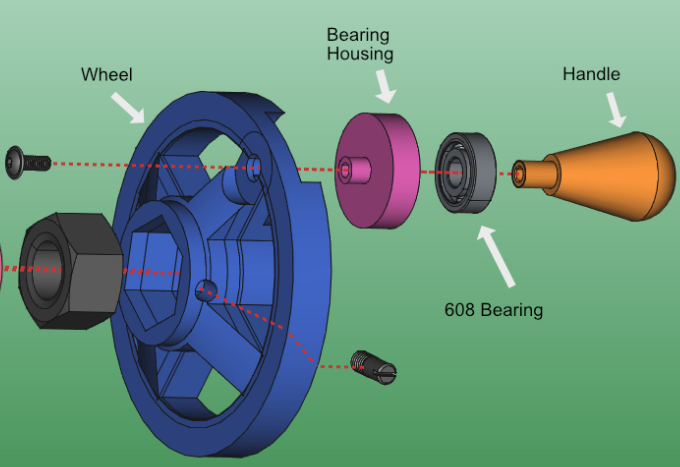
- Insert the Bearing Housing into the wheel. Glue optional but recommended.
- Once glue has dried, press the 608 bearing into the housing
- Test fit the handle in the center of the bearing. Add masking tape, if necessary, to create a tight fit
- Insert the M4 screw through the back of the wheel (washer is optional), hold secure while twisting the handle onto the screw from the other side. The hole is 25mm long and I recommend using the longest possible screw for strength.
- Insert the ¾" nut into the hexagonal hole in the wheel. Use epoxy or a strong glue to secure in place. Make sure it's pressed all the way in!
- thread the M6 grub screw partially into the hole near the hex bolt
Step 2 - Prepare your vice
There's a ton of youtube videos on this, but i'll attempt written instructions here…
You need two wooden “chops” to create the vice. I recommend that they are at least 1" thick, but preferably closer to 2".
- Start by clamping the front and rear chops together, so you can drill through them at the same time
- The screws will be positioned a few inches from each side of the chops and in the middle (vertically)
- Use a 1" forstner bit to drill through both the front and back chops at the same time
- The rear chop will have a hexagonal hole in which you glue a ¾" hex nut. This hole will only go about half-way through the board.
- Use the 1" hole you just drilled to align and trace the ¾" nut onto the back of the board.
- Use the bushings (if needed) in the holes you drilled earlier. These will help with alignment and should be glued in the holes so that they are flush from the faces.

Step 3 - Attach to your Vise
- On the front of your vise, slip the Wheel Bushing over the threaded rod and out of your way (for the moment). Leave a few inches of threaded rod available for working space
- Screw the wheel onto the end of the threaded rod
- Move the Wheel Bushing towards you and into the hexagonal hole on the wheel
- Align the circular hole on the Wheel Bushing with the grub screw, then tighten the grub screw as much as possible.
- Optional: you can drill through the hole for the grub screw and into the threaded rod. Then you can unscrew the wheel and widen the hole. This will allow you to sink the grub screw into the rod and create a much tighter hold
