
MOAI Pet Feeder
Obliczymy ostateczną cenę na podstawie wybranego pliku. Sprawdzisz ją i zaakceptujesz przed płatnością.
Zapisane na tym urządzeniu.

The MOAI is a DIY smart feeder controlled via Wi-Fi using a mobile app.
- Ocena
- 0 / 5
- Polubienia
- 49
- Pobrania
- 58
- Wydruki
- 0
- Wyświetlenia
- 1512
- Oceny
- 0
Aktualizacja u źródła:
Informacje o modelu
- Źródło
- Printables
- Kategoria
- Pets
- Licencja
- Creative Commons — Attribution — Noncommercial — Share Alike
This project is about feeding my pet treats. Sometimes my pet does something right, and I want to reward him. So I take my cell phone out of my pocket and give him a treat for doing something right.
Required equipment
HARDWARE
- Wemos D1 Mini ESP8266 WiFi Board (Usb-c model)
- 28BYJ-48 Stepper Motor
- ULN2003x Stepper Motor Driver-(motor)
- 6 Jumper Wires F-F
- 3D Printed parts
- top of the head
- the head
- the bottom of the head
- the spiral
- USB-C cable
- neodymium magnets 6mm diameter and 3mm grosor
- 2 screws M3x10
- Philips screwdriver

SOFTWARE
- Arduino IDE
- App inventor (online)
- Arduino code for the Wemos (on this project)
- The App Inventor program file (on this project)
- A smartphone or tablet
- Tinkercad
Project time schedule
Time spend in each part:
- 3D Printing models (12h)
- Collecting the parts (20min)
- Assembling (1h)
- Programming (1h)
Workflow
🛠 What You’ll Need (Hardware)
Wemos D1 mini (ESP8266-based microcontroller)
USB cable (for programming the board)
Dupont cables
3D printed MOAI structure (or equivalent)
Power supply
Smartphone or tablet
🛠 What You’ll Need (Software)
Arduino IDE (installed on your PC)
MIT App Inventor (could use the online version)
✅ Step 1: Hardware Assembly
Connect the Dupont cables according to the wiring diagram showing in the image below.

Thats all! Simple and easy.
Before opening the Arduino IDE to program the board, make sure you have installed the CH340 drivers (https://www.wch.cn/downloads/CH341SER_EXE.html) so you can program the Wemos board.
Once downloaded, execute it and press the Install button.
Now connect the WeMos D1 mini to your computer using a USB cable.
💻 Step 2: Preparing the Arduino IDE
Now let's add the Wemos boards to the Arduino ID. Open the Arduino IDE.
Go to File > Preferences.
In the "Additional Board Manager URLs", click the icon on the right and paste this URL:
http://arduino.esp8266.com/stable/package_esp8266com_index.json

Click OK, then again OK.
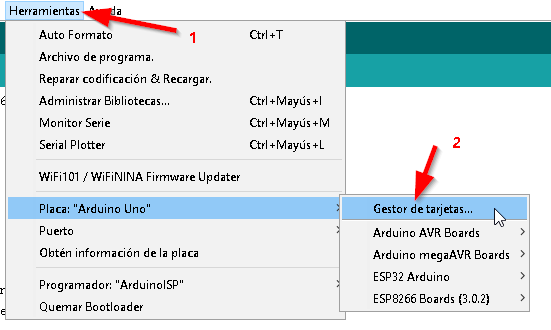
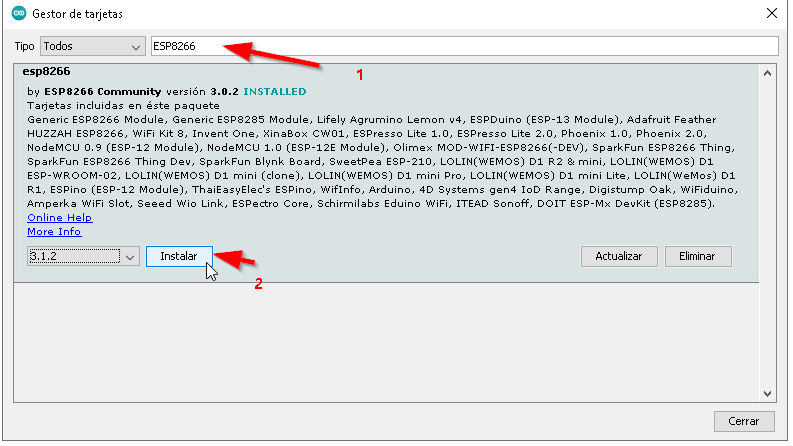
Open the Tools -> Board -> Board Manager menu. In the top search box, next to "Type," enter "ESP8266." In the middle of the box, "by ESP8266 Community version x.xx" will appear. Find the "Install" button in that box and click it. Wait for the installation. Once installed, close the boards window.
2.3 Install ESP8266 Board Package
Go to Tools > Board > Boards Manager.
Search for ESP8266.
Install the package labeled "by ESP8266 Community".
2.4 Select the Correct Board
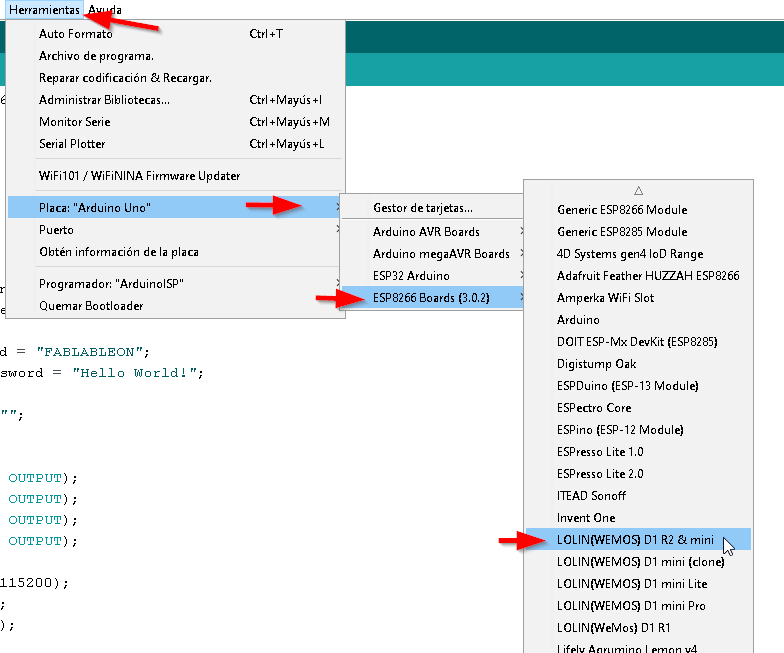
Go to Tools > Board > ESP8266 Boards and choose: “LOLIN (Wemos) D1 R2 & mini”
🧠 Step 3: Upload the Code
Open a new Arduino sketch and delete all existing code.
Paste the Arduino code for the MOAI project into the window.
We need to change a little bit the Arduino code. We need to add your wifi credentials, so the board can connect to the internet.
Locate the following two lines and replace them with your Wi-Fi credentials:
const char* ssid = "YOUR_WIFI_NAME";const char* password = "YOUR_WIFI_PASSWORD";
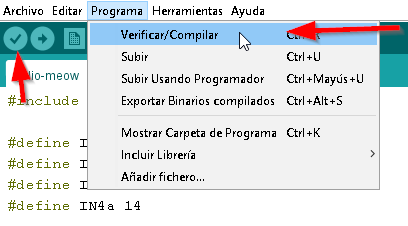
Click the Verify/Compile button (✓) or go to Sketch > Verify/Compile.
If it compiles correctly, you'll see the message “Compiled”.
🔌 Step 4: Upload Code to Wemos D1 mini
Make sure the Wemos is still connected via USB.
Check the correct board is selected: Tools > Board = Wemos D1 mini
Check the correct COM port is selected: Tools > Port = COM port that appears when Wemos is connected.
Tip: unplug and replug the USB to identify the right COM port.
Click Upload (→) or go to Sketch > Upload.
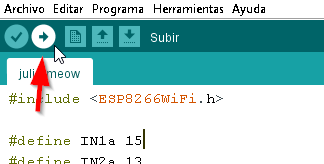
Wait for the upload to complete. You'll see “Uploaded” at the bottom of the IDE.
📱 Step 5: Install the Mobile App
Go to MIT App Inventor and create a free account.
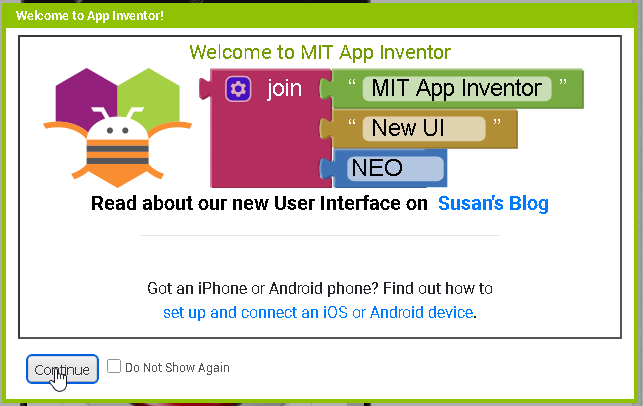
In the dashboard, go to Projects > Import project (.aia) from my computer.
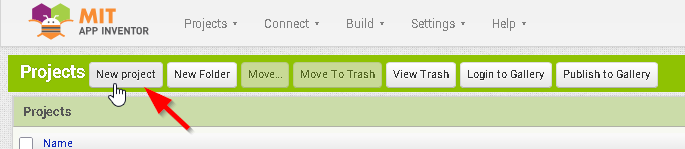
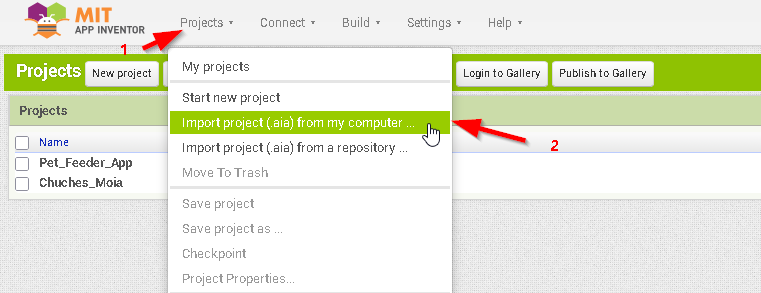
Upload the provided .aia file in this project.

Open the project.
5.1 Install the App on Your Smartphone/Tablet
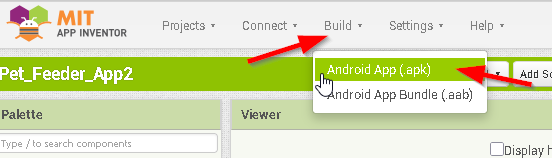
Go to Build > Android App (APK).
After compiling, a QR code will appear.
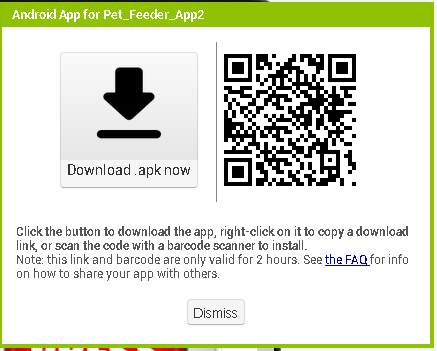
Scan it with your phone to download the app.
If you receive a warning like “This file may be harmful”, choose Download anyway.
Open the downloaded file and install the app.
Android may prompt a security scan — you can accept and proceed.
Step 6: How to Use the MOAI
Before using: make sure both the MOAI and the smartphone/tablet are connected to the same Wi-Fi network — the one you entered in the Arduino code.
Connect the MOAI device to a power source (use the same computer with Arduino IDE for the first time).
Open Arduino IDE.
Select the correct COM port again (Tools > Port).
Open the Serial Monitor to read the output — the device’s IP address will appear.
On your smartphone or tablet, open the MOAI app.
Enter the IP address into the app when prompted.
That’s it! The app is now connected to the MOAI.

🎮 Interacting with the App
Tap the center button or image in the app.
The app sends a signal to the Wemos, triggering the feeding mechanism (or lighting up the LED if you're testing).
Authors
Fab Lab León student Julio and his Instructor Pablo.