
Rain-X Latitude Wiper Blade Adapter - 2024 Chevy Trax, Other GM Models
Obliczymy ostateczną cenę na podstawie wybranego pliku. Sprawdzisz ją i zaakceptujesz przed płatnością.
Zapisane na tym urządzeniu.

Adapter made specifically for the new-gen Chevy Trax to attach Rain-X Latitude wiper blades.
- Ocena
- 5 / 5
- Polubienia
- 10
- Pobrania
- 102
- Wydruki
- 1
- Wyświetlenia
- 831
- Oceny
- 1
Aktualizacja u źródła:
Informacje o modelu
- Źródło
- Printables
- Kategoria
- Automotive
- Licencja
- Creative Commons — Attribution — Noncommercial
Background
If you own a 2nd Gen Chevy Trax ('24 or newer), or any Chevrolet with their new propreitary wiper blade connector, and you've run into the same problem where aftermarket windshield wipers don’t attach correctly to the wiper arms, welcome to my post! I understand your pain, and I empathize with you. You may have seen my other post for this problem, with the Trico Force adapter (linked below), and in that post I stated I was going to work on making an adapter for the Rain-X Latitude wiper blades. Well, this is that post!
When I first set out on this journey, I tried installing Rain-X Latitude wiper blades on my girlfriend's Chevy Trax. And after attempting to install them, they didn't sit correctly in the connector. I ended up returning them, purchased the Trico Force wiper blades instead, discovered they had a similar problem to the Rain-X ones, and eventually designed and printed a solution for them. I did look into getting OEM wipers from ACDelco and/or GM, but they are STILL completely sold out (and worse quality anyways).
With the life of those Trico wiper blades coming to an end, I wanted to create an adapter for the brand of wipers I use the most on vehicles, which is the Rain-X Latitude wipers. I've used these on my cars for years and I recommend them to everyone. Also because this brand/model is widely available everywhere. I'll get into more info about the design itself and how it works next!
Details
I don't believe the problem applies to all Trax vehicles, but the issue is because the Push Button for the arm is in the wrong location on the arm. It follows the same standard as the the Push Button Narrow (PB Narrow), but instead the button hole is closer to the end of the arm on these models (see these two images below).
Push Button Narrow (left) and Push Button (right)

What is on the Trax

Source for Pictures: Imgur [Link]
Not to mention, the design of the attachment requires the blade to be firmly secured in place by its connector ‘track’. GM designed the arm and blade to interlock. When you insert the OEM blade, the connector tab has to be lifted up, slid onto the arm, then folded back down to fully secure the wiper. The length of the ‘track’ is ~4mm and is positioned towards the front of the arm. This design seems deliberate to make using aftermarket wiper blades harder to produce, and introduced yet another challenge to tackle with this project.
Reference for OEM Mechanism:

My Design
My design of the wipers tries to blend these two different mechanisms. First, I had to reverse engineer the actual attachment that connects to the Rain-X wiper to utilize as my base, and then I had to incorporate a mechanism that allows the wiper blade to slide into place, snap the push button into positon, and then lock the wiper down in the same way the OEM does so it doesn't slide off. It was a tricky problem to tackle which took many itierations before getting a working version that I was happy with.
The adapter prints in two pieces: the Rain-X Platform and then the Rain-X Connector. The tolerances are a bit tight and will require a little bit of force to get everything to snap into place, but I assure you that everything will function as normal! For me, I had to put the connector into its place on the platform and then squeeze a bit in the areas where the nubs slot into their spots. Then I repeatedly and rapidly pivoted the connector up and down to get those pieces working well. And then finally, pivoting the connector down, it should snap into place in the rear. You might have to force it to clamp down but again, this is part of the design. It might also flare out the edges of the platform, but that shouldn't be too much of an issue.
There are also two different styles of this wiper blade!! The design of this one is intended for the one with two holes in the factory adapter. There is a version with one hole and one nub. I am actively working on a solution for this version (since it appears that the latter is still sold in some places. But for now, please ensure you can get the proper version for this model to work guaranteed! I will post an update once I have successfully tested a solution for this.
Installation
To install this adapter, the steps are pretty straightforward. But it will require a sturdy tool for leverage, like a flathead screwdriver, a key, or something flat and sturdy like the handle of some tweezers, which is what I ended up using.
Removing the Original Adapter
With your tool of choice and the Rain-X wiper blade, slot your tool underneath one of the nubs like in this picture below. It was easier to start with the smaller nub and then try to work it up and off the blade. You will likely ruin the original adapter so ensure you are trying to install the correct adapter before proceeding!

It might take some force, but now try and pry the cap so the lip of it is on top or clear of the nub we were leveraging under. From here, you can either try and pull this cap off or you can go to the other nub and try to leverage it off over there too. If you go that route, I would recommend tilting the cap towards the pivot point while trying to pry it off to make things a little easier. This process will require some patience
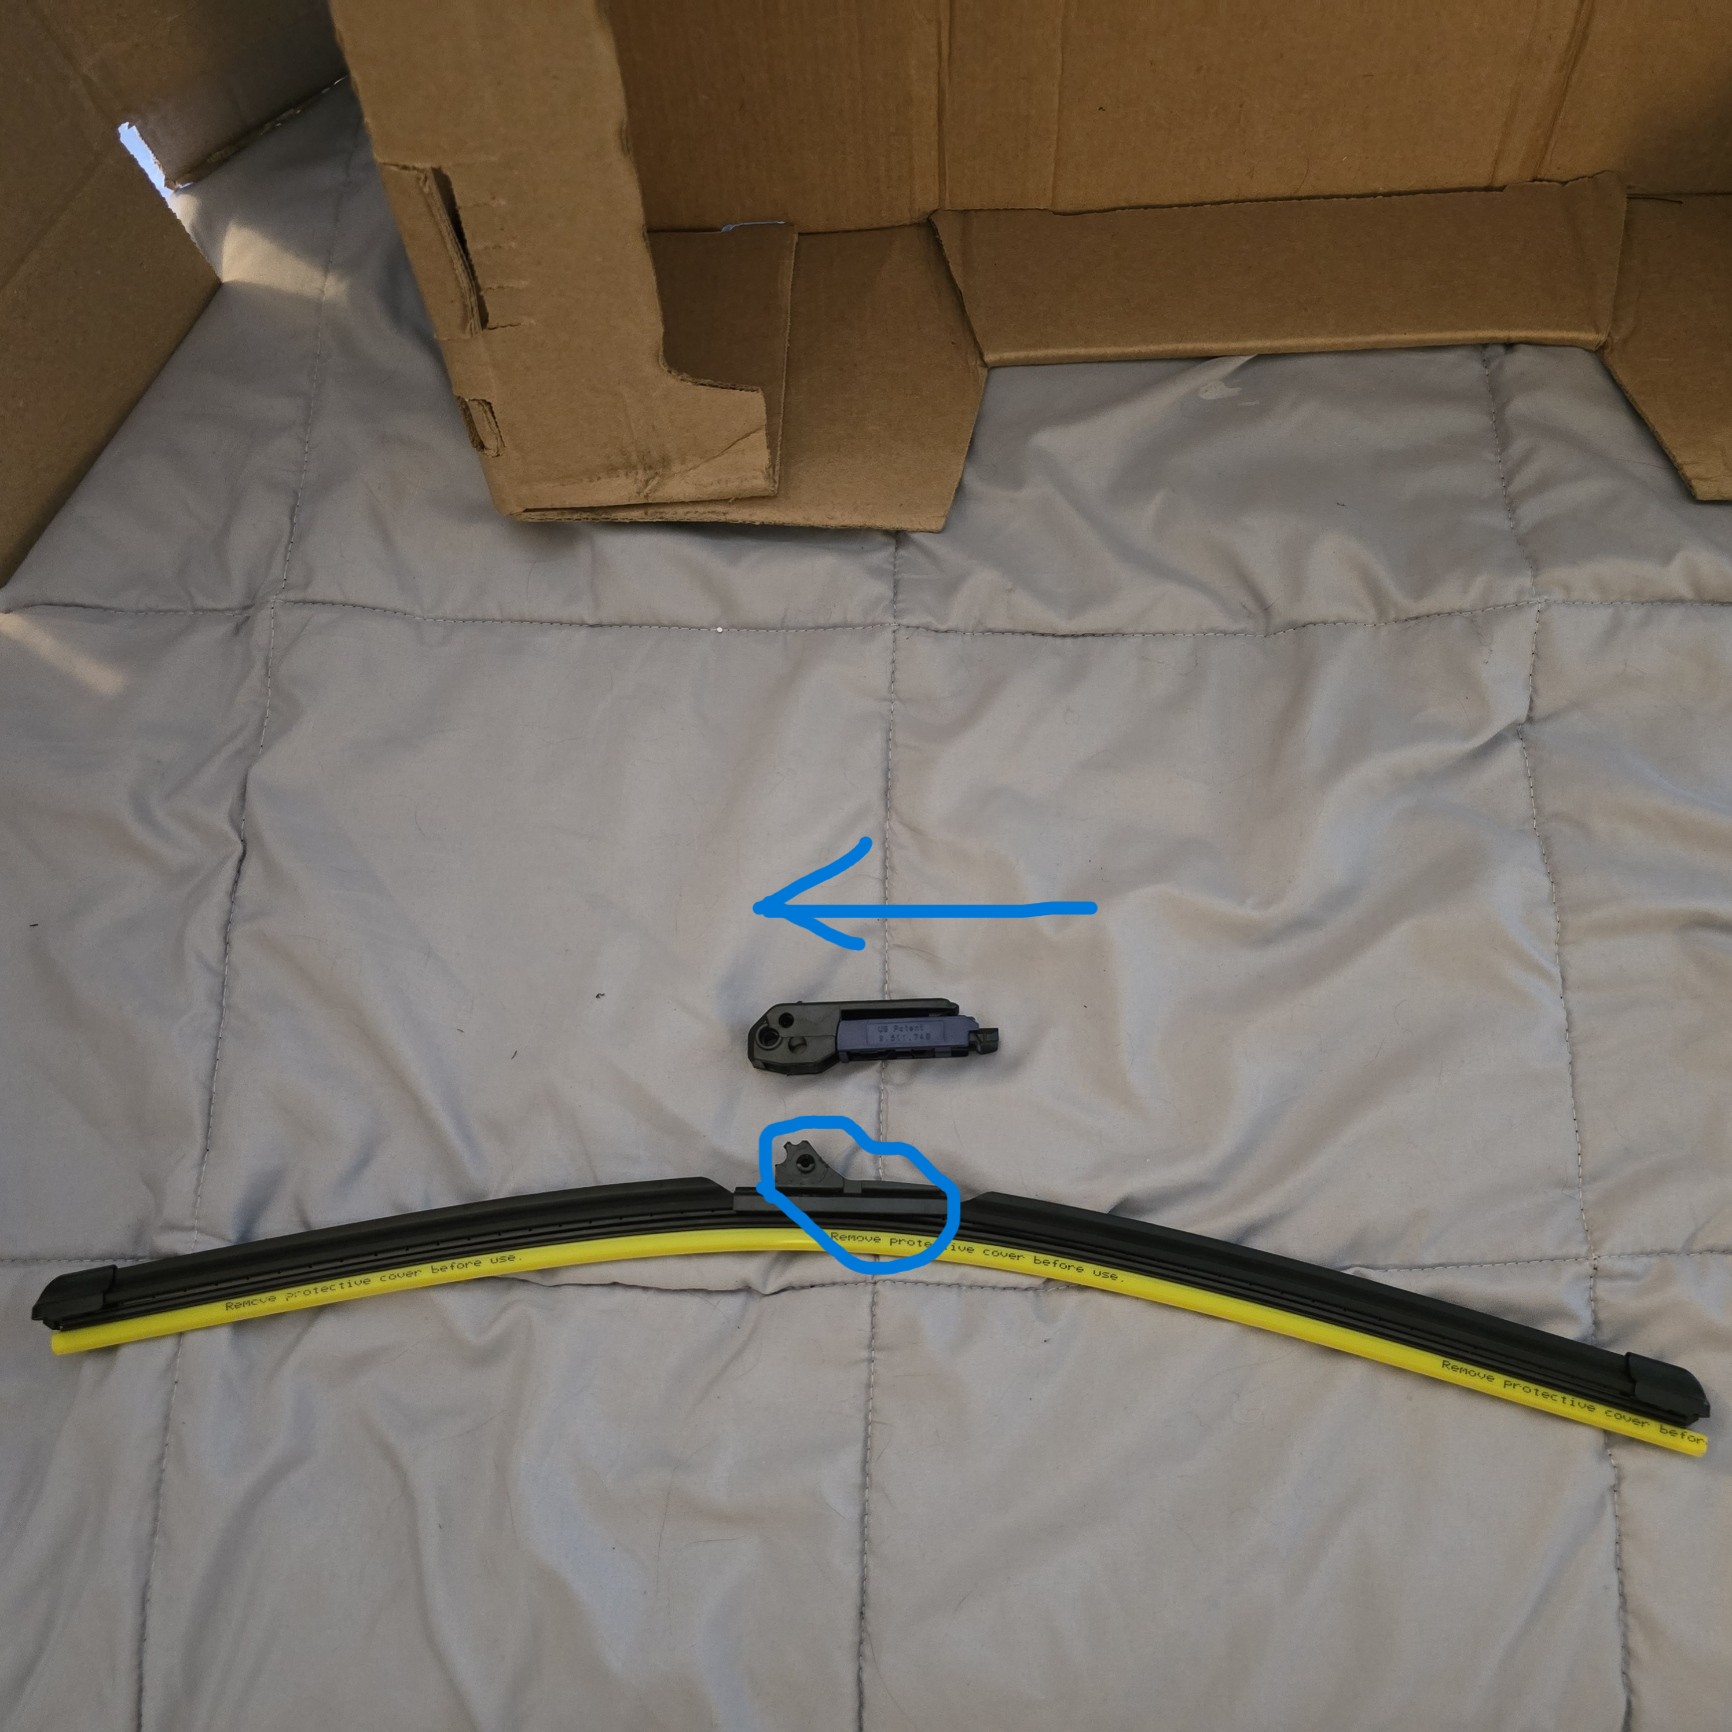
Eventually, you'll be left with the base of the Rain-X wiper blade. Congratulations! Next, we are going to do the reverse and install our new 3D printed adapter! Take note of the orientation of the wiper blade and how the adapter will connect below. (Make sure the peak
Attaching the New Adapter
Go ahead and slot the adapter onto the blade. I found it easier to slot the nubs into place one at a time, but everything should snap into place.
Take your time attaching the the adapter onto the wiper blade. Depending on your material, you should have a little bit of flex. And even though the platform piece is sturdy and thick, we don't want to unnecessarily break it!
Finally, you will be left with this final product!
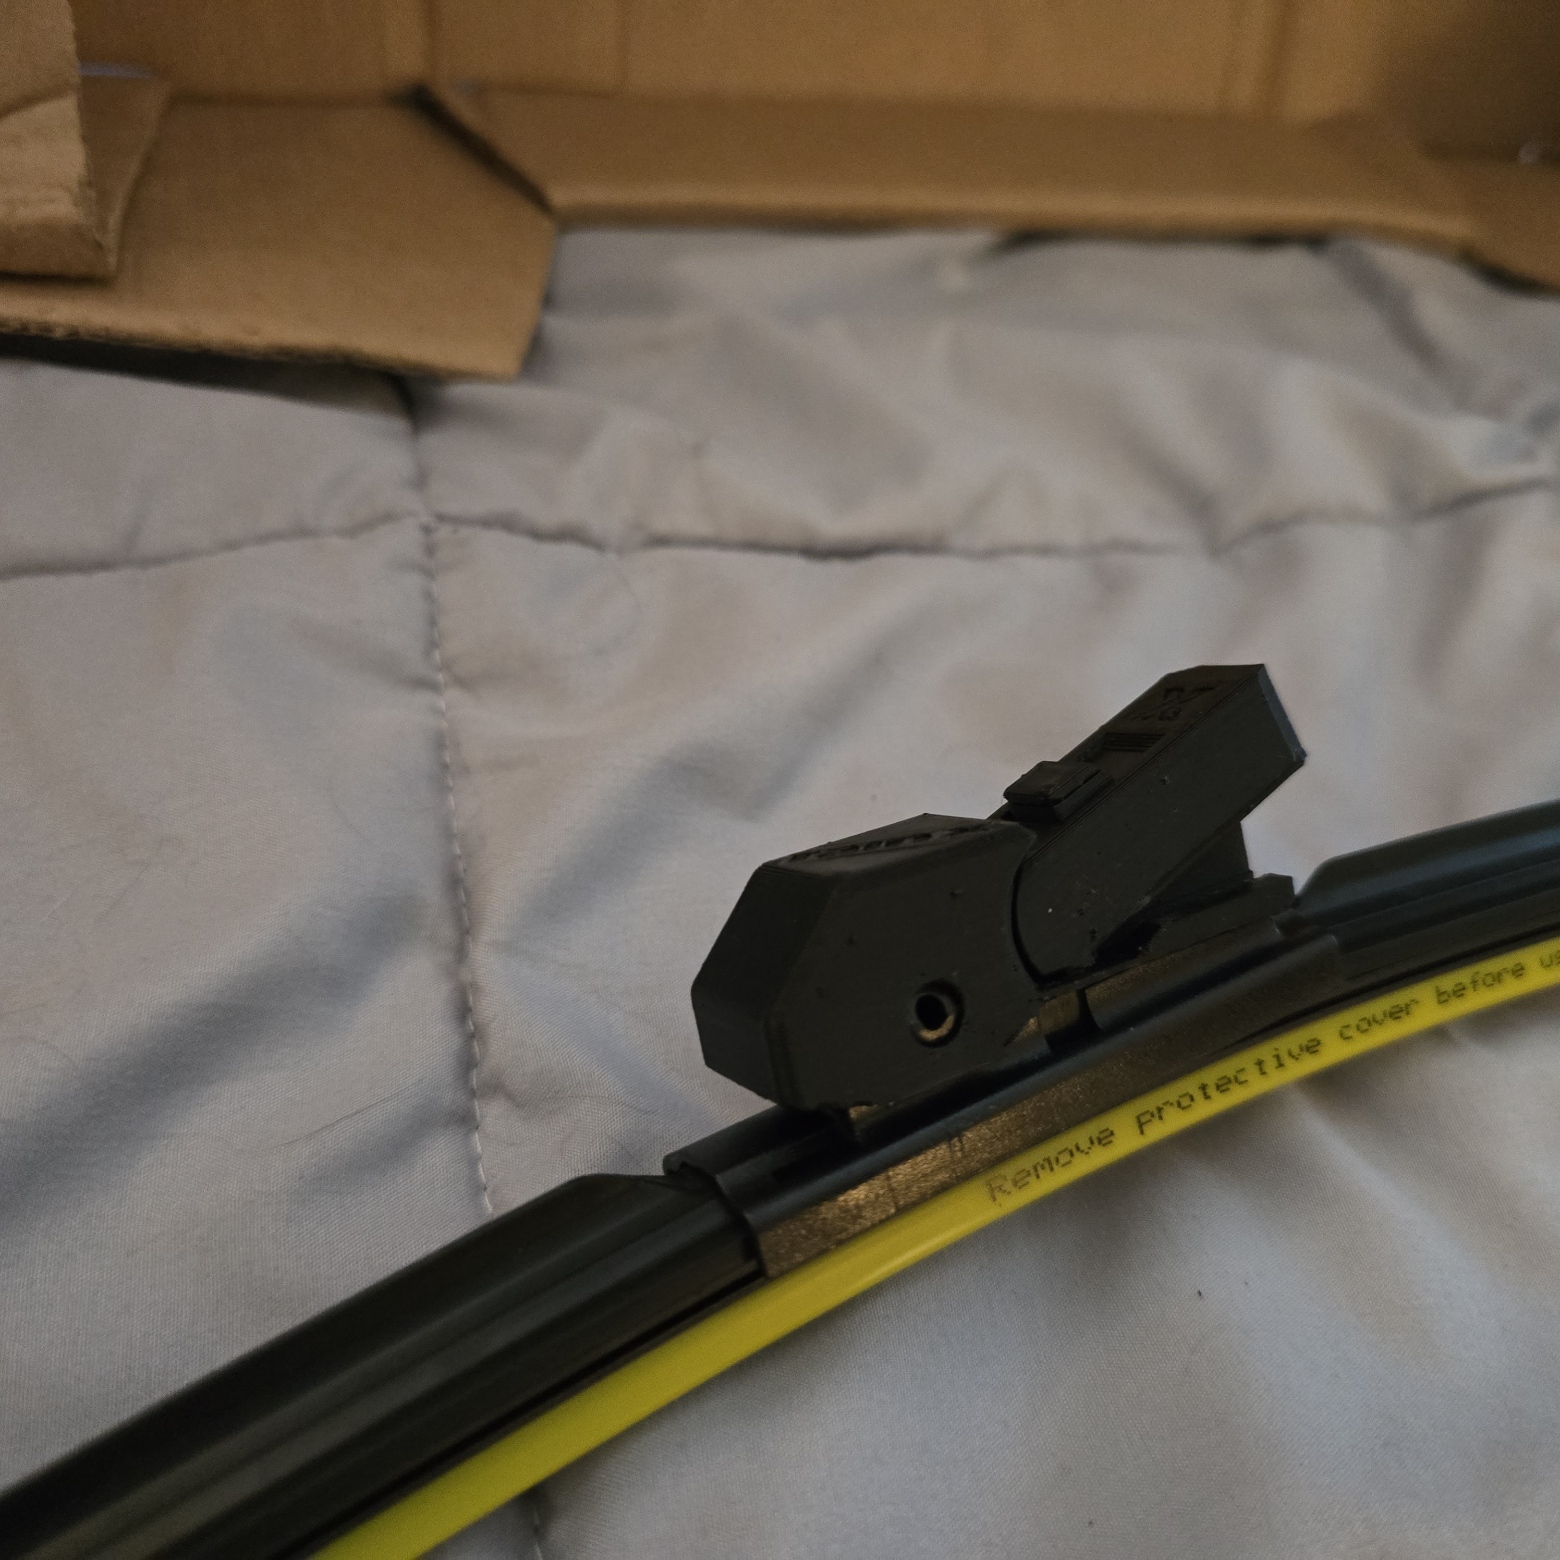
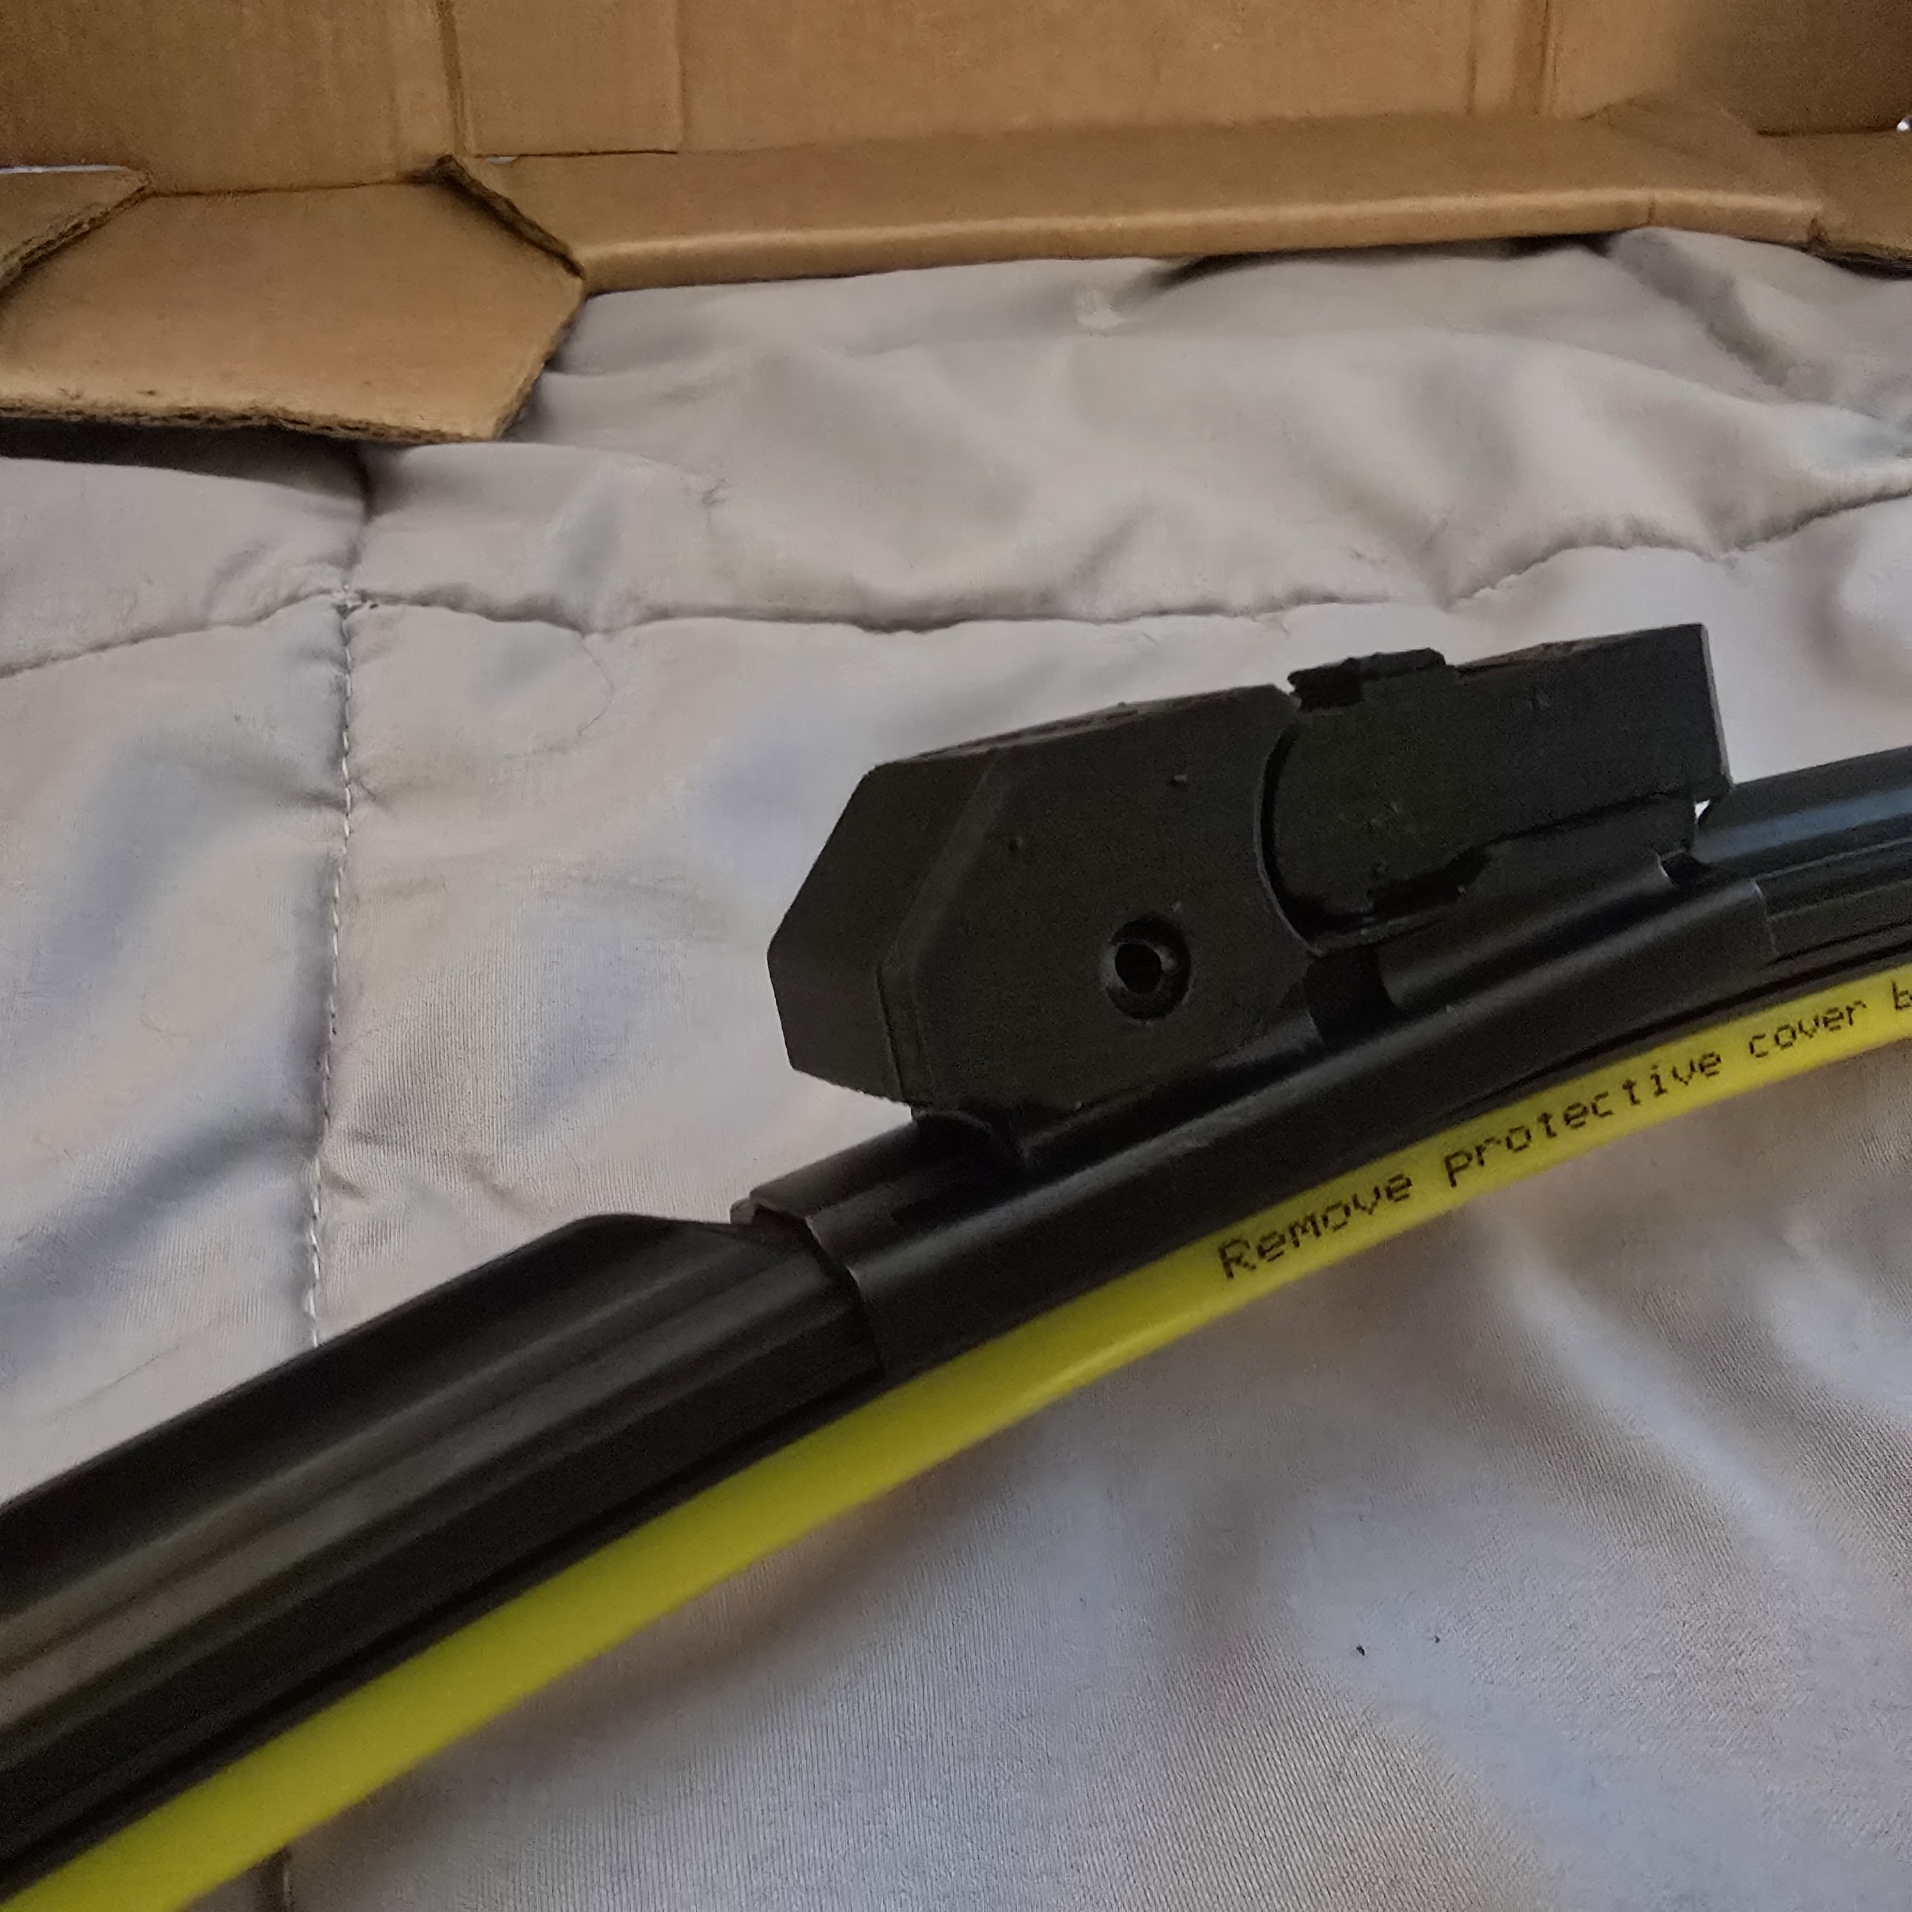
There might be some resistance when trying to tilt the assembly, but it shouldn't impact the performance of the adapter and wiper.
Installing on the Car
Lastly, installing it on the car is just as easy! Flip up the connector to its max position and then slide it into place on the wiper arm of your car until it stops. The push button tab should be seated or nearly seated.
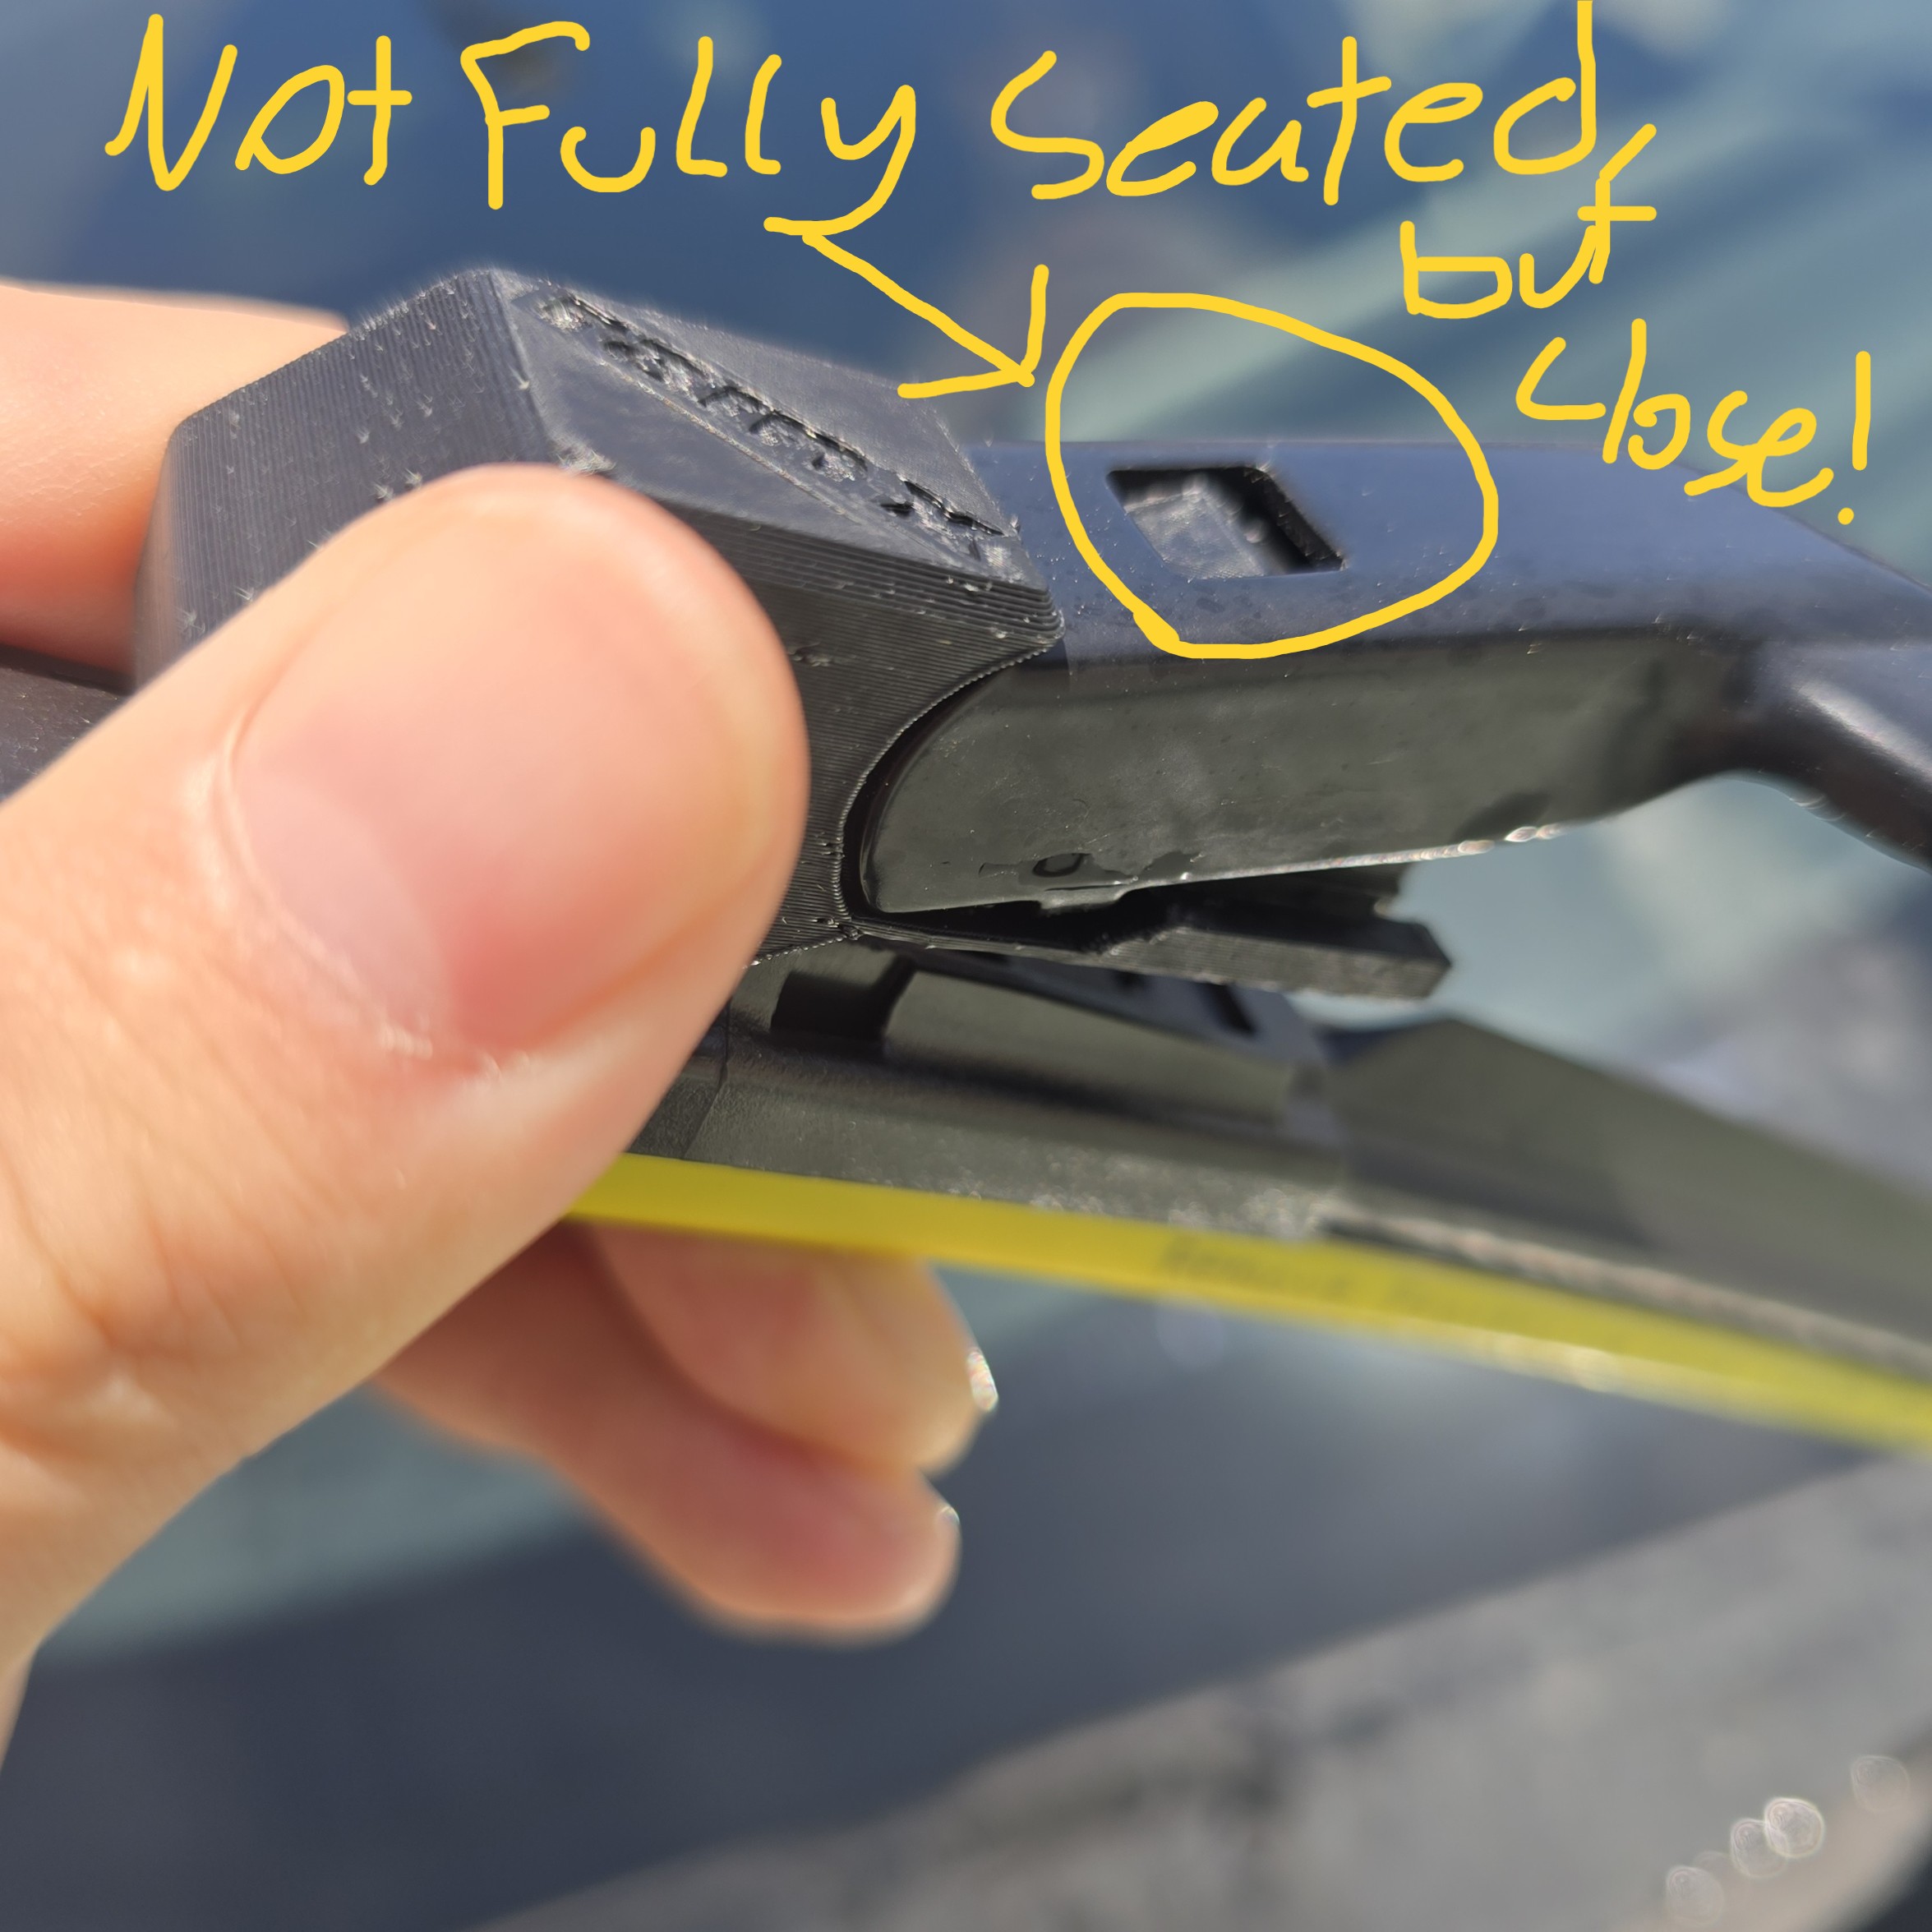

Close down the connector to lock the arm in position. If the push button tab was not seated before, this action should pop it into the locked position. The adapter was also designed so that this push button cannot be pressed unless the connector is tilted up, which is only possible when you are intentionally trying to remove the wiper.
At last, you can place the wiper blade in its final resting spot and that is it!

To remove the wiper blade, simply do the reverse of the above steps. Lift the wiper arm up, tilt the connector so the arm can be slid out, press in the push button tab, and then slide the wiper off. Functions like your typical wiper blade would!
Material Recommendations
This part needs to be printed in nothing less than PETG, but I would recommend ABS or ASA for their wide availability, ease of printing, higher temp resistance, and slight flexability. You might be able to get away with using PLA+/PLA PRO, but I would not endorse it. Remember that the wiper blades are constantly exposed to sun and the elements, and this piece is the only thing connecting the wiper blade to the wiper arm. So PETG, ABS, ASA, Nylon, or any other high temp, high stress resistance, and decent UV resistance material should be usable. ABS and PETG are just more widely printable by the community. I also did not anneal or smooth the prints out with acetone, both because of a lack of resources and how it might mess up the dimensions. But again, feel free to give that a try and let us know your results!
For the Trico Wiper Blade attachment [link to that here], they have been installed on the Trax for 6 months now without any issues. They've been in temps ranging from -5°F to 95°F, in the snow and rain, and have been through several car washes. No visible wear, cracking, splitting, or anything like that. Other than the obvious layer lines and my logo on it, you would never know the part was an homemade piece.
Print Settings
- 0.4mm nozzle, 0.2mm layer height
- 8-20% Infill, Gyroid or Honeycomb pattern
- (you could do 100% infill. I just don't think it would be worth it. It's plenty strong since the volume of these pieces is not too large)
- 2 walls, 3 top/2 bottom layers.
- I also enabled ‘Ironing’ to smooth out the top surface layers. Not required, but it does make it look a little more polished and might help with long-term weathering.
- Also, for the version with the “Rain-X” logo, I did enable “Print Thin Walls” to include more details. Not required either, but does make the print look a bit better.
- Raft/SimpleRaft for bed adhesion.
- This worked for me WITHOUT an enclosure on my Ender 3 V2. Just make sure no air is blowing onto your printer.
- Supports for angles 75° or greater. 55% would also work
- Zig-zag support infill, support ‘Touching Buildplate’, horizontal expansion set at 1.0mm, enabled support roof interface (for easier removal).
I successfully printed it on my Ender 3 V2 using SUNLU ABS from Amazon. Believe it or not, I was able to achieve printing this WITHOUT an enclosure at all! In the past, I was able to print this with the stock Ender hot end with the aluminum heater block and heater core, with the only upgrade being the Capricorn blue PTFE tube.
Since then, I upgraded my setup for higher-temp materials with a Zinc-plated copper block, hardened steel nozzle, and bi-metallic heat break. These settings worked for me in my setup:
- 250°C Initial Layer temp, 245°C Printing Nozzle Temp
- [Glass Bed] 100°C Initial Layer Temp, 95°C Printing Bed Temp.
- Used Elmers Disappearing Glue Stick for bed adhesion (worked just enough for me, on a clean bed at least!)
- Swapped in a brand new 0.4mm brass nozzle before starting with ABS filament.
- If you have a hardened steel nozzle, this is mostly unnecessary.
- 50mm/s printing speed.
- 0% Fan Speed for the first 7 layers, set max fan speed to 30%, then minimum layer time to 10s before fan starts incrementally. Most of this printed using 0 fan input at all.
Final Thoughts
I hope this doesn't end up needing to be a long-term solution. In fact, I should have never needed to make or post this in the first place! General Motors has created quite a mess with this, and made it very frustrating for thousands of new car owners. I've seen countless people online saying they are facing the same issue. So I hope those people can find this part.
I hope this will be the last adapter I have to design for this vehicle, but if that changes I will obviously be posting models on here for those different variations for everyone to use!
Finally, if anyone wants the source files I used to try and create an adapter for other types of blades, please reach out and I'd be more than happy to provide!
--
If there ends up being enough demand for it, and you are someone who does not have access to a printer, I might consider making it for purchase on an eShop, or via Direct Message! If that ends up happening, a link to one or more places will be here. Or, feel free to reach out to me and we can work out details.
--
UPDATES:
No updates to report.