
A cutting-edge Avocado Snipper
Obliczymy ostateczną cenę na podstawie wybranego pliku. Sprawdzisz ją i zaakceptujesz przed płatnością.
Zapisane na tym urządzeniu.
For deftly clipping the stems of far-flung fruit, lest they concuss a guest, or worse, go to waste.
- Ocena
- 0 / 5
- Polubienia
- 8
- Pobrania
- 17
- Wydruki
- 0
- Wyświetlenia
- 158
- Oceny
- 0
Aktualizacja u źródła:
Informacje o modelu
- Źródło
- Printables
- Kategoria
- Outdoor & Garden
- Licencja
- Creative Commons — Public Domain
After many fruitless years, trying a plethora of handy hints to no avail, we have at last started enjoying success in ripening and consuming avocados from the two trees (of the Fuerte and Hass varieties respectively) which we had nurtured from pits and planted ourselves all these years ago. In almost three decades the two trees towered tremendously, and eventually bore much fruit, which were green and rock-hard, then rubbery, then rotten. We tried picking them early and picking them late, wrapping them in paper or leaving them bare, storing them with apples or ripe bananas (for the ethylene), leaving them in the light, hiding them in the dark, in the warm kitchen, in the cold fridge, conducting eldritch rituals at midnight on the moors, and dancing (in full evening dress) under the full moon, all of which uniformly failed to produce edible results. So we gave up.
Then, after deciding that at least they make lovely shade trees (although it is somewhat disconcerting when the huge Fuertes crash down unexpectedly, occasionally culling the odd visitor in the process), we tried once more a few months ago, this time harvesting a few specimens not by plucking as before, but by cutting, leaving a few centimetres of stem on the fruit, and thence into the refrigerator for a week or two. And suddenly our woes were over - ever since, we were gorging on luscious creamy avocados, and life was good. Still is, except that, after consuming all the low-hanging fruit, as one does, we have now become greedy, as one does, though still devoid of desire to expire of beaning-by-avo or plunging to a grisly demise, as one does not. One cannot (or at least should not) climb an avocado tree - the branches are brittle, and the ladder only reaches so high, even if a suitably stable spot could be found for it on the mulchy soil between the coffee shrubs in the leafy glade under the trees.
They say cutting the stem makes little difference, and they also say ripping it off (so-called ‘snap picking’) is often better - it is certainly easier and faster, not that speed matters much in our case. But the eponymous they saying these things are Californians and Kiwis, so everything they say is better taken with a pinch of salt, as is avocado itself, come to think of it. And some black pepper. All we can say is that we flipped from famine to feast by the simple expedient of whipping out the clippers.
So, what we want is a wand with which we can wield secateurs way up high with proper precision and power, to gather the extant high-hanging fruit. On a trip to the hardware store we learned that those desirable long aluminium poles such as used at swimming pools are surprisingly expensive, but that structural timber (especially pine, with the common 38mm x 38mm cross-section) can be acquired in all lengths for a relative pittance, in the Battens and Laths department. For our first attempt we came home with a 3m batten (or maybe a lath) of 22mm x 44mm pine, while making a note that the 38mm x 38mm brandering was available in lengths up to a rather magnificent 6.6m.
While there, we also acquired an affordable pair of secateurs, with solid metal handles. Stripping the rubberising off the handles revealed beautifully smooth aluminium, which could easily be drilled and countersunk: I used a 4.5mm drill bit, because the wood screws in the jar had a nominal 4mm diameter:

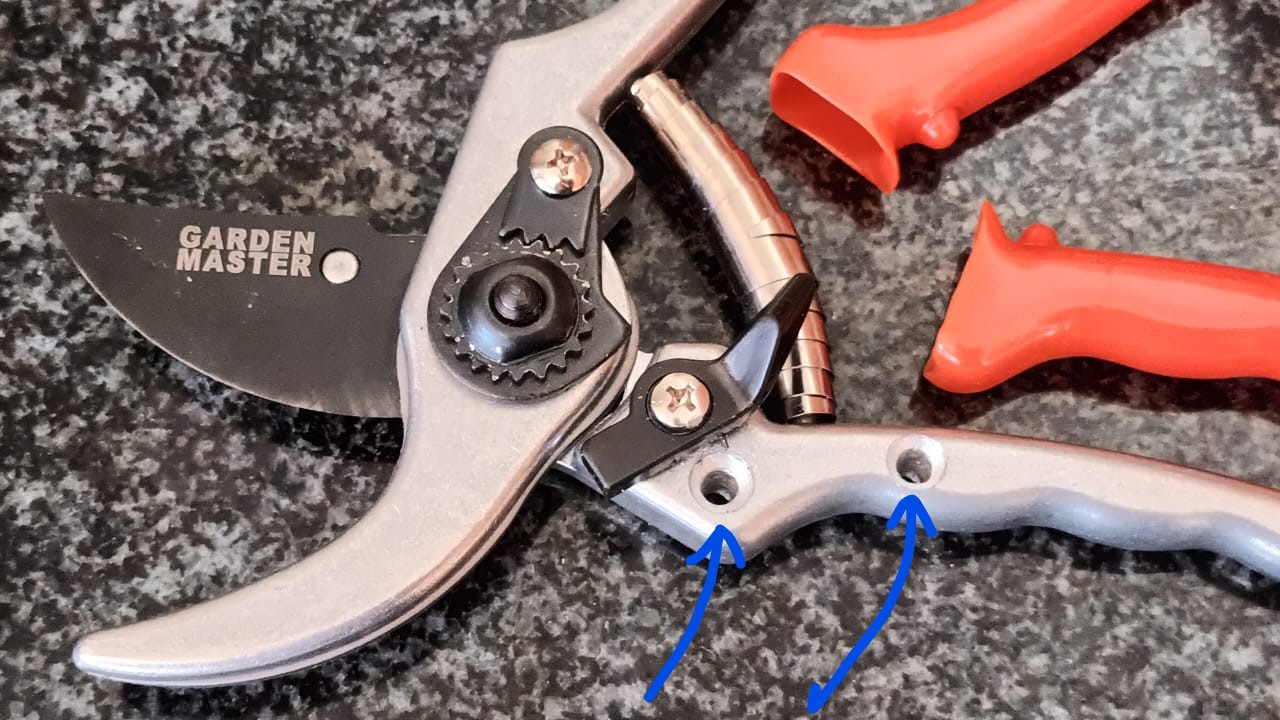
The tips of the handles were also drilled, to take a rope used to operate the device remotely:


The hole through the stationary handle (the one with the screw holes, which will be fixed to the stick) is reamed and smoothed using a Dremel tool, to prepare a polished path for a piece of plastic rope, passing through this hole, but prevented from pulling out of the other handle by a knot in its end. By tugging on the twine one can thus trigger the trimming action from afar. This works better than even we had dared to hope. The secateurs are fastened to the end of the pole using wood screws - longer is probably better but beware of splitting the wood. When in doubt, drill pilot holes.
At last we get to the printing part. The main feature is a 150mm ring affixed to the pole approximately 127mm below the blades. This can be kept in place with another screw, which need not be long or strong - its only purpose is to stop the ring from sliding along the pole. The upper edge of the ring sports seventeen spikes, to snag a bag to gather the swag. (Specifically seventeen spikes were selected for its attractive alliterative attributes and also because 17 is a prime number.) At the back of the ring mount is a smaller hole through which the rope can be threaded on its way down; this may help keep it from mischief midst the verdure.


Optionally two other pieces can be printed. One is a V-shaped guide, mounted directly below the blades, to simplify setting the secateurs suitably straddling the stem selected for snipping. It can get tricky being precise when waving a long stick above your head amongst the foliage in the canopy. The other piece is just another rope guide eyelet, one or more of which can be placed along the pole to keep the string disciplined on its way down. That is very much optional.

Two versions have been prepared - the one we currently use, mounted on the aforementioned 22mm x 44mm pine pole, as well as a version scaled to use 38mm x 38mm brandering (for when the 6.6m pole comes home to roost, as it inevitably will, once we have figured out how to transport it, and where to store it). This was easy to do because the FreeCad design is parametric, as are most of our recent efforts. The design file is also supplied for your delectation, if your inclinations extend in that direction, and you happen to speak FreeCad. (Which I can recommend - like most of its ilk the learning curve may be steep, but the webs are awash with helpful information, it is pretty powerful, and it is free, as hinted at in the name.) The very first object entry in the design file is a Variable Set named ‘Dimensions’, containing all relevant numbers and measurements, which can be adjusted as desired. The variable naming scheme should surely be sufficiently specific to be serviceable. Alternatively, for smallish adjustments one can simply scale the .stl files in any dimension, to make it fit better on a specific (rectangular) stick. Nothing is critical - there is not even a rule that requires the ring to be round, so scale X and Y independently, if you wish.
Regarding the protective purse prudently placed to prevent the pruned plunder promptly plummeting downward: a plastic shopping bag was used at first, and it worked well enough, but it did tend to obscure the view during the critical stage of the operation, so we switched to an orange mesh bag (after emptying out its contents). A transparent polyethylene bag or even a silk stocking can also serve.
Printed in PETG, with no supports or brims. PLA will work too. Variable layer height saves some printing time and I increased the perimeters to 3 and the infill to 20%, because I felt like it.