
Klipper For Anycubic Mega Zero STOCK MOTHERBOARD
Obliczymy ostateczną cenę na podstawie wybranego pliku. Sprawdzisz ją i zaakceptujesz przed płatnością.
Zapisane na tym urządzeniu.

Flashing klipper firmware to anycubic mega zero 1.0/2.0 WITH STOCK MOTHERBOARD including printer.cfg!
- Ocena
- 0 / 5
- Polubienia
- 5
- Pobrania
- 49
- Wydruki
- 0
- Wyświetlenia
- 300
- Oceny
- 0
Aktualizacja u źródła:
Informacje o modelu
- Źródło
- Printables
- Kategoria
- Anycubic Parts & Upgrades
- Licencja
- Standard Digital File License
Klipper Firmware on Anycubic Mega Zero
What is Klipper?
Klipper is an open-source firmware for 3D printers. Its main advantage is that it offloads the heavy computational tasks to a separate, more powerful single-board computer (like a Raspberry Pi), while the printer’s mainboard handles only the basic commands. This makes the printer faster, more precise, and more customizable.
Klipper on Anycubic Mega Zero
So, is it possible to run Klipper on an Anycubic Mega Zero? Yes!
Some people may say you need to replace the stock mainboard with something like a BTT SKR Mini, but that’s not true. You can use the original board—you just need to flash the right firmware.
Flashing – The First Hurdle
Flashing Klipper is usually simple if you’re using boards like the BTT SKR Mini, but with the stock Anycubic Mega Zero board, there are a few extra steps you’ll need to follow.
Host Setup
Klipper doesn’t run only on the printer’s motherboard—it needs a host device. This can be almost anything:
an Android phone,
an Android TV,
an old laptop or PC,
or (the most popular choice) a Raspberry Pi.
For this project, I used a Raspberry Pi Zero 2W, which is the most budget-friendly option (around $15). You can use any Raspberry Pi model, but make sure it has enough processing power (not like the Pico) and supports Wi-Fi (models with “W” usually do).
Flashing the MCU (with Raspberry Pi)
Now we need to compile and flash Klipper firmware for the printer. There are plenty of tutorials on YouTube, so I’ll just highlight the critical parts you must configure.
Step 1 – Install Klipper on your host
I’m assuming you already have Raspberry Pi OS Lite installed on your Pi’s SD card. If not, set that up first.
SSH into your Pi using terminal, PuTTY, or similar software, then run:
cd ~
git clone https://github.com/KevinOConnor/klipper
cd klipper
Step 2 – Configure and compile firmware
make menuconfig
Select these options in the menu:
Micro-controller Architecture → Atmega AVR
Processor model → ATmega1284p
Bootloader offset → 28KiB bootloader
Communication interface → USART (on PA0/PA1) (for me only UART0 was available, and it worked fine)
Save and exit, then compile:
make
Your firmware file will be in:~/klipper/out/klipper.bin.hex
Step 3 – Connect Pi to printer
Use an OTG cable to connect your Pi to the printer, then check if it’s detected:
ls /dev/ttyUSB*
It should show something like /dev/ttyUSB0.
Step 4 – Install AVRDUDE and flash firmware
sudo apt install avrdude -y
Then flash your board:
avrdude -v -p m1284p -c arduino -P /dev/ttyUSB0 -b 115200 -D -U flash:w:klipper.bin.hex:i
Make sure you’re in the right directory (~/klipper/out) before running this.
If the flash was successful, the printer’s LCD will turn solid blue (blank screen).
Connecting Pi to the Printer
Keep the same wiring setup as when you flashed the board.
SSH into your Pi and install KIAUH (Klipper Installation And Update Helper).
Installing KIAUH
⚠ Disclaimer: use at your own risk.
Install Git if you don’t have it:
sudo apt-get update && sudo apt-get install git -y
Download KIAUH:
cd ~ && git clone https://github.com/dw-0/kiauh.git
Start KIAUH:
./kiauh/kiauh.sh
You’ll now see the KIAUH menu with different install options.
Installing Klipper Instance
From the KIAUH menu, choose to install:
Klipper
Moonraker
Mainsail
Keep defaults (one Klipper instance). After installation, reboot your Pi.
Check your Pi’s IP address:
hostname -I
Now, open your browser and go to either your Pi’s IP or hostname (e.g. http://printer.local). You should see the Mainsail web interface! 🎉
Configuring Klipper
The final step is to configure your printer.cfg.
You can use my configuration file—it’s set up for:
a custom heated bed on Mega Zero 1.0,
BLTouch with Z-min and Pin27 adapter,
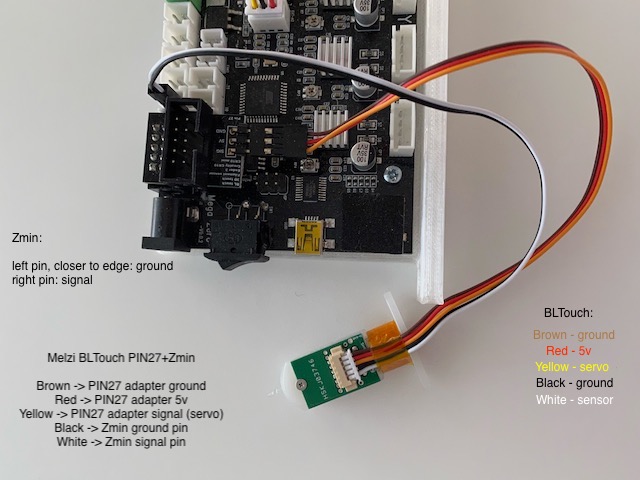
support for the original LCD display.
Once you update and restart Klipper, your printer’s screen should light up and you’ll be able to control everything from the web interface.
Final Notes
That’s it! If you run into issues, check YouTube tutorials or the Klipper forum.
🙏 Thanks for reading—even if this only helps a handful of people, I hope it saves someone some time. Initially, I just wanted to share my printer.cfg, but I ended up writing this mini-guide instead.
⚠ Remember: this is not a complete step-by-step tutorial. Make sure you understand what you’re doing—I’m not responsible for any damage to your printer.