
Mechanical Clicky Counter (0-99)
Obliczymy ostateczną cenę na podstawie wybranego pliku. Sprawdzisz ją i zaakceptujesz przed płatnością.
Zapisane na tym urządzeniu.

Re-implementation of @BaGooN's Clicky Rotate Counter, with an automatic mechanism for the tens digit.
- Ocena
- 5 / 5
- Polubienia
- 122
- Pobrania
- 490
- Wydruki
- 3
- Wyświetlenia
- 1989
- Oceny
- 4
Aktualizacja u źródła:
Informacje o modelu
- Źródło
- Printables
- Kategoria
- Other Gadgets
- Licencja
- Creative Commons — Attribution — Share Alike
This is a re-implementation of @BaGooN's Clicky Rotate Counter with an automatic mechanism for the tens digit, of course working when counting both up and down. A trade-off is that it takes longer to reset, but going all the way from 0 to 99 on this doesn't take many seconds (and for an optimal reset, you only need to go at most half that distance).
The fully symmetrical case of the original model also annoyed me a bit since I have it clipped to my pants using a carabiner, and it was always a 50% chance of clipping the wrong hole to said carabiner when picking it up. For that reason, my version has only one hole. The internals are still fully symmetrical, so it's up to you if you want the hole in the ones digit or the tens digit. You can even clip the front and back parts together in opposite directions if you don't want any through-hole at all. After some prototyping, I also left out the 0 digit from the tens wheel, so numbers below 10 show as 0-9 instead of 00-09 (the tens 0 is still there in the Fusion source drawing, so if you want it back it's not much work).
Two versions are available, One prepared for multi-color printing (MMU, AMS, etc.) and one for single-color printing (the latter is also available as individual part STLs). You may want to add a manual color change when printing the single-color version.
The model is designed for printing with a 0.4 mm nozzle and 0.20 mm layer height. Print as placed in the model files, no supports are needed. Other nozzle sizes and/or layer heights may work just as well, but are not tested. I have only tested printing this in PETG, but other materials probably work fine. Matte filaments and other materials with poor layer adhesion may be a bad idea for the case parts, due to the snap-on assembly.
Assembly
- Decide whether you want the hole through the ones digit or the tens digit and put the digit wheels in place on the front cover, face down.
- Put the spring on its holder between the wheels, with its arms toward the ones wheel.
- Find a half-depth gear tooth gap (i.e. every other gap) on the tens wheel and move it to face the ones wheel.
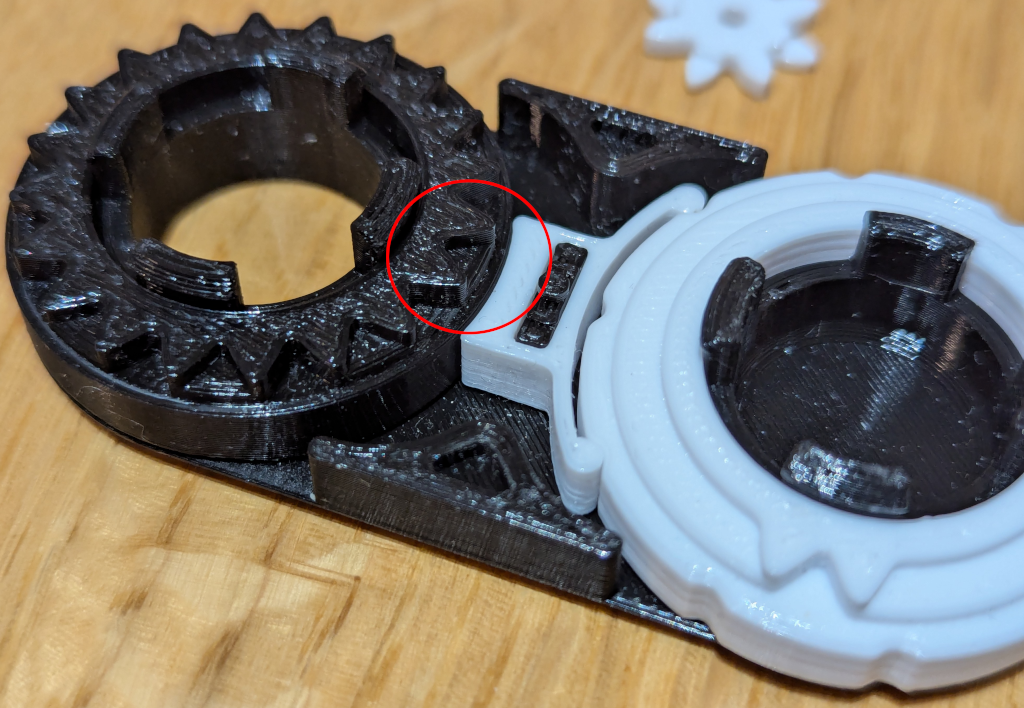
- Place the transmitter gear on the pin above the spring, so that two of its half height gear teeth are facing the ones and tens wheels (smooth side up, notched side down).
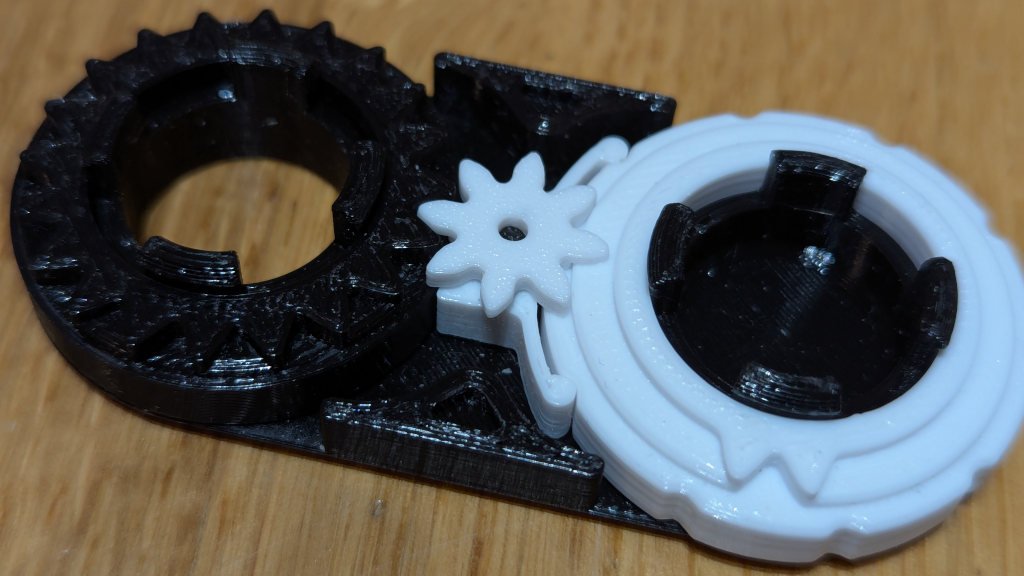
If placed correctly, the top of the placed transmitter gear should be one smooth surface, which should be flush with the top surfaces of the digit wheels. If you hold the transmitter gear in place with a fingertip and rotate the ones wheel, the tens wheel should smoothly move when the cogs on the ones wheel pass the transmitter gear (if you placed the transmitter gear into a full-depth tooth gap in the tens wheel, the mechanism will instead seize). - Click the back cover in place.
- Done!
Changelog
- 2025-10-06
- Added STEP file.
- (No parts actually changed.)
- 2025-10-16
- Minor edits/fixes in description.