
Prusament Spool - Swatch Organizer
Obliczymy ostateczną cenę na podstawie wybranego pliku. Sprawdzisz ją i zaakceptujesz przed płatnością.
Zapisane na tym urządzeniu.

Stop the mess! Upcycle your Prusa spool into a compact swatch organizer. Store up to 120 sample cards. (for NoNFC & NFC)
- Ocena
- 5 / 5
- Polubienia
- 316
- Pobrania
- 300
- Wydruki
- 5
- Wyświetlenia
- 3562
- Oceny
- 4
Aktualizacja u źródła:
Informacje o modelu
- Źródło
- Printables
- Kategoria
- Test Models
- Licencja
- Creative Commons — Attribution
Introduction
Don't throw away those empty Prusa spools! This mod transforms them into the perfect library for your filament swatches. It’s designed for makers who have outgrown the traditional "sample-on-a-ring" method and need something more professional and organized.
Feel free to modify the base design to fit your specific swatch dimensions and share your remixes with the community. Let’s see how you organize your lab!
Designed for old (NoNFC) and new (NFC) Prusa spools
Up to 120 swatches per Spool
Free to modify, remix, and share with the community
No additional hardware required
________________________________________________________________________________________________________________________________
The Swatch Design
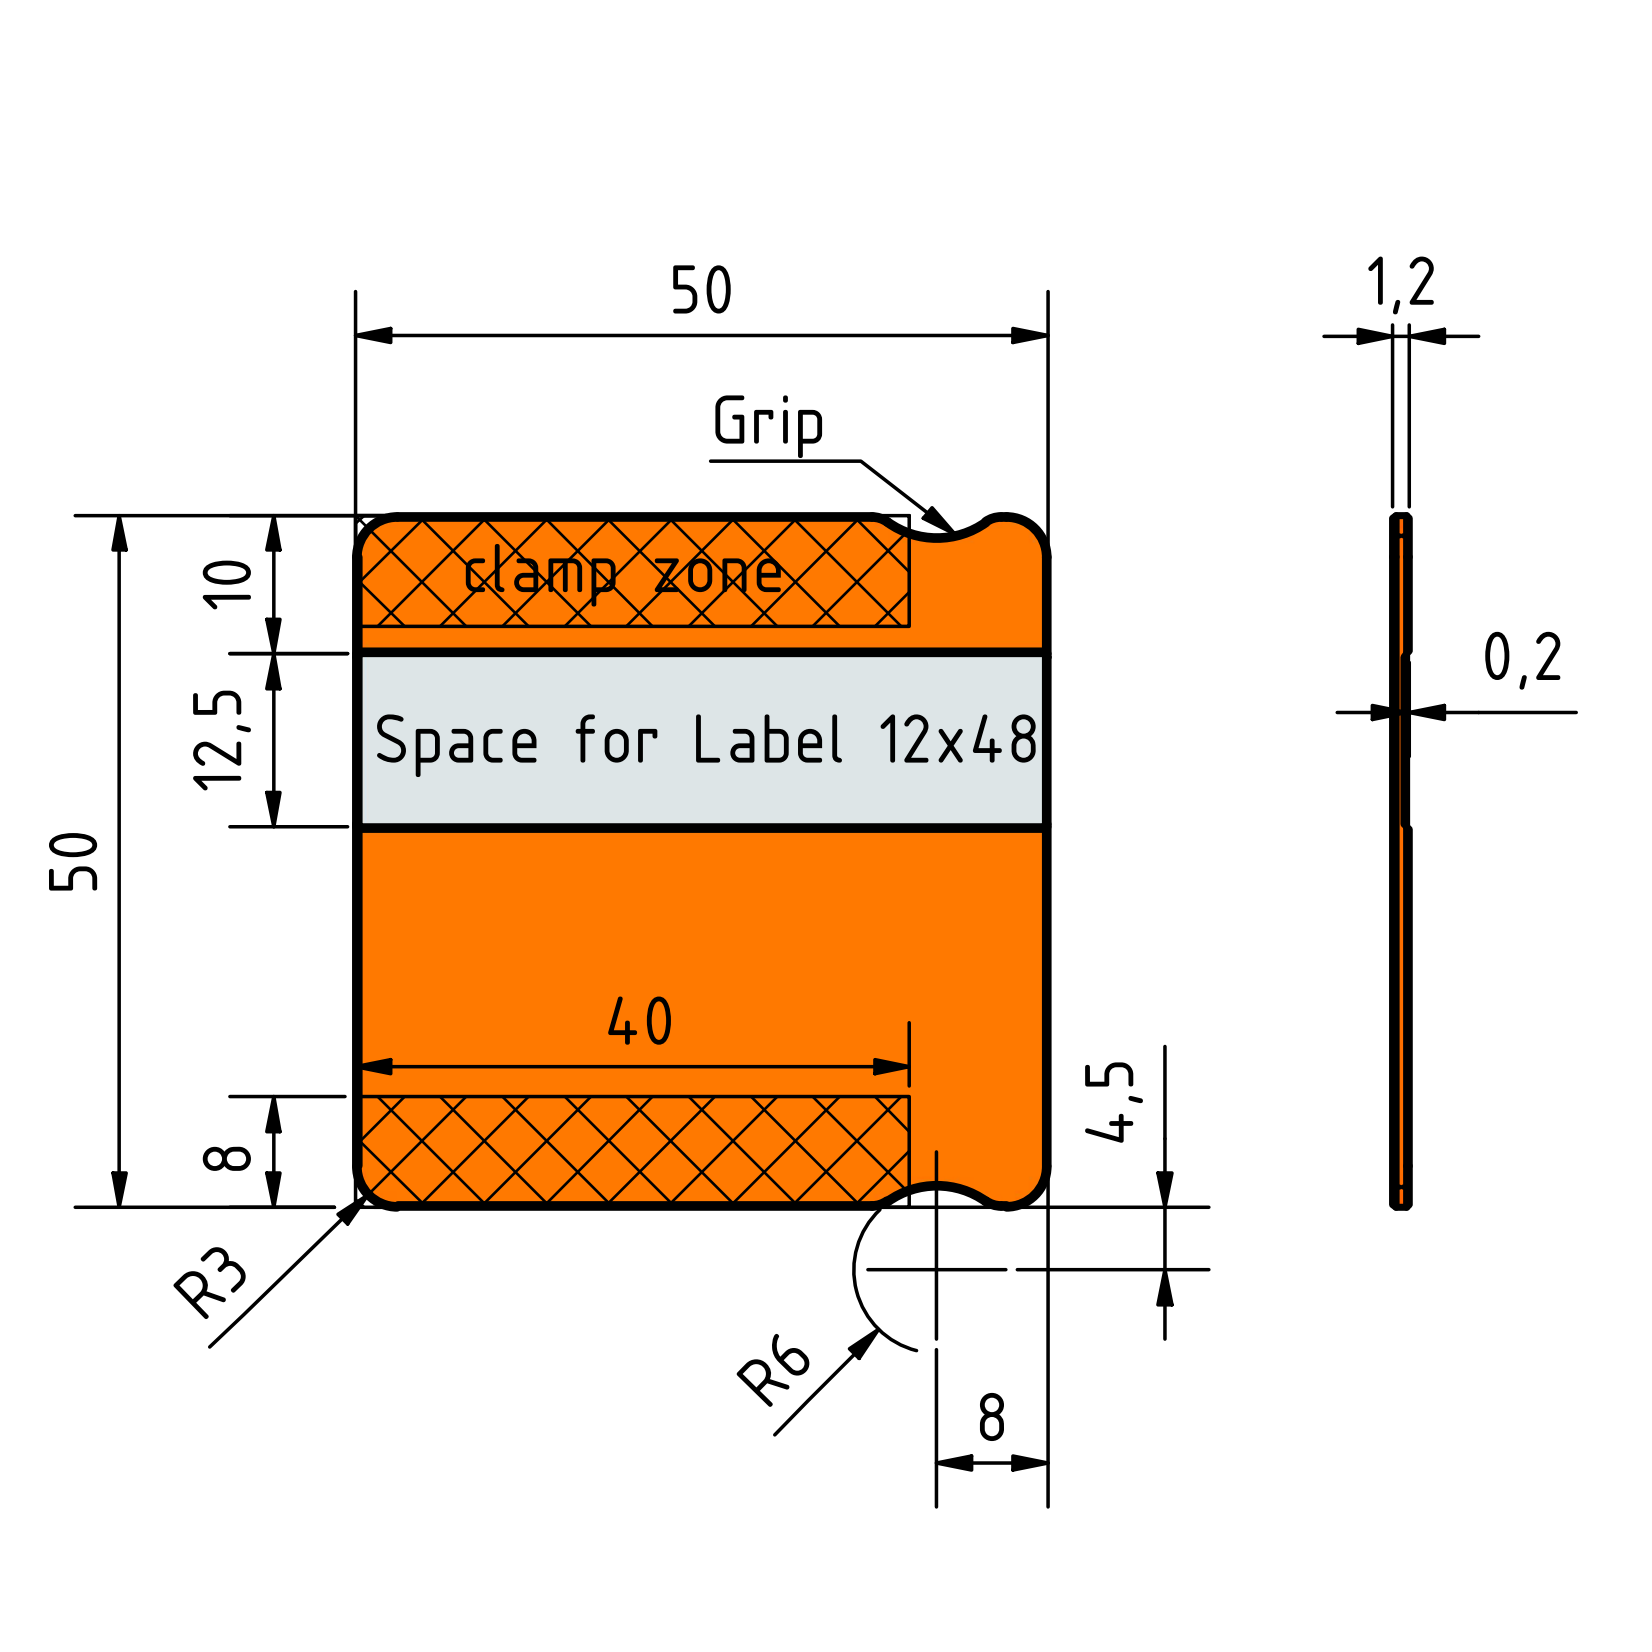
I focused on usability and clean looks. The swatches are not just simple plates; they are designed to be handled easily:
Ergonomic Grip:
Each card features integrated finger recesses, making them easy to grab and pull from the spool.Label-Ready:
Choose the Label Version (“-LBL”) if you use a label maker. It features a dedicated 12mm (1/2") recessed groove to ensure your stickers sit straight.Stepped Version:
Choose the Stepped Version (“-STP”) to visualize material opacity. The varying thicknesses allow you to see exactly how the filament behaves at different layer depthsFully Customizable:
Want to add embossed text or a hole for a keychain? The design is yours to modify!
Print Settings
The swatches are designed for a 0.2mm layer height. Adhering to this setting is crucial for the LBL and STP versions to ensure that the features print as intended.
________________________________________________________________________________________________________________________________
The Spool Design
The assembly is completely toolless. You won’t need any screws, hardware or even to disassemble the spool. Everything is designed for a simple fit.
To support various printers I have included different versions for different bed sizes. Just choose the one that fits your setup.
A quick tip: Print the small segment first to verify the tolerances with your specific spool before committing to the full size components.
"..._Swatch Magazine_60deg" fits small beds like the Voron v0 (120x120mm).
"..._Swatch Magazine_120deg" fits almost every other common 3D printer.
Old and New Spools
For the older NoNFC spools and the newer NFC spools, there are two different magazine versions located in the 02 folders. The magazine parts are not compatible with the other spool type, as each version is specifically designed for its respective spool. Simply pay attention to the folder name or the file name suffix when choosing which parts to print.
The filament swatches and the securing ring, however, are compatible with both spool types and can be used interchangeably.
Print List
Component | Filename | Quantity | Approx. Weight |
|---|---|---|---|
01 Filament Swatches | ..._Filament Swatch_... | up to 120x | 120x ~6g= ~720g |
02 Swatch Magazine | ..._Swatch Magazine_120deg... | 6x | ~360g |
-> Alternative | ..._Swatch Magazine_60deg... | 12x | |
03 Securing Ring | ..._Securing Ring_180deg | 2x | ~40g |
________________________________________________________________________________________________________________________________
Assembly
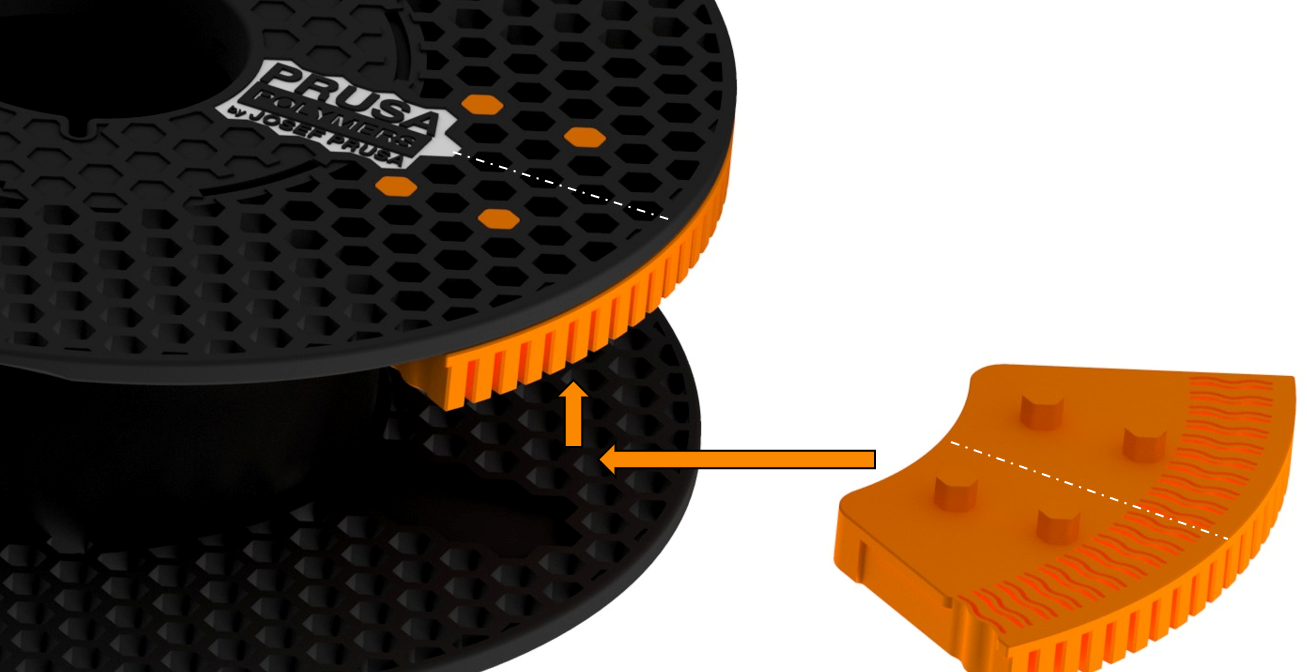
Start by aligning the hex part of the swatch-magazine with the hexagonal holes in the spool. Use the Prusa logo as your reference point. It should sit right in the center of a four segment arrangement as shown in the pictures. Repeat this step for all parts on the top and bottom of the spool.
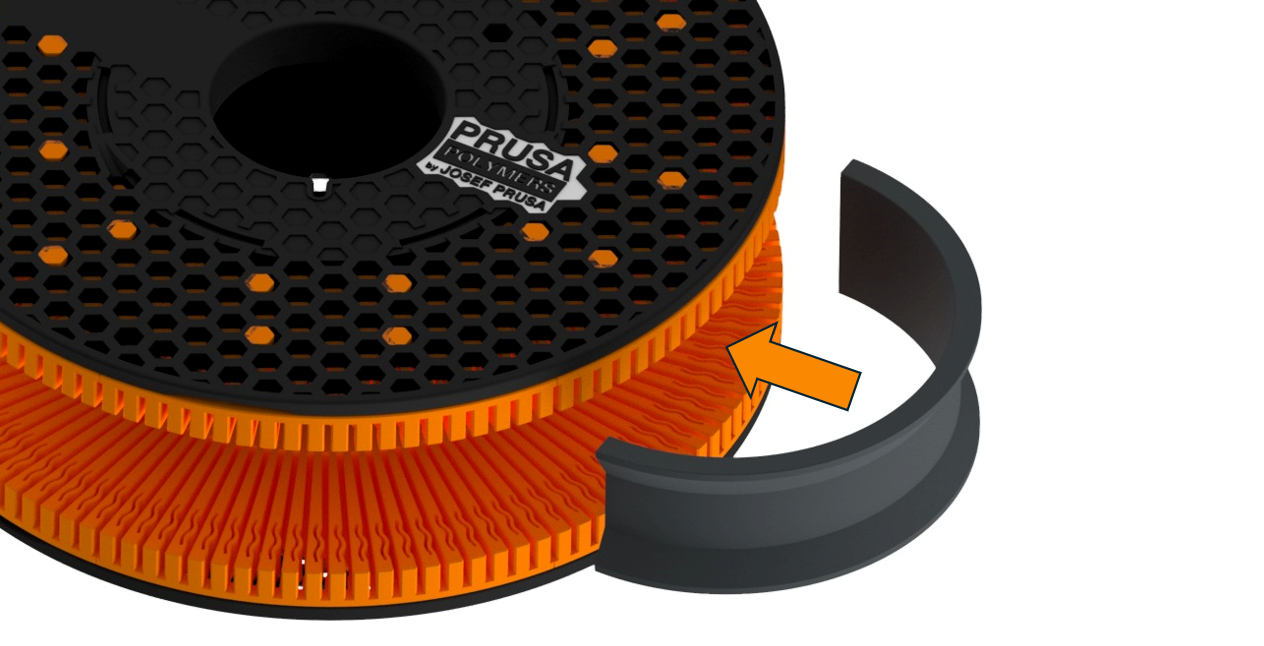
To lock everything in place, slide the securing ring halves between the swatch-magazines. These are designed with an interference fit to ensure they stay firmly wedged.
A quick tip: Print the provided test piece first to check the fit. If it feels too loose or too tight for your specific spool, simply scale the height of the ring slightly up or down in your slicer.
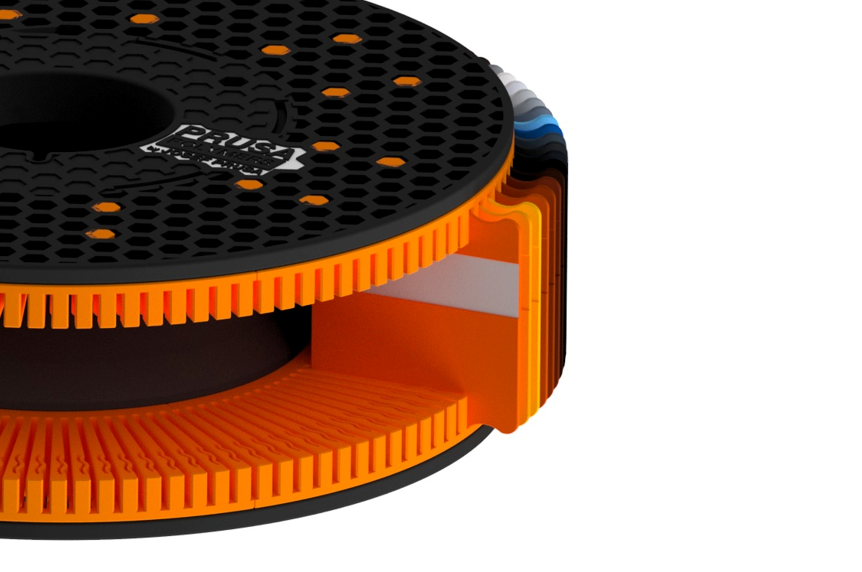
Once your spool is fully assembled, you can slide the sample cards into the slots. They are held in place by a flexible mechanism.
If the samples appear slightly tilted, it is likely because the two spool halves have a small amount of play and are twisted. Simply rotate the halves against each other in the opposite direction to align everything perfectly.
________________________________________________________________________________________________________________________________
Mods and Remixes
Discover creative mods and remixes made by the community that give the project a whole new look and functionality.
The Ferrie Wheel
A cool Remix by Alt-Danny that transforms your Swatch Spool into an upright Ferris wheel. A fun and practical way to easily access and browse all your samples.
The Drybox Labels
A great practical remix by Ezner that gives the filament swatches a double purpose. Beyond being a regular filament sample, they include an integrated hook, allowing you to use them directly as labels for your filament dryboxes.
________________________________________________________________________________________________________________________________
Update Log
27.04.2026 - Upload (V1)
16.06.2026 - Added a test-version compatible with the old spool design (V.Test_..._NoNFC)
23.06.2026 - Added the first Mod (The Ferrie Wheel by @AltDanny_3485903) to the page
08.07.2026 - The NoNFC version was tested by @MNKmakes and approved. Added a 120deg NoNFC version of the magazine parts.
24.09.2026 - Added a Mod (The Drybox labels by @Ezner) to the page
________________________________________________________________________________________________________________________________
Special Thanks
I want to give a huge shoutout to the team at KeebSupply for supporting this project and providing the high-quality photos. The keyboard you see in the second picture is also one of their designs. Make sure to check them out!