
1 / 10
Playstation 5 controller round wheel (Mustang style) PS5
Zamów wydruk tego modelu
Obliczymy ostateczną cenę na podstawie wybranego pliku. Sprawdzisz ją i zaakceptujesz przed płatnością.
Zapisane na tym urządzeniu.

PS5 Mustang steering wheel
- Ocena
- 4,625 / 5
- Polubienia
- 562
- Pobrania
- 3987
- Wydruki
- 9
- Wyświetlenia
- 23 418
- Oceny
- 8
Aktualizacja u źródła:
Informacje o modelu
- Źródło
- Printables
- Kategoria
- Video Games
- Licencja
- Creative Commons — Attribution — Noncommercial
SzczegółyPliki (10)Wydruki i komentarze (Wydruki: 9) (Komentarze: 35)Remiksy (0)Kolekcje (589)Powiązane
This is a remix of https://www.printables.com/fr/model/157076-playstation-5-controller-mini-wheel from @pixel2_237985.
Presentation
The original wheel with two circles was not confortable to me, so I designed a real round wheel to be more comfortable and with a better grip.
Inspired by the steering wheel of 1967 Ford Mustang.
Updates
- 2024-03-06: With the sudden success of this piece, I decided to give it a little makeover by adding some colors: I uploaded two 3MF files (steering wheel + horn) with multicolor for those who have BambuLab's AMS.
What you need:
- 608 bearing, 22mm diameter, 7mm thick, 8mm center (fidget spinner, skateboard)
- 1.6mm diameter metal rod X2 (butterfly paper clip/14 gauge finishing nail/wire)
- Superglue
Instructions
- Glue the top and bottom edge of the bearing into the frame. Wait for glue to dry. Superglue might leave a white haze on the controller if it's not dry.
- Attach the pivot to the rack:
Cut down a 14 gauge finishing nail to a length of 20 mm. Pass the nail up through the pivot and into the rack. The pivot should spin free on the nail with minimal play. Put a drop of superglue in the slotted part of the rack. This is probably the most ideal setup. A piece of paperclip [wire] works but it's tricky to get a tight bend on the end. - Snap the rack onto the frame:
Attach the assembly to the controller. Start by sliding the pivot on to the left stick. Clip the back of the frame on, then the front. - Glue a 22mm length of metal rod into the "nub". Pass this down through the bearing and frame. There is a step in the nub, have this on the left side.
- Press the wheel into the bearing and glue the horn on the rod.
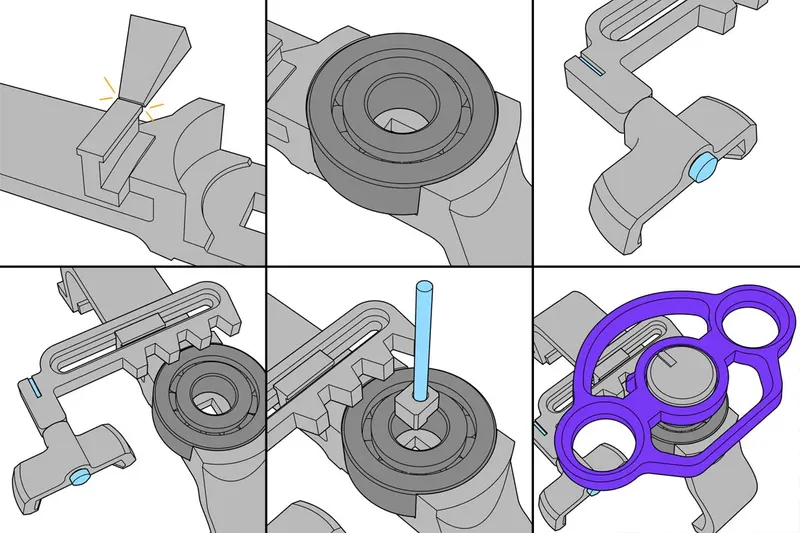
(Instructions and images from the original model)
Print Settings
Printer Brand:
Prusa
Printer:
I3 MK3S
Rafts:
No
Supports:
No
Resolution:
0.20
Infill:
15
Filament: Geeetech PLA White