
RGR ezBuff - Disc Polishing/Resurfacing Machine
Obliczymy ostateczną cenę na podstawie wybranego pliku. Sprawdzisz ją i zaakceptujesz przed płatnością.
Zapisane na tym urządzeniu.

A disc polishing & resurfacing machine you can print at home, and build for a fraction the cost of commercial options!
- Ocena
- 5 / 5
- Polubienia
- 161
- Pobrania
- 358
- Wydruki
- 5
- Wyświetlenia
- 7009
- Oceny
- 2
Aktualizacja u źródła:
Informacje o modelu
- Źródło
- Printables
- Kategoria
- Tools
- Licencja
- Creative Commons — Attribution — Share Alike
Updates
Decided to add the Updates at the top, so they are easiest to find for users that have already printed them, and are coming back for these.
First of all, thanks everyone for the overwhelming support so far!
A lot of you have expressed working on printing this, and have ordered parts, which is honestly amazing to see, but at the same time scary and a little overwhelming - never expected this to blow up like it has.
Please post makes and questions as you progress through your builds, am here to support!
version 1.01 (7/7/26) - I have spent the past week using the machine even more, and noticed some minor flaws I have addressed. The compound could seep into the inner split of a disc leaving residue behind - while not harmful, it's not "pretty" either.
I have added a new version of the Spindle Mount ("Motor_SpindleMount_O-ring"), which takes a 14x2mm o-ring you can add to stop that from happening. I updated the [optional] Disc Clamp as well to fit this better.
In the future, I will think about a solution which works more like a quick-release.

RGR ezBuff
After 7 years of R&D, and tons of failed prototypes, it is finally done - a polishing machine you can use to restore your disc collection with!

It is meant to be cost effective to build and print. You can print everything with a single 1kg roll of filament, and the size was constrained to fit the most common small form factor 3D printer (Bambulabs A1 mini).
Meaning even if you don't own a 3D printer yet and purchase one for this project, you can make one yourself for a total price which still costs less than commercial options out there!
What it does
It's a simple machine, designed to rival expensive options. After finding out (most of) these machines require you to purchase "minutes" as consumable in order to keep using them, I decided that we as a community should have better options available. This aims to achieve that, with the idea that if anything breaks, it's pennies to replace as well, instead of having to rely on overpriced parts from a dedicated supplier.
It can polish out small imperfections from your discs, and clean the surface of contaminants.
You can expand it to use as a resurface machine, for those deeper scratches that make games unplayable.
(though I would make a 2nd machine dedicated to resurfacing, you do not want these impurities back in the polish phase, causing additional damage)
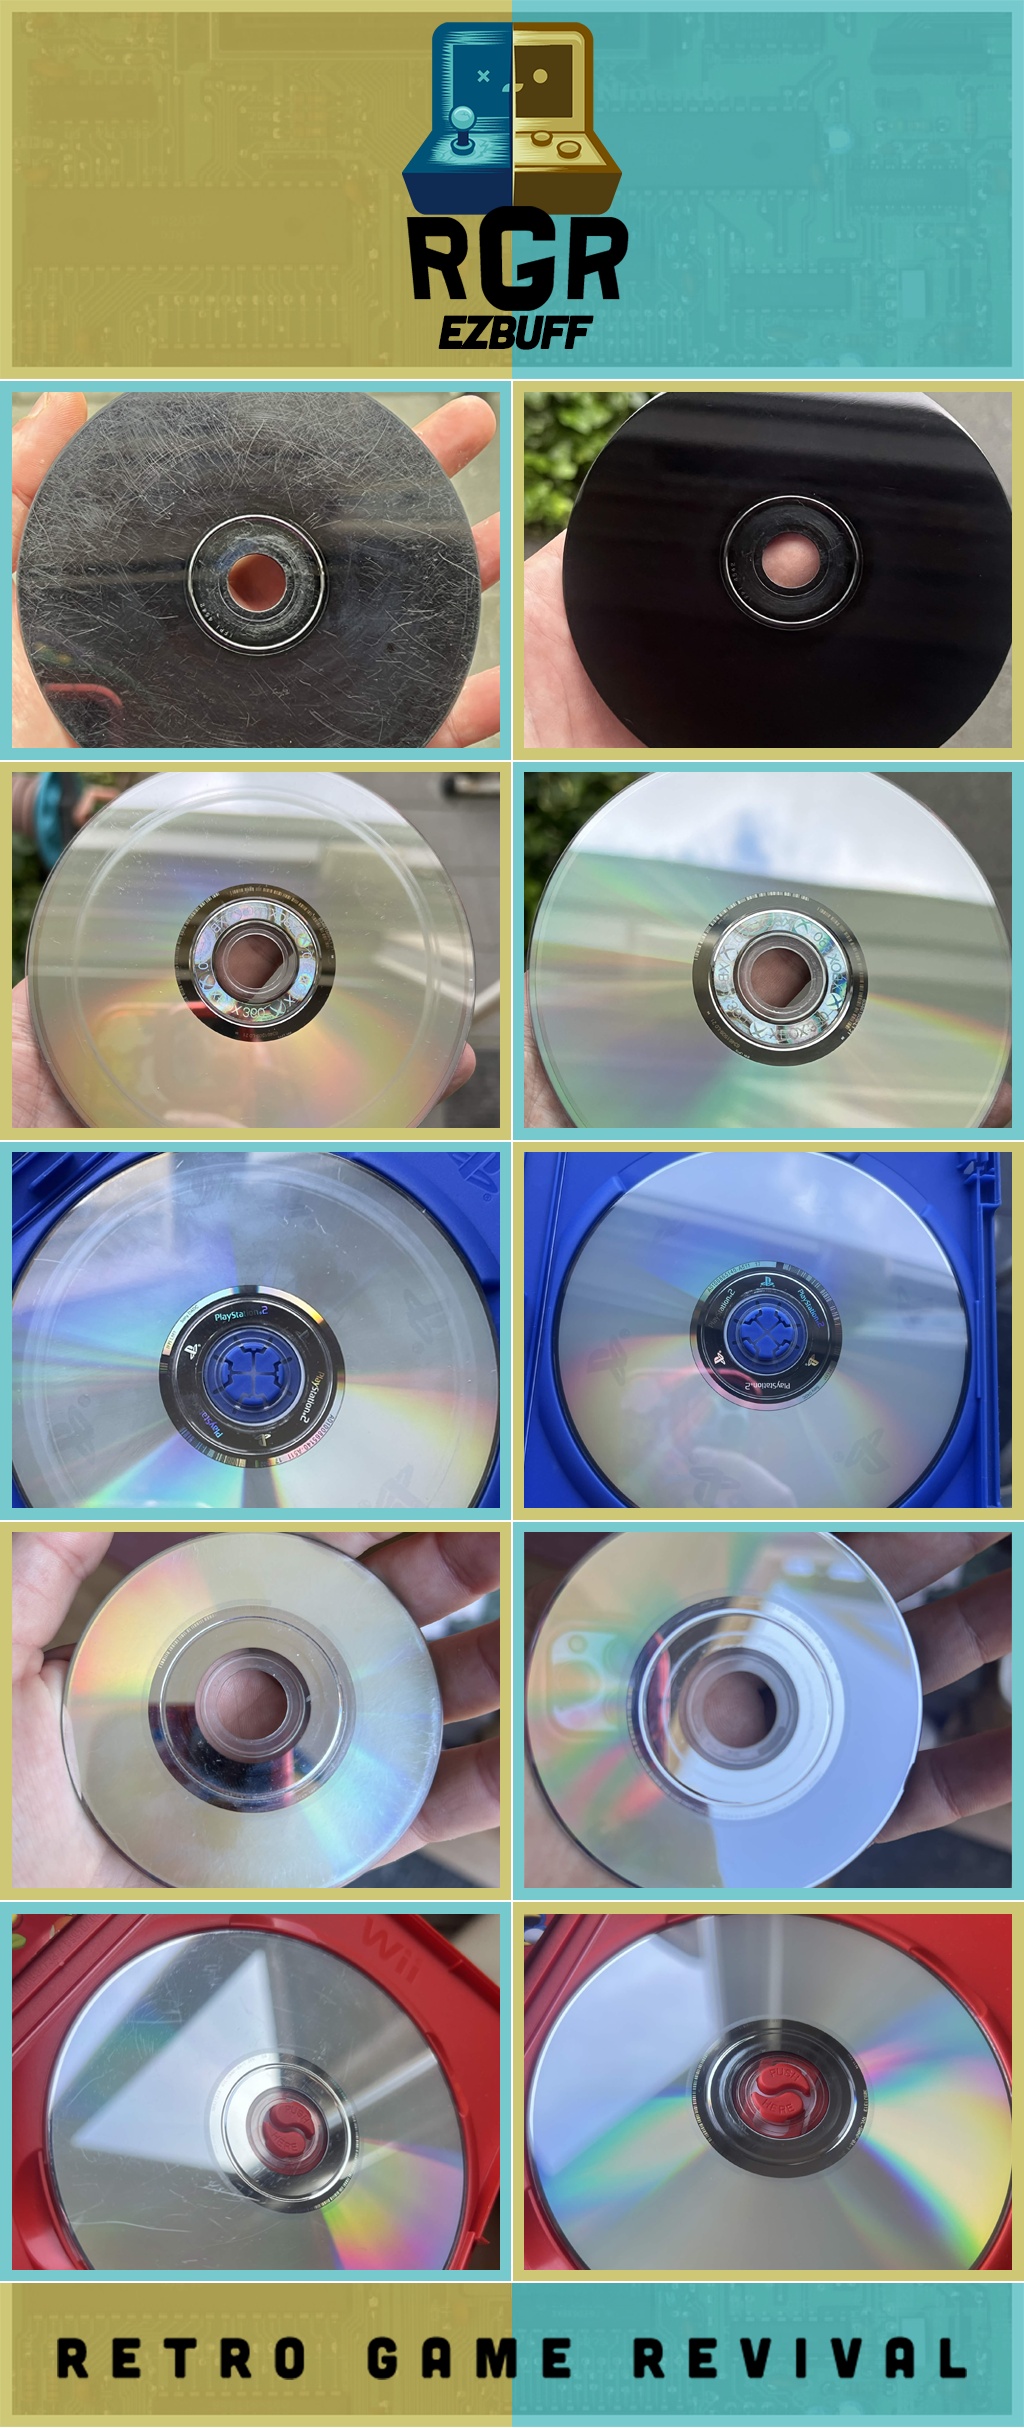
I have managed to get so many discs working again that either suffered from the infamous circular damage (xbox360 most known to do so), or plain mishandling (where it looks like it was used as a Frisbee, or tossed around at a yard sale). You can see the highlights of my testing over 50+ successful disc repairs in the pictures).
What it does not
Unfortunately, some discs will be beyond repair, specifically disc rot and data layer damage, simply not something that this machine (or any other) can fix.
The machine is a subtractive device, as well as a rotary one. This means that you can take off too much material at some point, and there is no returning a disc from that. it also creates rotational "swirl marks" (microscopic imperfections). They are only visible under extremely bright lights and harsh angles, and thus don't affect the lasers ability to read a disc (when done correctly).
Every machine on the market, including professional ones, has this. And I'd rather have a working disc!
Other details
Before making this machine, it should be noted that while it's motor powered, it's still a manual device and each different amount of damage and type of disc requires a slightly different approach. It's best to do testing to get familiar with the device before using it on any type of disc you really care about!
Additionally, it's a "slow and steady wins the race" approach - you may have to spend a bit more time (depending on type of damage) on a disc than you might think versus other devices out there. I am not expecting this version (yet) to be a machine in which you can process hundreds of discs a day.
The whole machine is designed around 24V parts (you need your own adapter for that, atleast 3A), however everything works and runs fine off of 12V. I suggest to start at 12V, and when you feel comfortable around the machines performance after doing a few test discs, switch over to 24V if you feel you need to extra push - do note that both the motor and (optional) fan will be more loud with that.
Important: Any damage done using this machine cannot be held accountable to the creator. Users are always expected to judge safety themselves, and damages created to discs are a risk understood to be associated operating this machine.
Future
I sincerely hope in the first place that this is gonna help anyone restore their games that otherwise would have been considered broken. I go to thrift stores and yard sales, where I picked up a lot of gems over the years, which were too damaged to work, and have now been recovered to enjoy once more!
Would love to hear any feedback, and collaborate together with the community in order to expand this machine into the best shape it can be. A list of materials and their effectiveness would be a great thing to maintain (different options across the world, for different regions that may not have each option available).
In the long run, I would love to go beyond this, and make a "Pro" version, which could automate things, and have a interface to make usability easier
If you want to contribute to this, or find this project helpful, please consider helping me out by a Ko-Fi donation ❤
Printing
The entirety of the design has been made for 0.2mm layer heights, and as little support as possible required (only 1 piece needs it now). Due to that requirement, support layers are built in for overhangs, which need to be at 0.2mm (or a division of that).

All the parts in the "Motor" and "Rails" folder are required to be printed in PETG at the very least - trust me, I tested PLA, and it generated enough heat to actually melt the motor through the printed mount!
Shell etc can be done in PLA with no problem.
Typically I have everything set at 3 walls, and 25% infill.
For parts in the "Detail" and "Rails" folders, as well as the "Motor_SpindleMount" object, it bumped it up to 4 walls and 50% infill for additional strength.
On these settings, only printing the basic pieces (excluding the gamecube adapter parts), all plates equal to little over 800gr of filament used, and little over a day of printing for all of the parts:

Note 1: For the "M6-8mm_Adapter" you'll have to use your slicer to cut it to size.
The length of the model is 100mm, and you want to make this the size of your M6 bolt minus 10mm.
If you use the default values (60mm M6 bolt), that would make the adapter be 50mm.
You can cut it like this:

(Remove the spare bit, so you don't accidentally print the wrong end)
And you'll be left with a perfectly sized adapter part:

Don't forget to duplicate it, and print 2 of them.
Note 2: The files for the "RailHousing" versions require you to setup a pause in your print, so you can embed the bearings that make the polishing rails spin!
This would be at layer 47, and 166, if you are using 0.2mm layer heights.

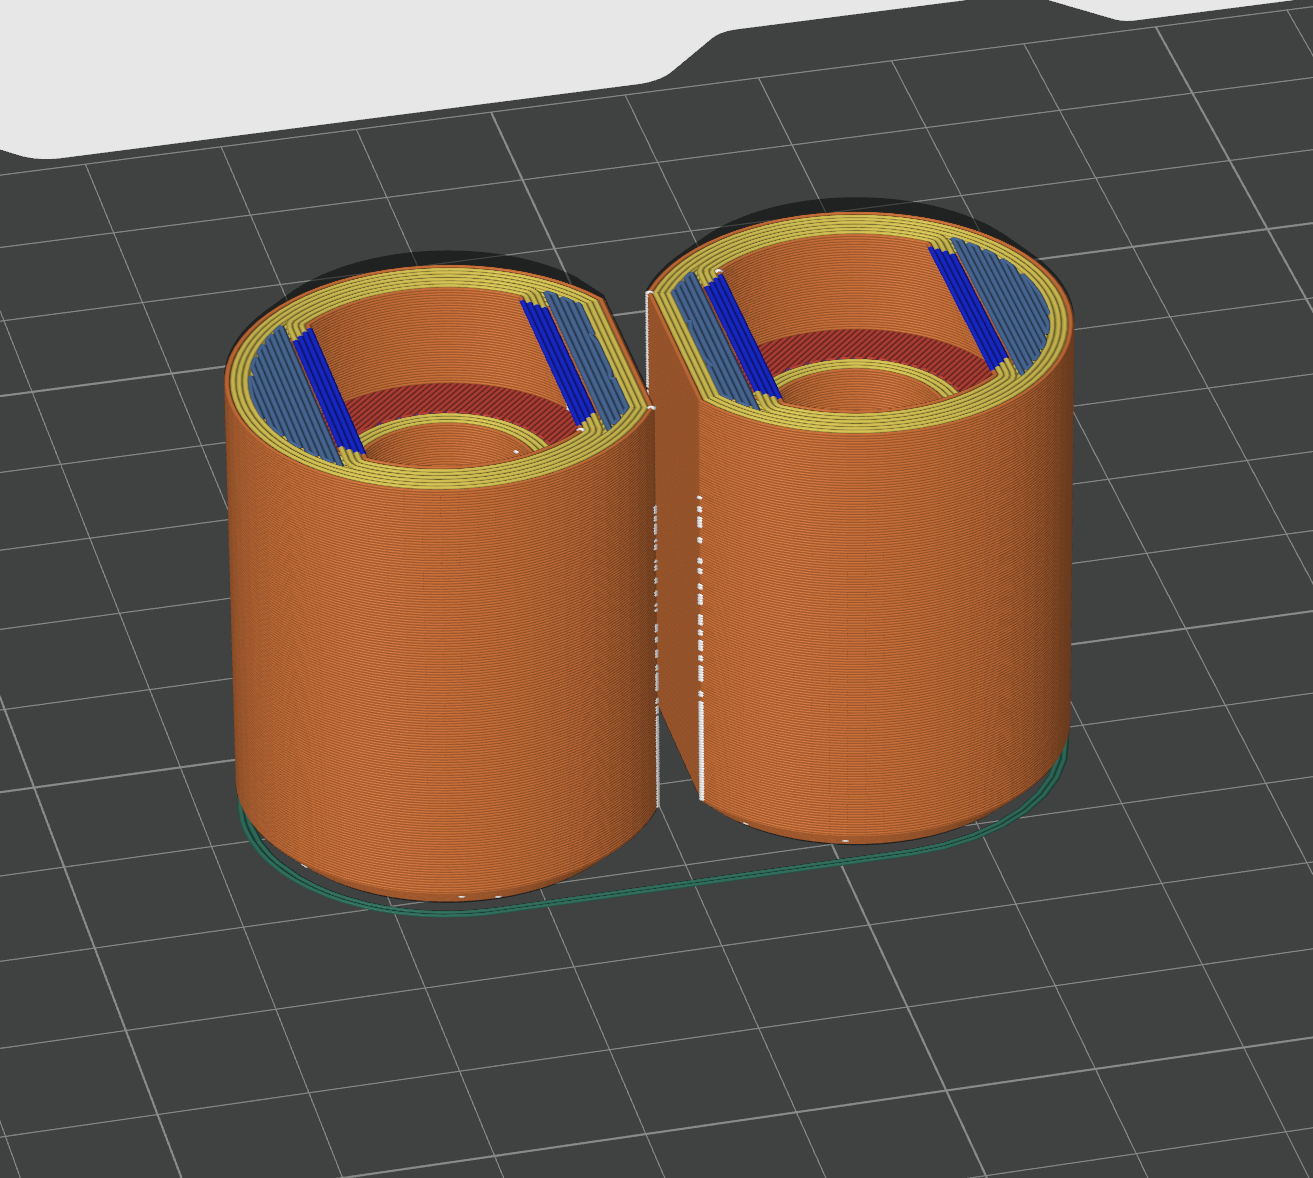
Note 3: make sure to print 2 copies of the "PolishDiscClamp", and that one is mirrored (X or Y, doesn't matter) in order for them to be facing the same way once assembled at the top.
BOM
I have made a list on AliExpress (non-affiliated) which contains all the parts you need (some extra bits will be leftover, so perhaps doing a bulk order with people is most cost effective here).
The things you need (checklist to see if you may have any already):
DC Motor 24v - XD-3420 (Spiral; with thread and hole)
Speed Controller (PWM) - 1203BB
DC Power Female Socket - 5.5 x 2.1mm (DC-099)
2x Compression Spring - OD10, L25, D0.7
4x 8mm bearing - 608 RS/2RS
2x M6*60mm bolt
Round/Tube Silicone Foam Seal - 3mm diameter
Anti slip tape - typically used for shoe sole replacement, we need this for grip of the disc as it spins
2x 50mm (2") Hook and Loop Sanding Pad - M6 connector (typically advertised as "1/4 Inches Shank Drill Attachment")
(optional, but advised) 2x 50mm (2") soft sponge interface
(optional) 24v DC fan - 60x60x10mm
M3 screw assortment:
4x M3x8/10mm (whichever is easier to source)
6x M3x16mm
5x M3x20mm (additional 2 if you use a fan)
5x m3 nuts - nyloc, due to possible vibrations, we don't wanna risk them coming loose!
Assembly
Parts
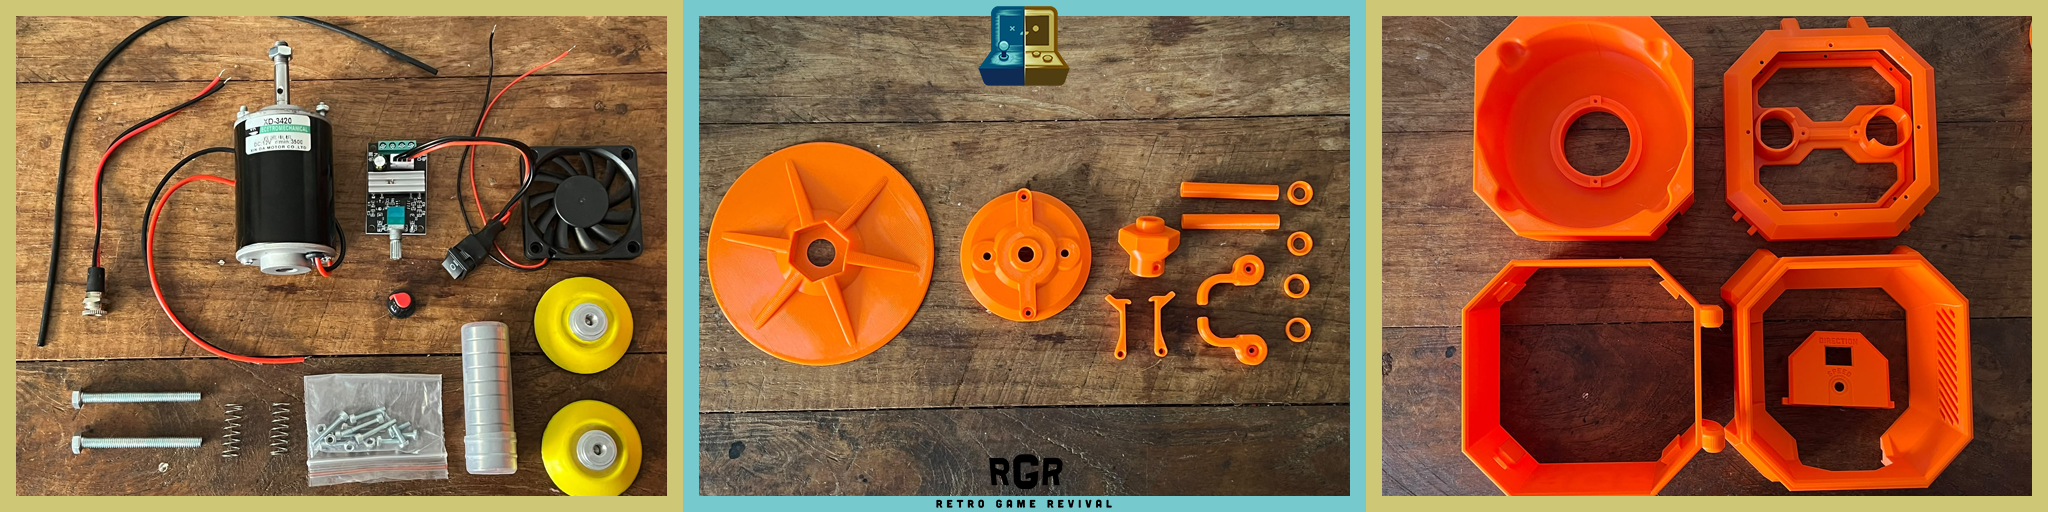
These are all the printed parts and hardware to make the basic version of the RGR ezBuff.
Step 1 (PWM Controller)
Start by mounting the PWM controller onto the front, securing it with the screws to the front, and adding the direction switch through the cutout (snaps in place) before connecting it to the PCB again.

Step 2 (Base electronics)
Start with mounting the hardware to the base. Screw the DC jack into the back using the hex nut to tighten it against the shell (presses in place).
Optionally if you want a fan (recommended), this is the time to install it using the screws (20mm) to attach it to the side (hole is oversized on purpose, but M3 works fine).

Step 3 (Base wiring)
Now you connect the PWM controller to the base. The front cover slides into the base, and secure it (tight) with 2 screws (16mm).
Next is where you connect the wiring up to the PWM controller - fan and DC input go into the power positive/negative terminals.

Step 4 (Motor)
You have to assemble the motor before going back to the shell itself - start with attaching the motor itself to the "MotorMount_TrayInsert" using the provided screws.
After that attach the "Motor_SpindleMount", making sure the holes are aligned before sliding it on (this is supposed to be a tight fit!). When that is on, use the m3 screw (20mm) and nyloc nut to secure it to the motor spindle.

Step 5 (Motor mount)
Here you will attach the motor to the "MotorMount_DripTray". Feed the wires and the motor through the hole and align the screws (has a locking tab to make that easier).
Simply fasten it tight with the 2 m3 screws (16mm).

Step 6 (Mid Shell)
Next you want to attach the mid frame (with the logo) to the bottom we prepared earlier. This has some snap fits design into it to make it easier. This creates a stack of the shell parts (2nd image).
Before adding the Drip Tray, make sure you connect up the Motor wiring to the PWM controller!
Last you can slide the Tray with the motor over the dovetails on the center shell piece which firmly hold it into place.
Take extra care to ensure it is aligned properly (the back should have no gap for the foam rubber strip we install next), and that the wires at the bottom aren't pinched between any of the printed parts!

Step 7 (Sealing strip)
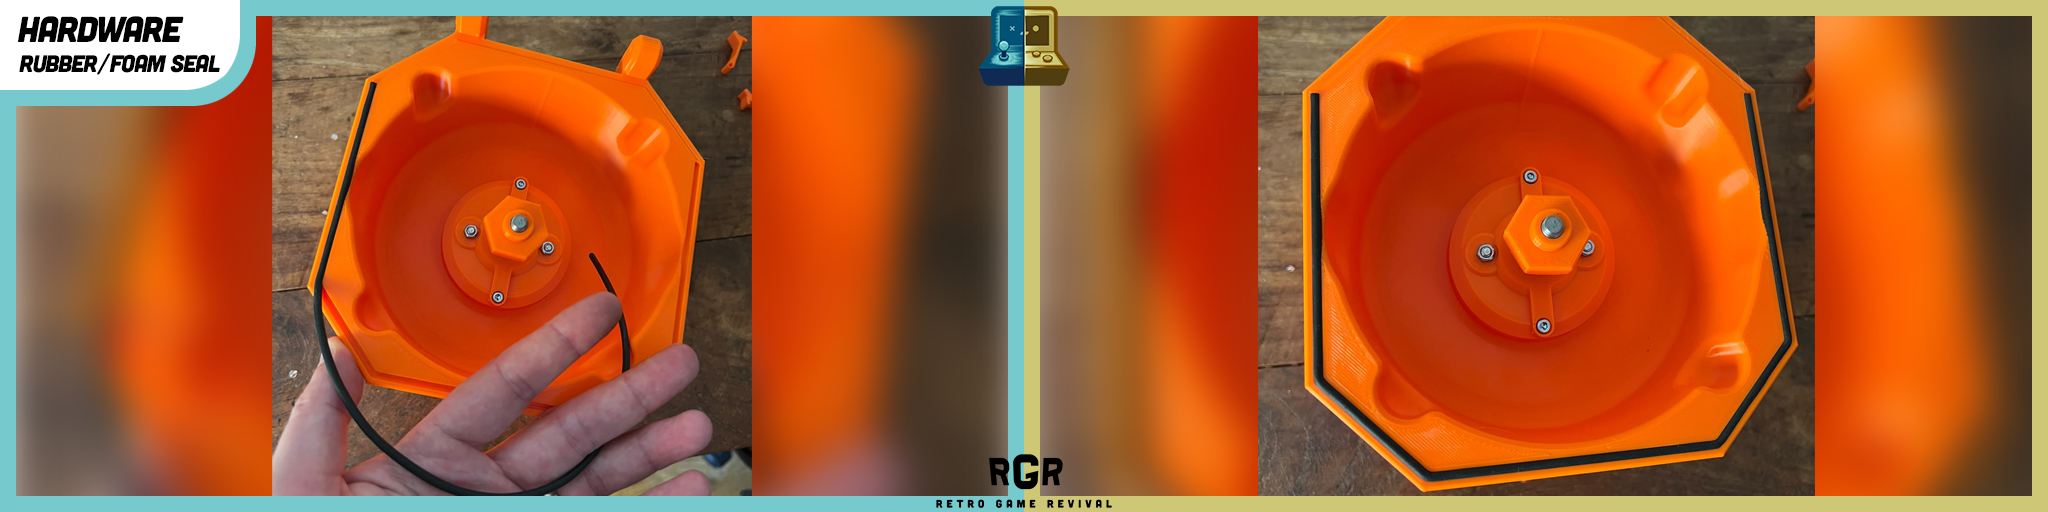
With the pieces aligned, you can start to lay in the foam strip, try to "pack" it in there as much as possibly (least amount of stretching it as you lay it in there), and cut it off at the end section - should look like a U-shape when done (2nd image).
This step is kind of the magic sauce to a quality buffing process, as this eliminates noise and chatter from the lid, which would otherwise potentially cause more scratches in the disc. Take your time here.
Step 8 (Top clamps)
Here you'll add the clamps that allow you to move the polish pads in variable height.
Ensure the clamps are oriented properly (see 2nd image), and simply screw them down with the m3 screws (16mm).
You can tighten them all the way down, and slightly loosen them back for the best result in usage.
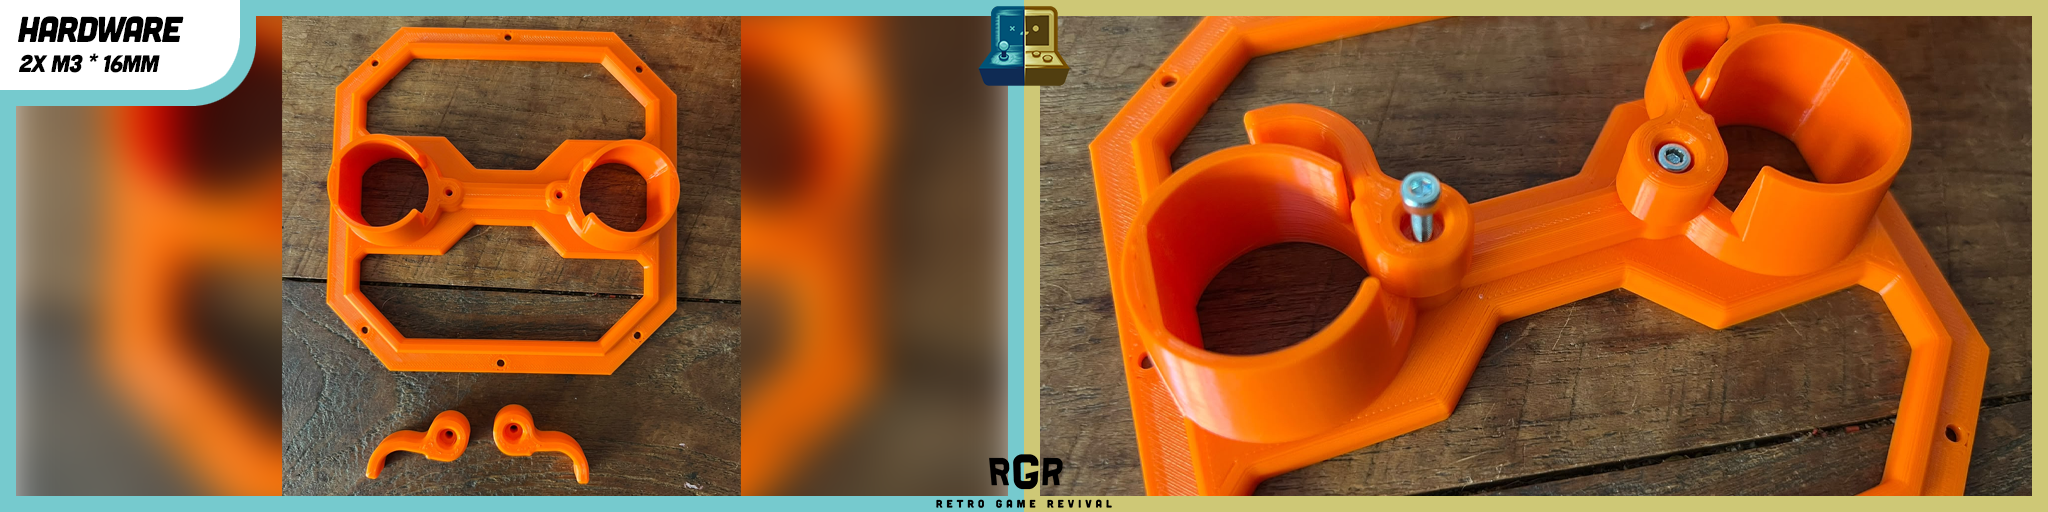
Step 9 (Top lid)
Take the top lid, and insert the previous part through the bottom, it should fall into place, all you need to do now is secure it with 4 screws (8/10mm, either is fine) as shown.
Make sure to use nyloc nuts on the inside here! This is because vibrations might make normal nuts come loose, and you do NOT want to have them drop on your disc while spinning at high rpm!
I have used 4 screws here, and there are 8 holes, feel free to also fill those, but they are there with (potential) future upgrades in mind. These 4 hold it all more than secure already.

Step 10 (Lid clasps)
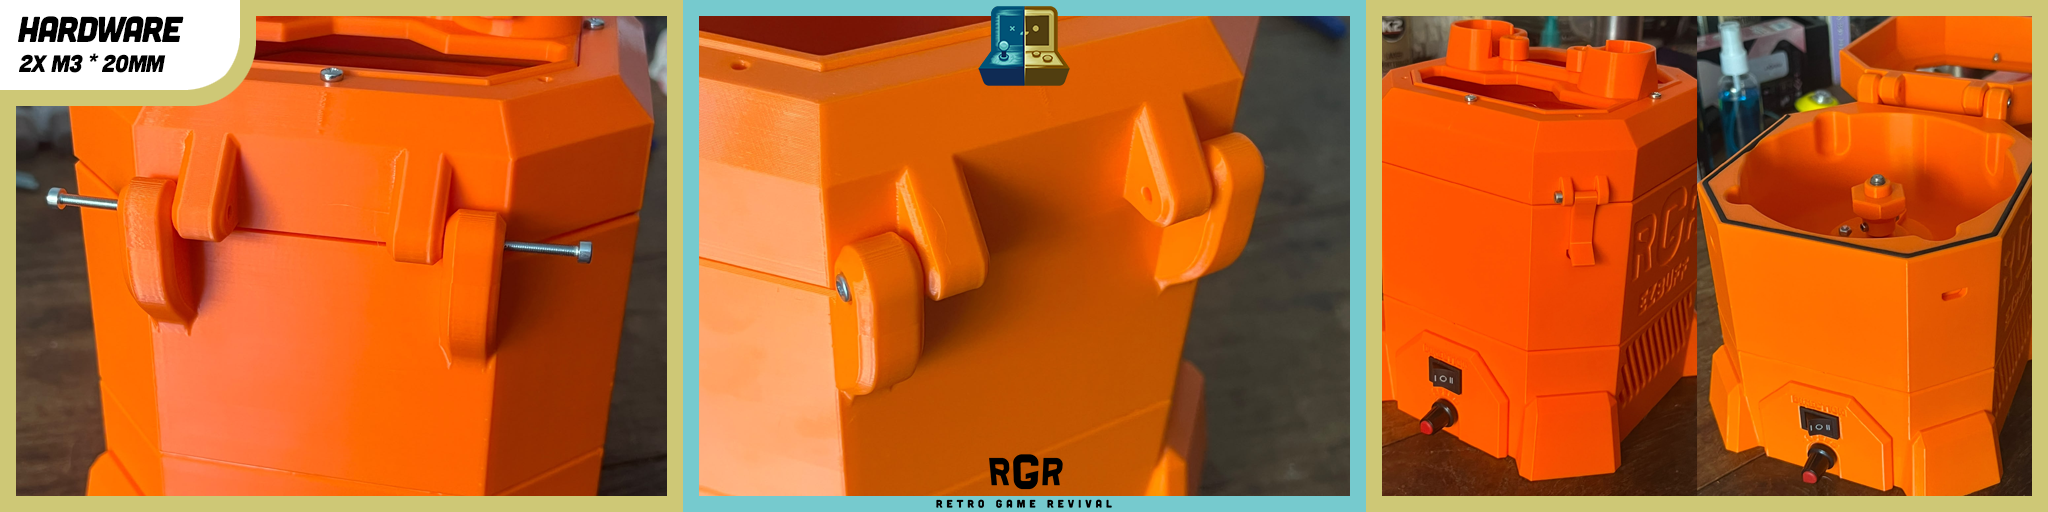
While still working with the Top lid, screw the m3 bolt (20mm) through the front extensions, and feeding it through the "CoverClasp" in between (image 2). Do this for both sides, this is what holds the lid shut - and has a surprisingly satisfying click when using them to it.

Step 11 (Hinge)
Lay the top lid onto the rest of the shell, and use 2 m3 (20mm) screws from the outside to align them together. This forms the hinge (because the holes are ever so slightly bigger on the lid) that holds the 2 parts together firmly.
Step 12 (Rails assembly)
The green part ("RailHousing_8mm") is printed in place with embedded bearings (printed like this to highlight for this guide).
take the m6-8mm adapter and screw tight onto the M6 bolt (60mm), then feed it through the bearings - there should be very little play, yet should be able to freely move up/down (difficult print, might require tweaking settings).
Now take the "SpringSpacer-Top" (bigger hole), and slide it against the railhousing. Next add the spring, and then the "SpringSpacer-Bottom". You'll need to hold it in place as you screw the Polish Pad on. Tighten the assembly with pliers - you don't want to give this a chance to spin itself apart (potentially use some loctite - I never did personally tho).
Do this again for the 2nd one.

Step 13 (Rails install)
(make sure the clamps are open first) Taking the pieces you just assembled, open the lid to the main Shell, and feed it through the bottom using the flat side to align it. use the clamps to hold them in place.

Step 14 (Disc plate)
You want to cover the flat surface of the "Motor_DiscHolder" with something that grips the disc, but does not damage it.
In the BOM list, there is tape used for shoes that achieves this - in my testing I used the following method (which might be cheaper depending on where you source materials). Either way, the process is roughly similar.
Attach double sided tape to the flat surface (displayed is carpet tape, which has held perfectly for this purpose). Attach the anti-slip surface to this, easiest is to keep a little overhang.
Cut out the edges using scissors, as well as the center (through which the motor will stick out a little).
When cut to size, the hex+circular printed interface interfaces tightly with the motor mount.
The polishing pads apply pressure on both edges equally, ensuring it spins without bouncing around too much - even if it may feel a little unstable without these.

these exact same steps can be used for both the "Full" and the "Small" variants.
Step 15 (Vibration dampening)
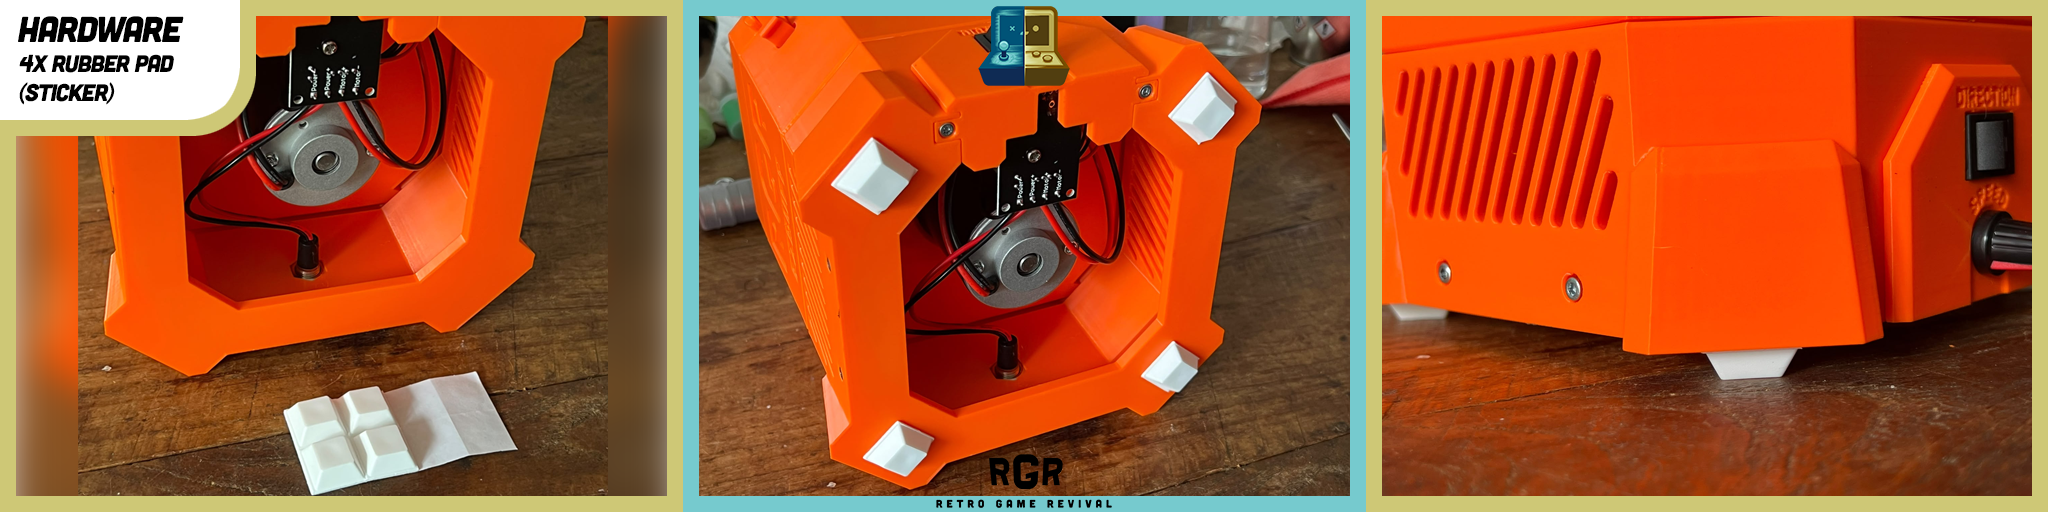
Technically this is optional, but it ensures a far more quiet operation. Without these, the machine will move around due to vibrations.
At the bottom of the machine, add 4 thick rubber pads on each corner, elevating it slightly off of the surface it will sit on.
Step 16 (Optionals)
The "Motor_DiscClamp" is an optional part you can print, and requires an M8 nut to be inserted - this can then be used to lock the disc down (if you want the ease of mind of it not being able to spin out, or if you only want to use a single rail for certain discs).
The "RailHousing_Angled" can be used as optional variant to apply more angular pressure on a disc if you have very hard to buff scratches right at the inner edge. Additionally, it is also recommended to use this variant for the gamecube, as it alleviates pressure that otherwise would hang more around the outer edge of these discs (resulting in a more uneven polish potentially).
Usage
As mentioned before, the best way to learn this, is to experiment and test around. This is exactly what I have been doing over the past couple of months, so let me help you get started with the key takeaways from my learning.
Let's start with the basics. The operation of the device is super simple:
open lid and place disc
close lid and lock latches (this is important, without that the pads will bounce)
make sure the height of the rails is set to lightly put pressure on the disc
toggle direction switch
you may wanna go back/forth different directions for deeper scratches, but that's optional
Turn on and ramp up speed with the dial
experiment from here on out with speeds and times
It really is as easy as that!
It is important to understand a few key elements of the process itself though:
Make sure to not overheat the disc, this will cause irreversible damage to the data layer
Before running a buffing session, make sure to clean the disc well - any contaminants left on the disc can be picked up and moved around the disc, potentially causing more damage than you started with
After using any buffing compounds (more on that later), make sure to clean the disc well - I personally like using windex, then taking most of that off with a microfiber cloth, leave it to dry for a bit, and any streaks remaining I use a different (dry) cloth to make it all shine.
The open top design allows you to add (spray bottle) water during the process, make sure to use de-ioinized water! impurities in tap water may cause damage.
If using the resurface option, try to keep the sessions short (10/15 seconds), and keep the disc wet throughout - the dust is technically a contaminant, and as before, may introduce more damage otherwise.
I know this may all sound overwhelming, but trust me it all becomes very easy and intuitive after you had a couple of attempts at it. You can get the same or even better results than I have!
For the polishing compound, I have intentionally left this more open. There are so many brands available, and I don't have the time or budget to test them all ofcourse.
There are 2 brands that are proven before to work great.
Novus plastic polish kit (#1, #2, and #3)
Meguiar's PlastX Clear Plastic Cleaner Polish (G12310)
PlastX being the budget friendly option. Novus being more expensive - however I have experimented with watering it down, and found that in a 1:3 ratio (4 parts total, 1 part Novus, 3 parts water) it performs equally great as without the water. This makes your small bottles go a long way!
The way this is best applied, is by putting some down on the disc, and when closing the lid, have the felt pad absorb it before turning it on. I typically like to douse the 2nd pad in water (or windex even), to prevent overheating - though that is entirely optional, and completely up to your own preferences.
GameCube is currently still very much considered WIP - If you do however, please use the angled rails as it's been found that the regular ones can cause excessive buffing around the edges (due to it's center of rotation being just over the edge, thus presses down more on the sides than towards the middle).
anything I missed, or learn in the future, I will update here with a timestamp for everyone.
License
I am opening this for commercial use, with attribution. You are not allowed to remove the logo to rebrand it as your own. Any derivative work will have to comply under these same rules, published under the same license.