
Electronic remake for USB handbrake
Obliczymy ostateczną cenę na podstawie wybranego pliku. Sprawdzisz ją i zaakceptujesz przed płatnością.
Zapisane na tym urządzeniu.

Mod for the usb handbrake that you can find on some major platforms
- Ocena
- 0 / 5
- Polubienia
- 2
- Pobrania
- 4
- Wydruki
- 0
- Wyświetlenia
- 66
- Oceny
- 0
Aktualizacja u źródła:
Informacje o modelu
- Źródło
- Printables
- Kategoria
- Video Games
- Licencja
- Creative Commons — Attribution — Share Alike
Electronic remake for USB handbrake
Why
This handbrake is sold with electronic components that are not always well calibrated or simply doesn't works (on Linux for example). This modification is a remake of the electronic that allows you to manage your device thanks to FreeJoy.
BOM
Category | Ref | Quantity |
|---|---|---|
Electronic | STM32F103C8T6 "Bluepill" | 1 |
Electronic | ST-Link or equivalent | 1 |
Electronic | 49E Hall effect sensor | 1 |
Electronic | 7mm momentary push button | 1 |
Electronic | Jumper wires | some |
Electronic | USB-A to Micro USB cable | 1 |
Fastener | ISO 4762 M3x35 screw | 2 |
Fastener | ISO 4032 M3 nut | 2 |
Magnet | N42 (or more) rectangular magnet (20mm x 10mm x 3mm) | 1 |
Printing | PLA (or any hard plastic) | < 40g |
Print settings
Material: PLA (or any hard plastic)
Layer height: 100µm for sensor case, 200µm otherwise
No support required
Assembly steps
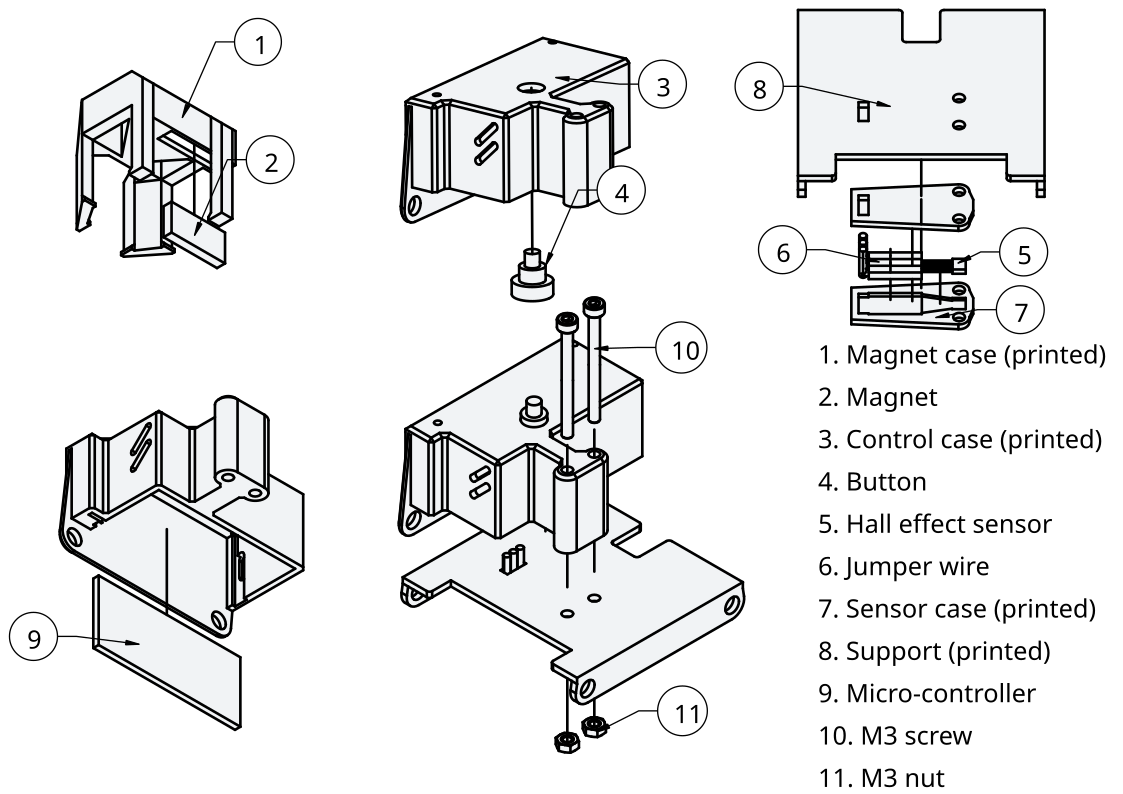
Magnet mount
After this assembly, insert the assembly in the hanbrake thanks to the bottom clips.
Button mount
Sensor mount
After this assembly :
Install the FreeJoy firmware in the STM32 card. You will need a ST-Link.
After that, you can cannect the card directly via the Micro USB port.
Make the wiring between the card and the button (B0, Ground).
Make the wiring between the card and the sensor (3.3V, Ground, A0). Use the sensor documentation to identify the correct pin.
Test the configuration by pushing the button and putting a magnet next to the hall effect sensor and monitor the value.
Card mount
Final mount
After this assembly, you can use the 4x M5 holes on the sides to mount this on the handbrake.
You can now plug in the usb cable and make the calibration.