Fabric - Home Assistant Voice PE - Echo Dot 3 Speaker
Obliczymy ostateczną cenę na podstawie wybranego pliku. Sprawdzisz ją i zaakceptujesz przed płatnością.
Zapisane na tym urządzeniu.

A housing to combine the VPE with the speaker unit of an Echo Dot 3 for far better voice quality.
- Ocena
- 5 / 5
- Polubienia
- 8
- Pobrania
- 16
- Wydruki
- 2
- Wyświetlenia
- 300
- Oceny
- 2
Aktualizacja u źródła:
Informacje o modelu
- Źródło
- Printables
- Kategoria
- Electronics
- Licencja
- Creative Commons — Attribution
A housing to combine the VPE with the speaker unit of an Echo Dot 3 for far better voice quality.
The idea is based on this repo:
https://github.com/glbailey/Voice-Assistant-EE
I realized that the Echo Dot 3 had a quite good speaker and it's currently quite cheap as a used device.
Most likely as Alexa+ is getting more attention.
But the round design used in the repo above, wasn't as pleasing to my eyes as the rectangular design of the VPE, so created this housing.
You need:
- Voice PE
- Echo Dot 3
- some thin an soft / stretching fabric
- Threaded inserts for M3 screws
- M3 countersunk screws
- 2-pin Mini Micro JST connector (if you don't want to remove the cable from the original speaker)
Look for thin and soft / stretching fabric, so it wraps around the corners nicely without wrinkles and or blocking audio frequencies.
I used some old fabric that my wife used for clothes for the kids.
My sewing skills are not really existing, and I did it manually with a needle and thread.
So I guess everyone else should be able to do it, too. 😄
Disassembly of the Echo Dot 3 is shown nicely here:
https://www.briandorey.com/post/echo-dot-3rd-gen-smart-speaker-teardown
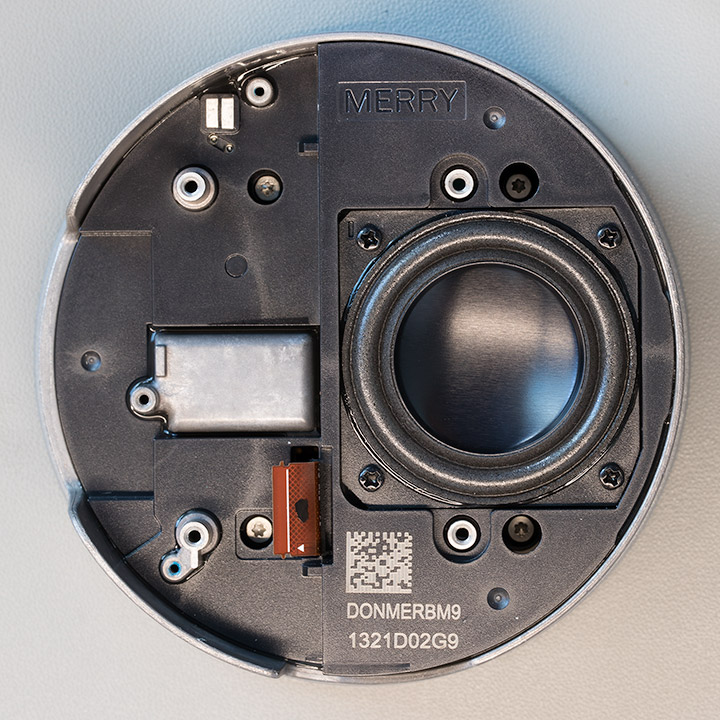
You need the whole metalic part with the speaker.
See this picture from the link above:
https://www.briandorey.com/docs/2019-07-20-amazon-echo-dot-3rd-gen-teardown/chassis2.jpg
Solder the cable of the micro JST connector to the 2 pins in the top left.
The left pin is the negative (-), the right pin the positive (+) terminal.
You have to lead the cable through the opening in the speaker block, as the VPE circuit board will be placed on the other side.
You can see this in the photos.
Assembly:
- After printing, you need 8 thread-inserts and melt them into the bottom part.
- After sewing the fabric, wrap it around the bottom edge of the bottom part (See photo, use some double sided adhesive tape at the inner edge to fix it in position if you have problems otherwise).
- Attach the bottom-fill and fix it with screws
- Use the rubber feets of the original VPE housing
- Open the VPE housing, remove the original speaker
- Lead the new speaker cable through the top-part of this model and the VPE housing
- Connect the cable to the speaker connector on the VPE circuit board
- Close the VPE housing with the original screws again
- Screw the top-part of this model onto the bottom part
- Wrap the fabric around the upper edge. Mark the needed length with a pen and cut it into shape
- Again, use some double sided adhesive tape at the inner side of the top part to fixe the fabric if needed
- Place the VPE into the top part. Take care, that the cable is moving into the housing and doesn't get trapped below the VPE in the top part.
- Cut a slit into the fabric at the position of the USB connector (See photos)
- Attach the printed part for the cable-insert
Additional notes:
There is no mute switch outlet in this model.
I didn't like the look when adding another cut-out for the mute switch in a more visible position.
Instead I added a automation that mutes / un-mutes the mic when long-pressing the center-button of the VPE.