1 / 8
Multifunction Flash bracket
Zamów wydruk tego modelu
Obliczymy ostateczną cenę na podstawie wybranego pliku. Sprawdzisz ją i zaakceptujesz przed płatnością.
Zapisane na tym urządzeniu.
Flash bracket to fit lighting stand. Includes magnetic snap-on attachments, filter holder, honeycomb, barn doors & scim.
- Ocena
- 5 / 5
- Polubienia
- 47
- Pobrania
- 94
- Wydruki
- 0
- Wyświetlenia
- 1134
- Oceny
- 1
Aktualizacja u źródła:
Informacje o modelu
- Źródło
- Printables
- Kategoria
- Photo & Video
- Licencja
- Creative Commons — Attribution — Noncommercial
SzczegółyPliki (13)Wydruki i komentarze (Wydruki: 0) (Komentarze: 1)Remiksy (0)Kolekcje (73)Powiązane
This bracket points your 5600 series flash along the central axis of the umbrella or reflector. This position means that the output of your flash is right where you want it. Not only that, rare earth magnets allow you to snap on useful attachments in any situation.
- Filter holder: Ensures that filters are secured and free from damage
- Honeycomb grid: Hardens the light source and prevents the light from spreading
- Barn doors: Limits where the light falls
- Scrim: Softens the light by creating a more significant and effective source
Additional materials
- Rare earth magnets 8 per attachment, total 40. (approx 5x1.75x3mm) from eBay
- Scrim material: Sail cloth or similar. 560 x 260mm, (sew in 8mm hem).
- Fibreglass rods: 4 x 2mm diameter, 250mm long. You should be able to get 1m lengths from model stores. Cut with a knife or saw, tends to crush if you use snips.
3D Printing
Preferably use petG at .2mm layer height.
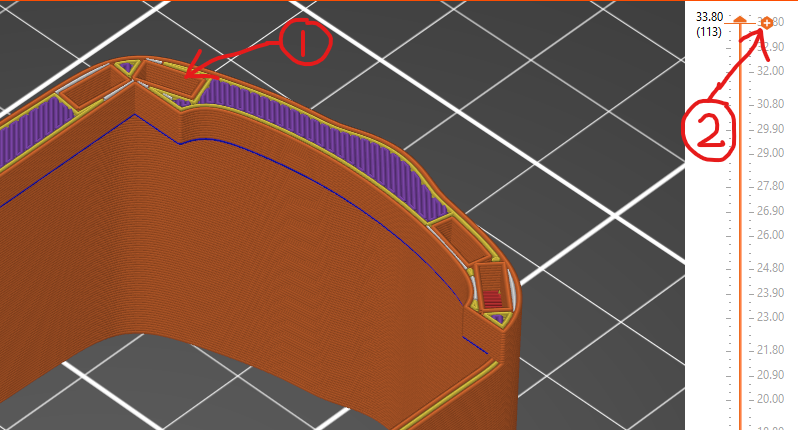
The magnets are hidden inside the plastic, which is achieved by stopping the print, inserting the magnet, and then finishing the print.
- Import model into PrusaSlicer
- Slice model
- Make sure you are in the preview window
- Move the layer height till one layer before the magnets hole is covered (#1)
- Right-click the plus sign (#2) and select ‘pause’.
- Click ‘slice’ again
- Send to print
- When the machine pauses, insert the magnets
- Click ‘Continue’