
Faketastic Retroid Pocket 2/2+ Shell
Obliczymy ostateczną cenę na podstawie wybranego pliku. Sprawdzisz ją i zaakceptujesz przed płatnością.
Zapisane na tym urządzeniu.
A 3D printable version of the Retroid Pocket 2/2+ shell.
- Ocena
- 0 / 5
- Polubienia
- 20
- Pobrania
- 135
- Wydruki
- 1
- Wyświetlenia
- 2170
- Oceny
- 0
Aktualizacja u źródła:
Informacje o modelu
- Źródło
- Printables
- Kategoria
- Electronics
- Licencja
- Creative Commons — Public Domain
WARNING - This is a difficult print. The need for clean internal AND external surfaces make this print a huge PITA (at least with resin). I've done my best to provide you with good printing orientations, but you may find something that works better. Failure to print in a good orientation results in warped parts that don't fit together. This is also a difficult modification due to needing to dissemble the entire handheld and remove the screen from the shell. To separate the screen from the shell, please refer to my guide on screen removal: https://imgur.com/a/7xqBJ9M.
RetroCorps also put out a great video on how to disassemble and reassemble the RP2/RP2+.(https://www.youtube.com/watch?v=qKf_TDS4KC8). I also highly encourage you check out RetroCorps other content - he's a bonafide pillar of the community.
OVERVIEW:
This is a reconstructed model of the Retroid Pocket 2 Shell. I was motivated to make this due to Retroid's choice to discontinue the "Funtastic" (hence 'Faketastic') line of shells. The intent was to make a 3D printable shell that I could use to print whatever color/transparency combo I wanted. I mostly succeeded, but the work isn't done. The model has been developed to the point that I want to start gathering mass feedback regarding questions that I cannot easily answer myself:
"What flaws does the model have?"
"What materials work best?"
"What print orientation works best?"
"Should I just give up and buy a legacy Funtastic shell for $100?"
Most of you have probably moved on to a new handheld, but I've created a Discord to allow more convenient communication for those who want to give feedback there.
(Faketastic Collab Server): https://discord.com/invite/FN8FdVAgK3
Print Settings
Printer:
Elegoo Saturn
Rafts:
Doesn't Matter
Supports:
Yes
Resolution:
3840 x 2400
Infill:
100%
Filament: Resin, Siraya Tech Simple/Fast No
Clear/Dyed/White
Notes:
I recommend any resin printer with a build volume similar to (or larger than) the Elegoo Saturn's (192mm x 120mm x 200mm). For smaller printers, a CHARLIE/XRAY combo (defined below) may still allow you to print these models.
Post-Printing
I haven't really nailed this down yet. As of 9/4/2022, I've been removing the supports, washing with warm/hot water (I avoid alcohol due to clouding and cracking, but I may have been using too high a concentration), curing for 15 minutes, then sanding as necessary.
How I Designed This
"This is my caliper. There are many like it.."

I designed this using a Husky Caliper. You can find them for $30. I also used a Personal license of Fusion 360. It's very easy to learn with a Udemy tutorial or two and I recommend it. I worked on it on weekends (on and off) for 6 months and it probably took around 60 solid 'design hours'.
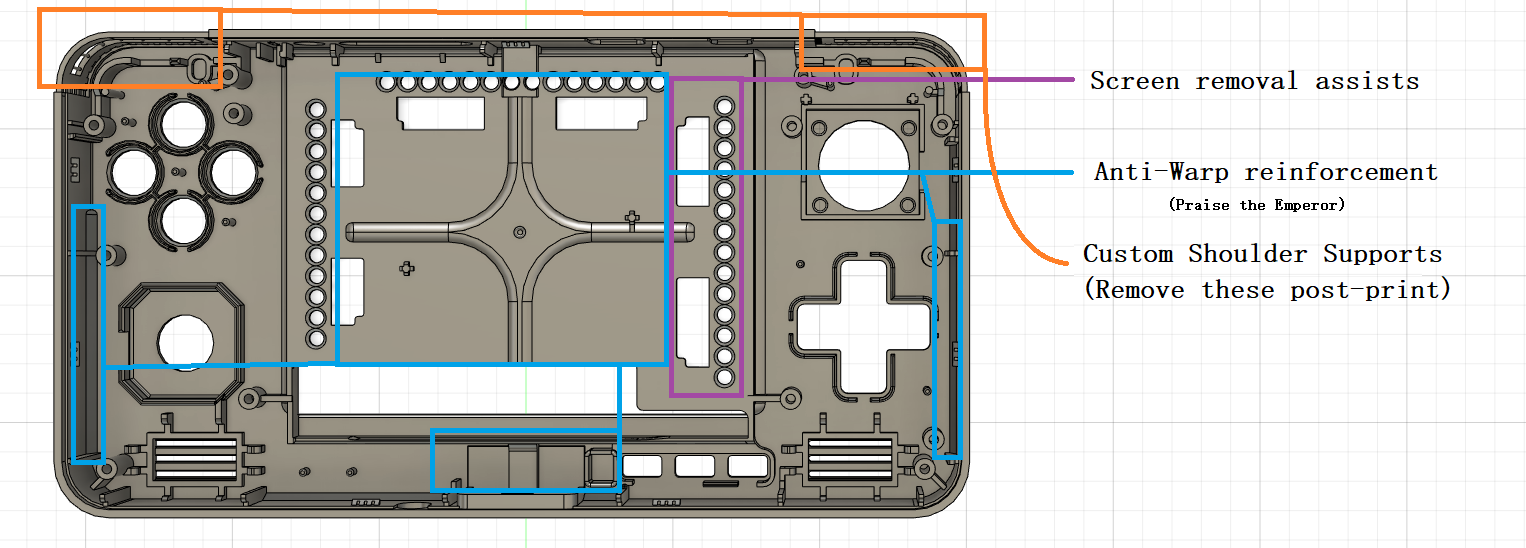
I made a few notable deviations from the original (pictured below).
Terms of Use
You may have some questions about how you can use this model and any future versions of it.
"Can I print this shell and sell it?"
"Can I modify it and claim it as my own?"
"Can I print suits of Faketastic lamellar armor and sell them on eBay?"
As RetroCorps might say: "Yeah man. Do it." This is now part of the public domain. If you're a seller, I encourage you to consider selling it. Not everyone can afford two hobbies, so a 3D printer is out of range for some, but they can probably afford a shell that costs $20-$40.
The only thing that I request in return is that you share your feedback.
How do I print it?
"Alright Raydude. Less talky, more printy"
This model was designed and tested as an SLA/resin print. You can absolutely make it work for FDM/filament (with little effort, I suspect), but I just haven't done it myself! All descriptions below are given with resin printing in mind. If I had to recommend a single type of resin, it would be Siraya Blu (Clear V2). A mixture of generic clear resin, Siraya Blu, and Siraya Tenacious (67%/20%/13%) has also proven reliable if you wanted to cut it with cheaper resins.
There are a few different ways to print this model and I've opted to give them cool phonetic nicknames so I can feel like a cooler person when I discuss them (remember, I spent a considerable fraction of my life designing a shell for a handheld emulation console - send help). Most people are probably going to use a BRAVO/ZULU combo.
=== FRONT SHELL ORIENTATIONS ===
ALPHA Orientation


Print time: ~2 hours (Short)
External Quality: Excellent - looks like it was injection molded.
Internal Quality: Terrible - looks like a blowout.
Details: Front facing AWAY from build plate, 0 degrees offset (parallel to build plate), heavy supports, no skate/raft necessary.
Suitability: Great choice if you're going to print an opaque shell because the internal messiness is hidden. Looks really good.
Other: Due to the front of the shell touching the FEP without offset, any defects on your FEP liner will be shown in the model.
BRAVO Orientation


Print time: ~6 hours (Medium)
External Quality: Good - not as great as ALPHA. Layer lines are visible.
Internal Quality: Good - resin doesn't collect on the internal side due to the steep incline.
Details: Top face TOWARDS the build plate, 20 degrees offset ("leaning" forwards).
Suitability: Great choice if you're going to print a clear/translucent shell - the mess associated with ALPHA would have been visible through the material.
Other: Due to the steep incline, you may want to manually insert supports on top of structures like screw-holes. The ones near the top tend to sag without support and auto-generated supports don't always catch them.
CHARLIE Orientation

Print time: ~12 hours (Long)
External Quality: Needs Testing - Layer lines are visible. Expect problems due to length.
Internal Quality: Needs Testing - I expect similar to BRAVO due to equal offset (+20 degrees).
Details: Either Side face TOWARDS the build plate, 20 degrees offset ("leaning" forwards).
Suitability: This orientation may be your ONLY choice if you have a smaller printer like the Elegoo Mars 2.
Other: I only used this orientation very early in the design process (I later upgraded to an Elegoo Saturn) and it had issues, but it was all I had.
DELTA Orientation

Print time: ~2 hours (Short)
External Quality: Terrible - like planting your face in the mud.
Internal Quality: Excellent - the best interface quality you can ask for.
Details: Front facing TOWARDS the build plate, 0 degrees offset (parallel to build plate), heavy supports, no skate/raft necessary.
Suitability: The opposite of ALPHA - this is great to use as a reference print, whether you're printing accessories (buttons, d-pad) or troubleshooting your prints, you should print at least one of these before you experiment so you know what the internals are supposed to look like.
Other: It's ugly. You don't print these for assembly. You may also add a slight offset (8 degrees) if you're worried about FEP adhesion issues due to the surface area. You may not need supports either (to save on resin). I see no reason that you can't just print DELTA directly on the plate. With base layer UV tweaking, a direct plate print has the potential to become ALPHA+ (Excellent/Excellent).
=== BACK SHELL ORIENTATIONS ===
There's not much more to say about the back shell. The same principles apply, and I haven't conducted as much testing here.
ZULU Orientation


Print time: ~2 hours (Short)
External Quality: Rough - You're probably gonna want to sand this down.
Internal Quality: Great - interfaces well with the Front shell.
Details: Rear facing TOWARDS the build plate, 8 degrees offset (ears closer to plate), heavy supports, no skate/raft necessary.
Suitability: Good choice if you don't mind sanding and want to make certain that no resin will collect on the internal side.
Other: It's a real mess on the outside. I hope you like sanding. You can remove the 8 degree offset if you're not concerned about surface area/FEP adhesion issues.
YANKEE Orientation

Print time: ~2 hours (Short)
External Quality: Excellent - You shouldn't get any 'rippling' or resin collection.
Internal Quality: Questionable - Resin will collect and it may not interface properly with the Front shell.
Details: Rear facing AWAY from build plate, 8 degrees offset (ears closer to plate), heavy supports, no skate/raft necessary.
Suitability: Good choice if you create your own custom supports. Maybe you can figure out a way to prevent resin collection on the critical interfaces (the edges). Will look great on the outside.
Other: I haven't tested extensively, but I expect assembly issues if printed this way. You can remove the 8 degree offset if you're not concerned about surface area/FEP adhesion issues.
XRAY Orientation

Print time: ~12 hours (Long)
External Quality: Good - Layer lines visible, but no resin collection. Add supports within screw-holes to minimize deformation.
Internal Quality: Bad - You'll need to spend some time post-processing. I don't think it will fit with the Front shell without some work.
Details: Rear facing AWAY from build plate, 20 degrees offset, heavy supports, no skate/raft necessary.
Suitability: It's the CHARLIE of the Rear shell. This, or some variation, may be your only choice for smaller printers.
Other: Expect some serious fit issues due to the supports touching the edge interfaces.
What about DYEING/COLORING my prints?
The epoxy dye brand that I used in the prints pictured is "NicPro" and it worked well with Siraya Simple and Siraya Fast.

You can also use pigment powders to achieve a "sparkly" look, but understand that this is a high risk, high reward printing style. If you don't stir the powder often or you use too high of a concentration, you risk the powder settling on the bottom of the resin vat and a layer of resin hardening on the FEP. I've only done this a few times, but when I did, I used "Techarooz". I don't really have enough experience to endorse this particular brand, though.

Feedback
If you find an issue or want to suggest a feature, feel free to leave a comment here or send an email with more details to [email protected]. You're also welcome to join the Discord at https://discord.com/invite/FN8FdVAgK3.
Known Issues
None at this time. Most issues you will encounter with the 1.0 release are related to the type of resin and the printing orientation.
Suspected Issues:
None at this time.
Category: Electronics
====================================
UPDATE LOG:
9/5/2022 - V045:Thickened disposable shoulder support beams from 0.5mm -> 1.1mm, filleted support interfaces to encourage favorable break-away.
9/10/2022 - 11/10/2022: Many updates, mostly organized on the Discord.
11/13/2022 - v55: Many updates, but most notably the rear shell has been overhauled to prevent warping over time.
11/27/2022 - 1.0 Release, big thanks to Ricky L for all the design support.