
Qidi Extruder (E-Step) Calibration
Obliczymy ostateczną cenę na podstawie wybranego pliku. Sprawdzisz ją i zaakceptujesz przed płatnością.
Zapisane na tym urządzeniu.

Step-by-step guide to calibrate Qidi Extruder E-Steps with Chitu Mainboards
- Ocena
- 0 / 5
- Polubienia
- 32
- Pobrania
- 102
- Wydruki
- 0
- Wyświetlenia
- 4033
- Oceny
- 0
Aktualizacja u źródła:
Informacje o modelu
- Źródło
- Printables
- Kategoria
- Other Printer Parts & Upgrades
- Licencja
- Creative Commons — Attribution
Extruder Calibration
Calibrating the extruder on printers using Chitu boards (and clones) such as the X-Max. Adapted from Facebook Post provided by Zoltan Gal-Bancsi
This guide follows the same logical steps as in many E-Step Calibration tutorials on the Internet, with the following differences:
- Other printers use steps/mm (E-Steps). Qidi printers use mm/step. This is why the computation needed is different from the computations presented in internet tutorials.
- There are specific Chitu gcode commands used to get the Current_Value and to set/save the New_Value.
These are the options for executing the gcode:
- Create a file in Notepad or other text editor (not MS Word or similar programs) and save it to a USB drive with the contents mentioned below (separate files for each case) and print them.
- If your printer is connected to the network (WiFi or LAN), then:
- You can use the Qidi Control Panel to transfer the file from your computer to the USB drive plugged in the printer, then print it.
- Or enter each line one by one in Qidi Control Panel's "Device Debug and State" edit control and press the play button next to it after each line.
- If you are using Octoprint/Pronterface/... then you already know.
NOTES:
- Use a good quality filament, preferably white so marks are clearly visible. I used PLA.
- The procedure can be done with or without the nozzle/hot-end. I performed without the nozzle.
- I used the USB drive method for file transfer and execution.
- The extruder in the picture is a Haldis Red Lizard
STEPS:
A. Determine the current mm/step value
- To get the current (old) value we need to extract a copy of the configuration stored on the mainboard by the firmware.
- Create a text file named GetConfig.gcode and enter gcode command:
M8512 ‘configFile.gcode’
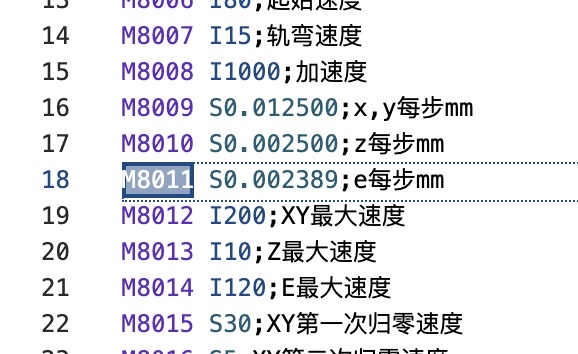
- After printing (running) the file, open and use Find to locate the 'M8011' command. After the ‘M8001 S’ is the current value (referred as "Current_Value" below). In this case the value is: 0.02389
B. Determine the difference between expected and actual filament extrusion.
- There are two options here: with the nozzle and without the nozzle/hot-end. Without the nozzle eliminates the need to heat the hot-end and removes a variable from the calculation. The gcode should not include the M109 and M104 commands if the nozzle is removed.
For no nozzle, create a text file named ExtrudeNoNozzle.gcode with the following gcode:
; No Nozzle
M82 ; Set E to absolute positioning
G92 E0.0000 ; Sets the nozzle's current location
G1 E100.0 F125 ; 125 is the speed recommended by Qidi
M82
With a nozzle, create a text file named ExtrudeWithNozzle.gcode with the following gcode:
; With Nozzle
M82 ; Set E to absolute positioning
; IMPORTANT - Replace the 210 value after the 'S' with the temperature for the filament
M109 S220 T0 ; Sets the hot end temperature and waits for the target temperature to be reached before proceeding
G92 E0.0000 ; Sets the nozzle's current location
G1 E100.0 F100 ; Extrude 100mm at feed rate of 100mm per minute
- Load filament such that it is fully engaged by the drive filament drive rollers
- Measure and place a mark on the filament 110mm from the extruder inlet (the inlet will be the reference from which measurements are taken).
- Print (run) the appropriate gcode.
- Measure the distance between the mark and the extruder inlet (ex: 8mm) and then subtract from 110mm to determine the Measured_Distance (ex: 102mm).

C. Compute the New_Value
(Current_Value * Measured_Distance) / 100mm = New_Value
ex: 0.002389 * 102 / 100 = 0.00243678
D. Set and apply the New_Value by creating a file named UpdateSteps.gcode with the following gcode:
M8998 I1 ; enable configuration
M8011 S0.XXXXXX ; IMPORTANT - Replace 0.XXXXXX after the 'S' with your ‘New_Value’
M8510 ; Apply
M8500 ; Save
E. Redo step B to verify.