
82mm lens cap (print in place)
Obliczymy ostateczną cenę na podstawie wybranego pliku. Sprawdzisz ją i zaakceptujesz przed płatnością.
Zapisane na tym urządzeniu.

It's a lens cap. It's only one size. I hope it's the size you need 🤞
- Ocena
- 4,875 / 5
- Polubienia
- 91
- Pobrania
- 1147
- Wydruki
- 5
- Wyświetlenia
- 3965
- Oceny
- 8
Aktualizacja u źródła:
Informacje o modelu
- Źródło
- Printables
- Kategoria
- Photo & Video
- Licencja
- Creative Commons — Attribution — Share Alike
I recently purchased a well-used camera lens which came with a lens cap that was missing the springs on one side. Seeing as I own a 3D printer and have access to the internet, that should be a not-really-a-problem that is easy to solve.
I did a bit of a search and found Boopidoo's wonderful lens cap design. And honestly, if you just want a reliable lens cap that comes any size, you should just print that one. I did.
However, something bothered me about that design. The sprint tension was quite stiff. But also, due to its small size (and being printed out of PLA, which is absolutely my fault), I suspect that it will get quite mushy over time and no longer hold reliably. I wanted a design that feels just right immediately off the printer and also has the highest chance of lasting a long time without losing its springiness (again, when printed in PLA, which is absolutely my fault).
Queue the iterations:

Consulting the only scientist I know (one of my coworkers), we came to the understanding that to design a good spring from a non-elastic material, the tension has to be spread out over as large an area as possible. I'm not going to go into the trials and tribulations of iterating over designs (since I'm sure you've all been there), but we can talk in the comments section.
Print settings
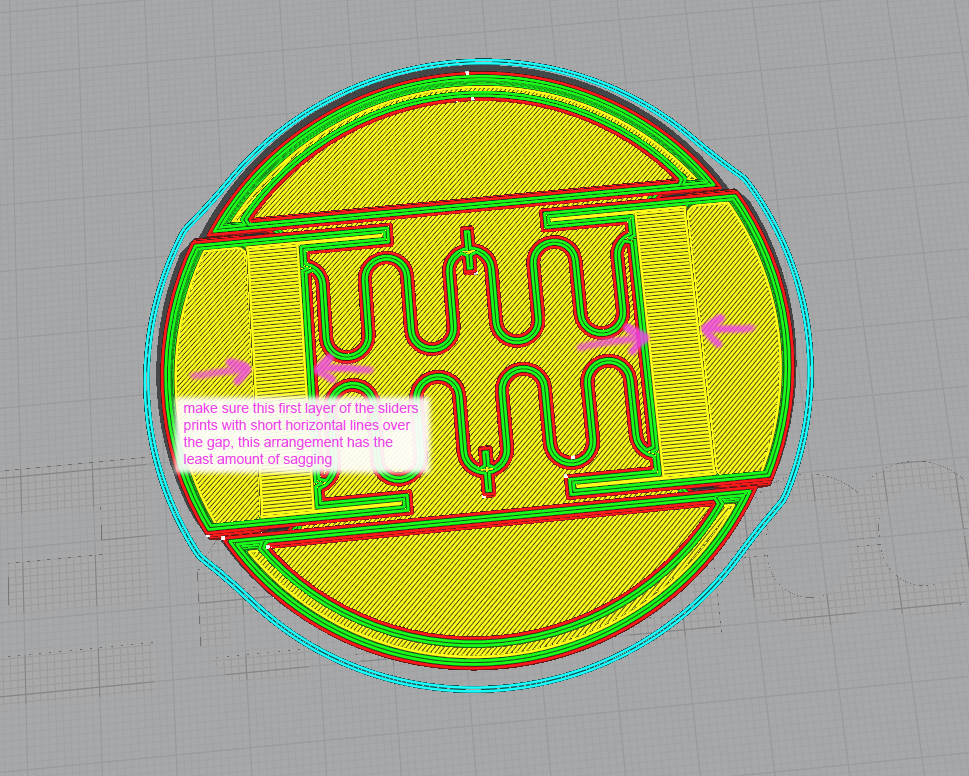
This model is print-in-place and involves moving parts. There's a small gap (0.3mm) between the cap body and the thumb sliders and spring. The sliders also print what is effectively a solid bridge layer above the body of the lens cap, where if they don't print well, will introduce too much friction which messes with the spring tension. Here are the important settings I used that I think will be a good start for you as well (note: I use Cura, so some of these will use Cura names… you should be able to Google some of these settings for your slicer if you are not familiar with them).
- Layer height: 0.3mm
- Initial layer height: 0.25mm
- Line width: 0.5mm (this will make the whole model solid with no infill… we like that)
- Wall count: 3
- Bottom layers: 4
- Top layers: 5
- Infill: 0%
- Top/Bottom line directions: [45,-45,90] (here, it is important that the first layer of the sliders is printed the short way over the gap… check this in the preview to make sure – see the image below)
Notes
The orange lens cap is Boopidoo's version, while the pink caps are iterations of my own design. They were all printed on an Elegoo Neptune 2 with a 0.4mm nozzle in Polymaker PolyTerra orange and candy pink filament.