
GoPro knob with enclosed M5 nut
Obliczymy ostateczną cenę na podstawie wybranego pliku. Sprawdzisz ją i zaakceptujesz przed płatnością.
Zapisane na tym urządzeniu.

Small knurled knob with embedded M5 hex nut (inserted into paused print) for GoPro mounts to counter regular M5 screw.
- Ocena
- 5 / 5
- Polubienia
- 17
- Pobrania
- 168
- Wydruki
- 1
- Wyświetlenia
- 1012
- Oceny
- 1
Aktualizacja u źródła:
Informacje o modelu
- Źródło
- Printables
- Kategoria
- Photo & Video
- Licencja
- Creative Commons — Attribution — Noncommercial — Share Alike
Many models involving a GoPro mount use a screw embedded into a printed handle and then rely on a nut in the mount to screw in. Frank's Prusa Mk3s camera uses a different method which inspired this model here: embed a nut into the handle, and use a regular M5 screw for the holder with a custom mount.
I didn't like the large handle, so I created my own smaller version that just embeds the nut and has a knurled surface for easy handling (I have used this tutorial to learn about creating a knurled surface in FreeCAD). It does not get in the way when working on my printer (for which I used the knobs). I have not tested this in large camera or outdoor scenarios.
There are two versions: the regular version of is about 8mm high. It's the minimal version to just enclose the nut properly. The longer version is 2mm higher and has an extra space behind the nut. It depends on the specific mount model whether you need the regular or the long version: dependingon the thickness of the third prong holding the screw is embedded in. Sometimes a 20mm screw is just too short, while a 25mm one protrudes just a little too much, which is when the long version comes in handy.
Print Instructions
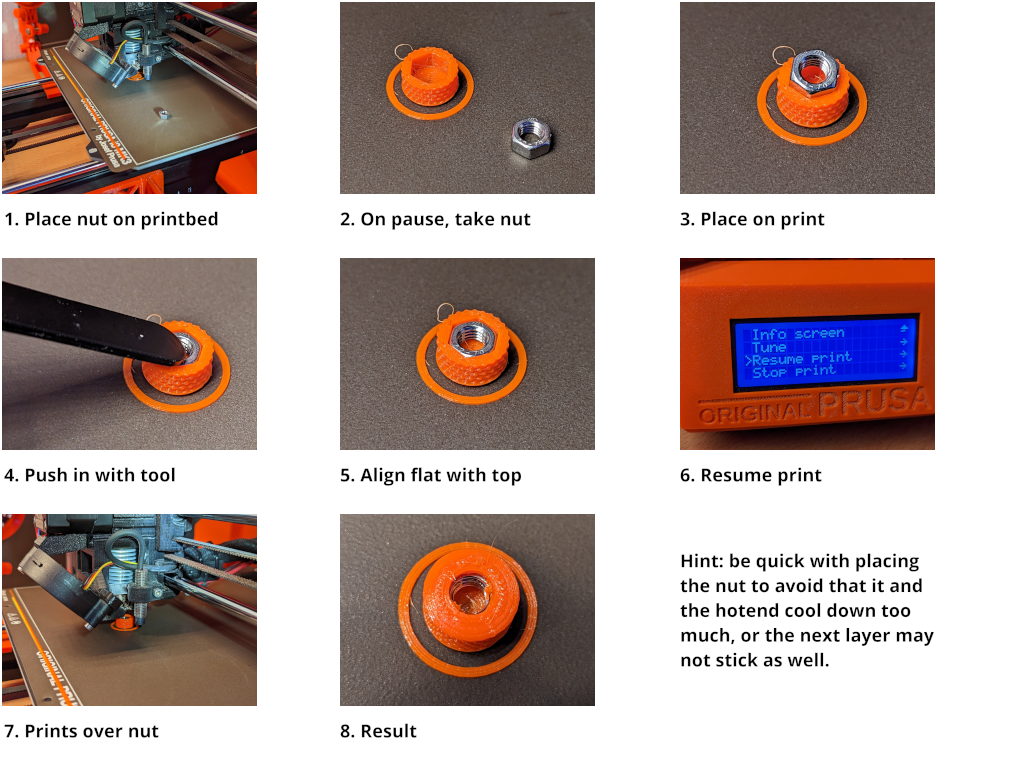
The print must be paused to embed the M5 nut. The provided G-Code files do that at the appropriate later. When you slice yourself, add the pause to the first layer above the nut (that “shrinks” the inner space for the nut again).
You need to preheat the nut so that the next layer works properly. Just place the nut on the printbed until the pause. Perform the nut insertion quickly and resume the print so that the nut does not cool down too much (otherwise you may see increased stringing as shown in the pictures above)! The following images describe the process.
| Printer | MK3s+ |
| Filament | Prusament PETG |