
Bambu Lab P1P Lite Enclosure
Obliczymy ostateczną cenę na podstawie wybranego pliku. Sprawdzisz ją i zaakceptujesz przed płatnością.
Zapisane na tym urządzeniu.

Stylish enclosure for your printer 😁
- Ocena
- 5 / 5
- Polubienia
- 312
- Pobrania
- 1904
- Wydruki
- 15
- Wyświetlenia
- 15 253
- Oceny
- 11
Aktualizacja u źródła:
Informacje o modelu
- Źródło
- Printables
- Kategoria
- Bambu Lab Parts & Upgrades
- Licencja
- Creative Commons — Attribution — Noncommercial
This enclosure features acrylic side panels and possibility to showcase your P1P in 2 colors. I chose orange to match my current setup :)
It uses around 700-800g of filament in total. Please use brim so it sticks to the bed properly !
I have a kit available, all the acrylic panels, plus screws and bits :)
EU: https://shop.netlaser.de/products/bambu-lab-p1p-lite-enclosure
Thank you to Netlaser for providing EU based kits :)
Acrylic CAD/ SVG file will follow. So you can get it laser cut. It can be all done with 3mm thick acrylic and the top is recommended in 5mm if you wish to put the AMS on top.
official notes and instructions from Bambu Lab:
https://wiki.bambulab.com/en/p1/manual/precautions-for-P1P-enclosure
Instructions PDF below. It is quite barebones, so please ask if anything is unclear.
Update 10-May-2023
- added a printable file “Rear-AMS Hub-Adapter” for those who use AMS on their P1P. This allows the HUB to be screwed on. From now on all acrylic panels will be shipped with a cut out to accommodate the HUB at the back. Laser cut .dxf has also been updated.

Update 11-May-2023
- added a printable file “Acrylic-Holder (P1P-Apr-2023 Version)” for those who have a P1P shipped with the LED preinstalled (post April 2023). This way the holder still fits one M3 nut and and there's no change to the laser cut acrylic panel.

Update 28-May-2023
- I updated the printable file “Door-Handle-6mm Magnet” so it fit's a 6 x 2mm magnet to get a stronger door-to-frame grip.

Update 09-July-2023
- Since the design is quite simple I added a make where you only print the fronts and give your P1P a cleaner look.
- available here: https://www.printables.com/model/489870-bambu-lab-p1p-clean-look

BOM
(x4) M3 40mm
(x24) M3 10mm
(x16) M3 5mm
(x16) M3 Nut
(x1) 6mm x 2mm strong round magnet
The black plastic threading screws included with the P1P.
Video for installing the chain, really easy !
I recommend installing the chain available on the Bambu official store:
https://uk.store.bambulab.com/products/cable-chain-assembly
I also recommend an M3 tapping bit. Makes the installation much easier.
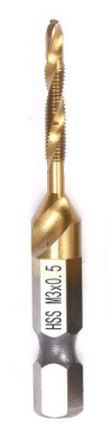
You can just put the bolt in without tapping, but it might be quite hard and even strip the bolt of its threads. The black M3 bolts included with the P1P are very good for tapping, so you can use those.

Support only required in these 2 stand offs. Supper easy to remove and apply !