
tutorial: molded leather valet tray with 3D printed mold
Obliczymy ostateczną cenę na podstawie wybranego pliku. Sprawdzisz ją i zaakceptujesz przed płatnością.
Zapisane na tym urządzeniu.

let's use 3D printing to make something else!
- Ocena
- 0 / 5
- Polubienia
- 108
- Pobrania
- 219
- Wydruki
- 1
- Wyświetlenia
- 2123
- Oceny
- 0
Aktualizacja u źródła:
Informacje o modelu
- Źródło
- Printables
- Kategoria
- Home Decor
- Licencja
- Creative Commons — Attribution — Share Alike
Little known fact: I bought my first 3D printer so that I can print leather embossing stamps. This actually works pretty well if you are interested in it yourself. So to go back to my roots for a bit – and fitting with the Catch-All Trays contest – let's make a leather tray using 3D printing!
My girlfriend sees these trays at various stores and boutiques all the time, but they tend to be priced in the $100+ range. I accidentally let her know that I can easily make them. So while I thought, while I do that, I should teach you to make them too. It's actually pretty easy.
As you can tell by the photos, my girlfriend has already claimed this tray for her jewelry, and has already requested several more as gifts for family and friends. These make great gifts!
Crash course in leather work
Small leather goods – think wallets, trays, sheaths, even some jewelry – are usually quite expensive. However, that is largely because working with leather is a highly manual – and fairly artistic – process. Leather, as a material, is quite affordable and more easily accessible than you might think.
For this project, and really most artisan/maker projects, you will need vegetable tanned leather (or veg tan for short). When searching online, you might also find it called tooling leather. This is different from chrome tanned, upholstery, or garment leather, which will not work for us.

Natural vegetable tanned leather will be a very light pale color (see the tray in the photo above). As it ages, it will naturally get darker and darker. The wallet in the photo above started from the same pale leather as the tray, but has spent a year in my pocket). So when you see really pale leather, don't shy away from it because it seems ugly – this is actually the best leather. If that is still something you don't want, dyed leather is fairly easy to find as well.
Vegetable tanned leather comes in various thicknesses. What I am using for the project is referred to as 5-6oz leather in the US (because who doesn't measure size in weight), or about 2.5mm anywhere else. About 2 to 2.5mm is ideal for this project, while 3-4oz leather (about 1mm) is better for wallets.
Now, let's talk about how to get leather affordably. First, if you really want to get into leather work, the best way to buy it is by the shoulder (quarter hide), side or double shoulder (half a hide), or whole hide. You can get a double shoulder on Amazon for roughly $45, which will get you about 7 to 11 square feet – these pieces are usually irregular, so it is safest to assume the lower end. You can also find pre-cut pieces, though those will tend to be a bit more expensive. For example, here is a 12x12 inches for $16, or 12x24 inches for $27, or 6x12 inches in various dyes for $13. Other stores you might try are District Leather Supply, Springfield Leather, or Rocky Mountain Leather. If you want to buy leather locally, a good place to try is Tandy Leather in the US. You can also search for a tannery near you.
For small crafts like this, however, there is a secret. Shops and tanneries will always generate scraps, due to the irregular nature of leather. Frequently, they will package these scraps and sell them for very little. Tandy Leather is likely to have them, and you can search online. In fact, the piece I use in this tutorial is a scrap, and my order of 2LB had 4 pieces of roughly this size, 1 much larger piece, and a good handful of slightly smaller pieces. 2LB should go for around $10-$15, and you can search for them online on Amazon, eBay, and etc. Sorry, I don't have links for you, as these are more transient.
Tools
In addition to some leather and your 3D printed mold, you will need a few tools for this project. I will create two lists: required and recommended.
Required:
- C-Clamps or other similar clamps. You will almost certainly not be able to mold your leather by hand. C-clamps are the most common way to do it. If you don't have any already, you should get some, they are very useful. You can get 4 for $24. You may also consider getting some deep reach c-clamps as well, just in case.
- Stone board, though a wood or plastic cutting board may also work. Just something solid to clamp to. Marshall's always has these and they are really cheap. If you get a stone board, you will likely be able to also use it for other things. A cheap wood or plastic board would also work, but you will probably scuff it up really bad and it will be relegated to your workshop forever, so don't use something really nice.
- Sharp knife. A razor or x-acto knife works well. If you want to get more into leather, I would recommend a skiving knife.
Optional:
- Bottled water. High iron levels in your water could react with the leather, creating black mold-looking spots. They are harmless and not actually mold, but they do look quite ugly. If you know this is you, you might want to get bottled water for this project.
- Plastic wrap. You might want this to prevent metal shavings from your clamps from getting to your leather. These shaving will also cause the same mold-like black spots.
- Sand paper. This can be used both for your mold – getting rid of layer lines, as they will transfer to your leather – and also for the tray itself – sanding down the edges of the leather gives it a neater look.
- Some kind of stick, or a real leather burnisher… which is just a fancy stick. This can be a wooden spoon, the handle of a tool, literally a stick from your yard (just get any mud off of it), or even a thick sharpie marker. Raw edges are in these days, but if you want to finish them, this will help.
- An inert oil. This is to rub on your leather. Coconut oil works really well, and you might already have this. Neatsfoot oil is what professionals use, and is also quite inexpensive, especially if you are going to make a bunch of these. In a pinch, even Vaseline will work well though (protip: a lot of professional leather products are mostly Vaseline with a couple of additives… leather is after all just skin). Refer to the instructions further down.
- Ruler and calipers. These are for measuring.
Making your mold
First, as always, we measure.

The piece which I am using is 160x150 millimeters. The leather will stretch a bit as you mold it, but you do want a little bit of overhang, so the size you go with should be a bit smaller than the leather itself rather than an exact amount. Also, measure the thickness. I forgot to do this, but I store my leather in labelled batches, so I assumed it was 2.5mm (don't assume like me, you should measure it). You will also need to decide how deep you want your tray to be (keep in mind that the depth takes away from the total size). If you are unsure, I recommend 15 to 20 millimeters. I chose 15mm for mine, resulting in a final tray that is 130x120 millimeters, just to give you some idea of what to expect.
Now, I have attached the STL I made for this tutorial, but your piece of leather (or maybe just your designed size) will be different from mine. But that's okay, because I am here for you. Since I don't know how to create parametric models (or whatever it is that the cool kids are doing) – and let's face it, I should not assume you know how to use those either – I made a Codeblock on TinkerCAD.
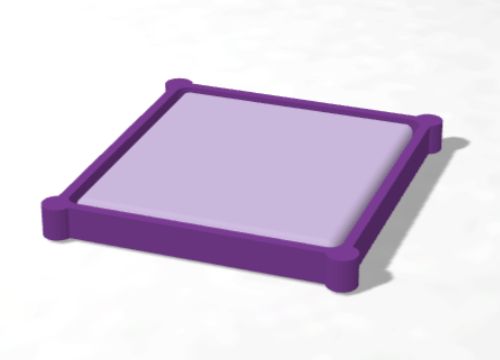
https://www.tinkercad.com/codeblocks/l83CQPGTpy7?sharecode=qAZ_1iQCJiNw-ITT0iLynv9b-e47okwF-DWIIaNZFLsYou can copy this code block, input the 3 measurements we just took and the one arbitrary number, and bam! Your own custom STL (I wonder if this is going to tank my download numbers 🤔). Also, do keep in mind the size of your printer bed.

Create your custom STL, export it, and let's move on.
Print settings
First, use a tough and non-elastic material. Most PLA+ and PLA pro filaments will work for this (note: don't use matte filaments, these are usually quite weak). I used a really old roll of Sunlu PLA, and have successfully used Tpoimns PLA in the past as well.
Here are the settings I recommend for good strength, surface finish, and also speed.
- Extrusion width / Line width: 0.8mm (wide extrusions help with strength and speed)
- Layer height: 0.2 to 0.3mm (I use 0.3mm, but you might get away with little to no sanding with smaller layers)
- Wall count: 3
- Top layers: 5
- Bottom layers: 2
- Infill density: 10%
- Infill pattern: gyroid
- Ironing: yep (imperfections in your top layer can transfer to your leather)
If you want to speed up your print time, you can split your model into 2 (PrusaSlicer has that option built in, Cura has a plugin). When you split them, use these settings for each part:
Inner tray mold
- Wall count: 2
- Top layers: 5
- Bottom layers: 2
- Infill density: 10%
- Infill pattern: gyroid
- Ironing: yep (imperfections in your top layer can transfer to your leather)
Outer frame
- Wall count: 4
- Top layers: 0
- Bottom layers: 2
- Infill density: 0%
- Ironing: no, it's not important for the frame
This will speed up your print a bit and use a bit less filament.
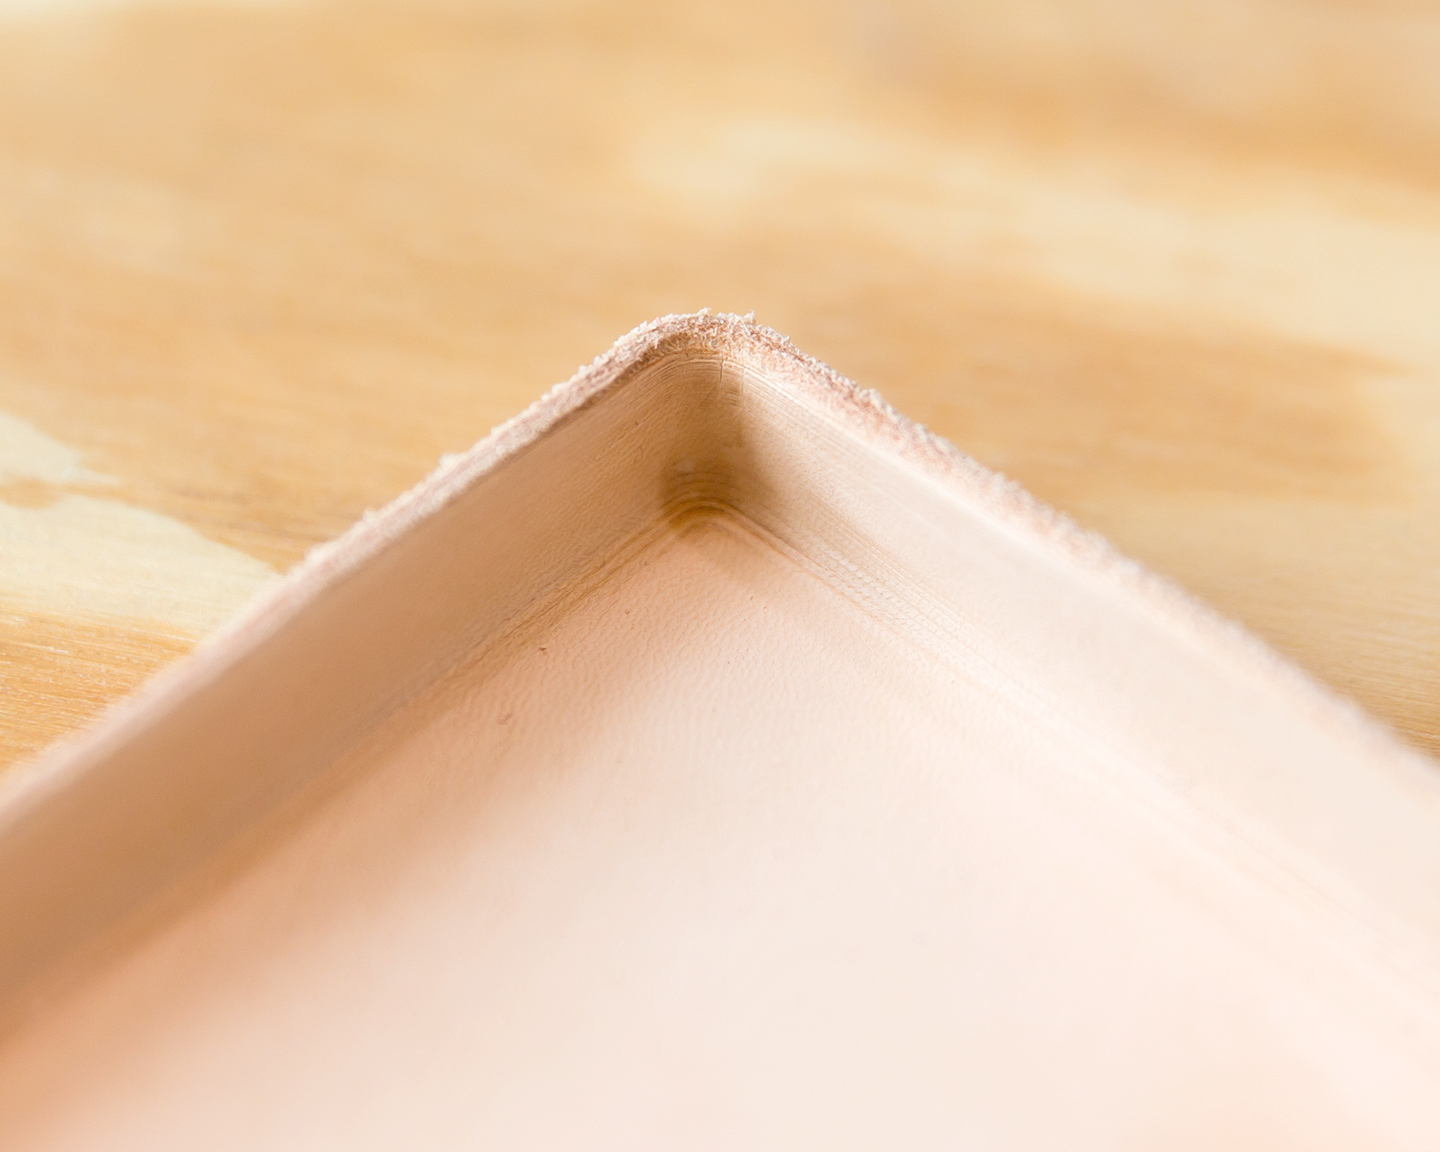
Use your best judgement on whether you want to do any sanding on the inner tray mold. Especially at the top where the mold curves, the layer lines will transfer to the leather. In mine, I used the worst case scenario – printing with 0.3mm layers and no sanding – to show you what that looks like.
Making your tray

Ready? This is the moment you've been waiting for.
1. Soak your piece of leather in water. Yep, we are wet molding. This is actually very safe, despite everyone telling you that you must never get your leather wet. Go on. This step will make your leather quite floppy and malleable, perfect for molding. Use a baking sheet, large bowl, or even rolled up in a vase or something. Just make sure it is fully submerged. It will make a lot of bubbles and even a fizzy sound when you put it in. Keep it in there until all the bubbles stop. You want it soaked all the way through, otherwise it will be hard to mold. This can take about 10 to 20 minutes.

2. Optional: If you want to go crazy, you can mix in some food coloring or RIT dye if you want to color your tray (or you can use a leather dye at the end… or leave it natural). If you do this, I recommend soaking it for a bit longer.
3. Take your leather out and dump the water (try not to make a giant mess like I did). Make sure to wash whatever you dish you used for soaking, since leather can leach some pretty nasty chemicals from the tanning process into the water. They won't damage anything, but you don't want to risk any residue getting into your food. Don't just dry the dish and put it away.
4. Leather has two sides. I'll call them the smooth side (the part with the skin) and the fuzzy side (the back, where you will see loose fibers). Place the inner tray mold on your board, curved ironed side up. Place the piece of leather on top with the smooth side down on the mold. The smooth side will become the inside of your tray. Place the the outer frame on top – I recommend placing it bed side up, upside down from how it printed. Make sure you center everything well. The leather will stretch just a bit when you mold it, but still, try to make sure that no sides are too short.
5. Optional: Sandwich your leather in some plastic wrap. Little metal shavings (or rust) may flake off of your clamps and fall onto the leather. Remember those chemicals we talked about leeching into the water? Well, when they mix with iron, they will create black spots that look like mold. The spots are harmless and not in fact mold, but will look quite ugly.
6. Take a deep breath. This next part can be a little complicated, especially if you are clumsy like me. You are in no rush, your leather will be malleable for quite a while. Go slow.
7. With the four clamps, place one on each corner and start clamping down. Start with the clamps just tight enough to hold on, and then alternate tightening until the frame reaches the bottom. If things shift around a bit, it's okay, you won't see any of the marks in your final piece. Just make sure you keep everything centered.

8. Once everything is clamped down, just wait. It can take 24 hours (or more like 3 days if you wrapped your leather in plastic wrap) to dry, so if you are patient, just wait that long. But also, there are some optional steps to speed things up.
9. Optional: The leather will take it's shape in about an hour. After this, you can take the clamps off, and take your plastic wrap off if you used any. With all the optional steps, your tray will be done in about 24 hours, maybe a bit less.
10. Optional: If you want to be really fancy and emboss your logo in the leather, this is when you would do that. I will leave this as homework to the reader, since this is a bit more advanced. Feel free to ask me about it in the comments if you'd like.
11. Optional: I noticed that my tray was bowing a little bit on the bottom. I flipped it over and clamped it down to the stone board again for… a little while. It was maybe an hour? This is not really required, since leather trays will always be imperfect at the end anyway. Plus, if you do oil it, the bottom will soften back out a bit and sit flat. So really… just skip this part.

12. Optional: At this point, I rough cut the extra bits off the leather, leaving just a small edge around the tray.

13. Optional: We will put the tray back in the mold now. Since it is holding its shape, we can do that by hand. I like to pull the outer frame up higher than the edge, so that instead of having the edges of the leather become parallel with the bottom, they now stick up perpendicular to the bottom. This will make final trimming easier. If you pull the frame too far, no worries, just take it apart and try again. This step is pretty forgiving. (Oops, I apparently forgot to take a picture of this part. Sorry! But I believe in you!)
14. Once dry, you are ready to do the final trimming. Take the outer frame off your mold. I like to keep the inner mold in the tray, and then keep my knife on top of the mold as I cut around the perimeter. This makes sure we get a nice even cut. Technically you are done now, but we can clean up the tray a bit and make it more professional looking.

15. Optional: The edges will be quite square and sharp. Take some sandpaper and break the edges, almost rounding them over. This will leave your edges a bit fuzzy.
16. Optional: If you are using leather dye, now is the time to do it. I don't like dye though, and I will probably judge you.
17. Optional: Vegetable tanned leather can form a nice shiny edge. Remember that optional stick? This is where you want it. Get a small cup of water. Using your finger, spread some water along the edges of the tray, just a small thing amount, and then rub it back and forth with the stick. You will see the edges start to get really smooth, and will also make the edges a bit darker. You can repeat this as much as you want, each time your edge will get better and better.
18. Optional: Your leather will get darker over time. If you want to give it a bit of a head start, you can oil it. Take whichever oil you picked when you thoroughly read the materials section and just… rub it on the leather. Rub both the inside and outside. It will look a bit splotchy and uneven when you first put it on, but that's fine, it always events out as it dries. Use a liberal amount, but not too much. If you use too much, months from now (especially when it is cold outside), the oil may come out of the leather and form a thin white film. If this happens, you can always just wipe it right off. Oil helps the leather darken faster though, and a little bit will definitely look nice. A little liberal bit.
That's it! You have a high-end leather tray now. And you used your 3D printer to make it! Aren't you excited?!
