
Minimalist wall lamp
Obliczymy ostateczną cenę na podstawie wybranego pliku. Sprawdzisz ją i zaakceptujesz przed płatnością.
Zapisane na tym urządzeniu.

One fourth of a sphere: it's that simple, yet beautiful.
- Ocena
- 5 / 5
- Polubienia
- 51
- Pobrania
- 135
- Wydruki
- 3
- Wyświetlenia
- 1505
- Oceny
- 2
Aktualizacja u źródła:
Informacje o modelu
- Źródło
- Printables
- Kategoria
- Other House Equipment
- Licencja
- Creative Commons — Attribution — Noncommercial — Share Alike
A minimalist wall lamp: one fourth of a sphere, that's it.
Designed to be printed as large as possible on an AnkerMake M5 (235×235 mm); finished size is 270×135×135 mm.
I used the experimental fuzzy skin feature on PrusaSlicer, and it makes for a great effect – with different settings – both on the shade part and on the base.
Clearly, don't use anything else than LED light bulbs: we are printing in plastic!
Other materials needed
- a G9 light bulb socket
- a G9 LED light bulb
- a connector to the power line: I used (and designed a slot for in the model) a KF128 connector, but it can easily be adapted to most other small connectors
- hardware to hang it on the wall: 2 screws which should have ⌀3.50-3.75 mm and have a head of ⌀5.0-7.8 mm and < 2mm thick. Note that a drilling mask is also provided with the STL files.
Print Specs
Shade
- Clear PETG
- Layer height: 0.28 mm
- Infill: 100%
- Fuzzy Skin, if desired: use the provided Shade_fuzzy_mask STL file to mask only the shade surface, and not its supports. Settings:
- Fuzzy Skin: Outside walls
- Thickness: 0.3 mm
- Point distance: 0.8 mm
- No brim, no skirt, no supports: they are already built in the model
Do expect a bit of warping with this kind of thin shape, but especially if you print it with the fuzzy skin it is really barely noticeable.
I assume that it could also be printed with clear or white PLA, for a different effect. Do beware of the lower temperature that PLA can withstand with respect to PETG.
Base
- Black matte PLA+
- Layer height: 0.16 mm
- Infill: 15%
- Fuzzy Skin, if desired: use the provided Base_fuzzy_mask STL file to mask only the external surface, and set:
- Fuzzy Skin: Outside walls
- Thickness: 0.1 mm
- Point distance: 0.1 mm
G9 socket adapter
Since not all G9 sockets are the same shape, I thought it better to design an adapter for the one that I got. Its shape is quite a common one, and this adapter should fit many.
If you have a different one, redesigning just the adapter is pretty easy, compared to modifying the shape of the base itself.
Just for reference, this is the socket I used, and it is the one this adapter is designed for:
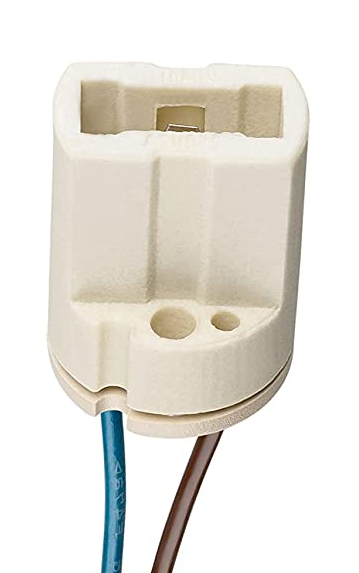
It is a pretty easy and cheap one to find in Europe on Amazon and, no doubt, in other countries as well.
When printed on a printer with tuned tolerances, this socket adapter should press-fit into the base and lock the socket in place.
If you remake this socket adapter for other types of sockets and want to send me the STL file, I will gladly add it to the files.
Cable lid
Not mandatory, but it makes for a nicer finished look. Print it with the same filament and params as the base.
Putting it together
It is really super simple, but here are some pictures, just in case:


Simplified print
If you just want a quick'n'dirty print and don't care about fuzzy skins and other details, you only need to print the files:
- Base
- Socket_adapter
- Shade_with_support