
Falcate Bracing Mold for Acoustic Guitars
Obliczymy ostateczną cenę na podstawie wybranego pliku. Sprawdzisz ją i zaakceptujesz przed płatnością.
Zapisane na tym urządzeniu.

A simple mold for creating bent laminated bracing for an acoustic guitar in the Trevor Gore style.
- Ocena
- 0 / 5
- Polubienia
- 15
- Pobrania
- 94
- Wydruki
- 0
- Wyświetlenia
- 941
- Oceny
- 0
Aktualizacja u źródła:
Informacje o modelu
- Źródło
- Printables
- Kategoria
- Music
- Licencja
- Creative Commons — Attribution — Noncommercial
These files represent my best attempt at creating two-sided molds for creating the curved primary and secondary braces used in Trevor Gore's “falcate” bracing design. If it isn't obvious, I am in no way affiliated with Trevor Gore and have no claim to his original falcate design. The amount of work he has put into the science of acoustic guitar design is incredible, and he and his cohort are deserving of all the credit for their work.
Originally, Trevor Gore's construction technique involved creating a single mold for the inner contour, and making use of a strap clamp to conform the spruce strips to the contour. This technique is as good as anything and certainly works for him - I just found it too fiddly, and prefer the security/splitting insurance of having an outer mold there. Also bear in mind that this represents my best approximation of Trevor Gore's design for a steel string guitar, not an exact replica.
This is clearly not a highly refined model in terms of polish, but the critical dimensions and curves are there. The gap between the two pieces of each mold should accommodate three spruce strips totaling 5-5.5mm in width. This should give you enough wiggle room to go back and scrape/sand down the completed braces to final dimension.
Printing instructions:
All the perimeters! The more walls and higher infill you throw at this, the better. It all depends on how much material and print time you'd like to throw at it - expect to use close to half a roll of filament for the full size primary brace molds! Make sure any z-seams are not on the inner curves of the molds. Printing with a skirt may also be necessary to prevent the corners from curling up.
I printed my molds in PLA without issue - this is a situation where rigidity is the primary goal, so PLA is a good candidate over something like PETG. More stiff/rigid filaments should work that much better!
If you're skeptical of how well the molds will hold up, or have more wood than filament to spare, feel free to print off the router template versions and use them with a pattern bit to make MDF/Plywood/etc versions. I've also added “pre-drilled” variants for each template.
Printing the full-length mold for the primary brace requires at least a 350x350 print bed, but I created a trimmed down version that should fit 200x200 print beds. This version contains only the critical curved portion. Keep in mind that additional clamps and cauls will be necessary to ensure the remaining length of the braces are laminated properly.
How to use the forms:
Milling the brace wood
Cut your spruce brace wood into roughly 1.8mm-1.9mm strips long enough to fill the complete form. Feel free to go thicker, but bear in mind that you will need to sand/scrape off any bandsaw or table saw marks, and shoot for a final thickness of 1.67mm. Remember, the goal is for three strips laminated together to have a final thickness of 5mm.
Keep the height of the strips as tall as possible during this process, as you can create one 20-25mm tall brace, then split it down the middle on a bandsaw to create two mirrored braces close to the desired final height.
Bending
Once you have three strips of the correct thickness, you will need to bend each of the strips to the rough shape of the form's curves. It is technically possible to achieve this by boiling/steaming the brace pieces and clamping them into the form to dry for a few days. However, it is advisable to pre-bend each piece on a bending iron to minimize spring-back before placing in the form to dry. Either way, let the braces get used to their new shape in the form for a good long while before gluing them up:

The Glue-up!
Once each strip is close to holding the final curve without excessive pressure, you should be ready for the glue-up! Remove the spruce strips, then apply clear packing tape, wax paper, or your preferred non-stick substance to both halves of the mold - a little mold release never hurt either! Gore laminates the strips using structural epoxy, and I'm not one to argue. There's a chance titebond or animal protein glues could work similarly, but your mileage may vary. Spread an even layer of your glue of choice thoroughly to the mating surfaces of each strip, align them in the mold halves, and clamp tight! Be sure to keep the two halves of the mold (as well as the spruce strips) well-aligned and flat, as they will want to shift a bit as pressure is applied. Clamping the whole rig to a flat workbench/surface is advisable - just make sure you've got something non-stick laid down!
After your adhesive is FULLY cured, remove the new falcate brace from the mold. Assuming you started with tall enough material to start with, you can now split the braces down the middle to get your mirrored falcate braces! Repeat the process for your secondary falcates, and the most challenging braces are complete!
What next?
There's a lot more to this process to go before you have a fully braced guitar top, but that's up to you to figure out. Even better, why not support the originator of this awesome design by either purchasing his amazing books or paying for one of his online courses where he goes through the entire bracing process from start to finish?
Check him out!
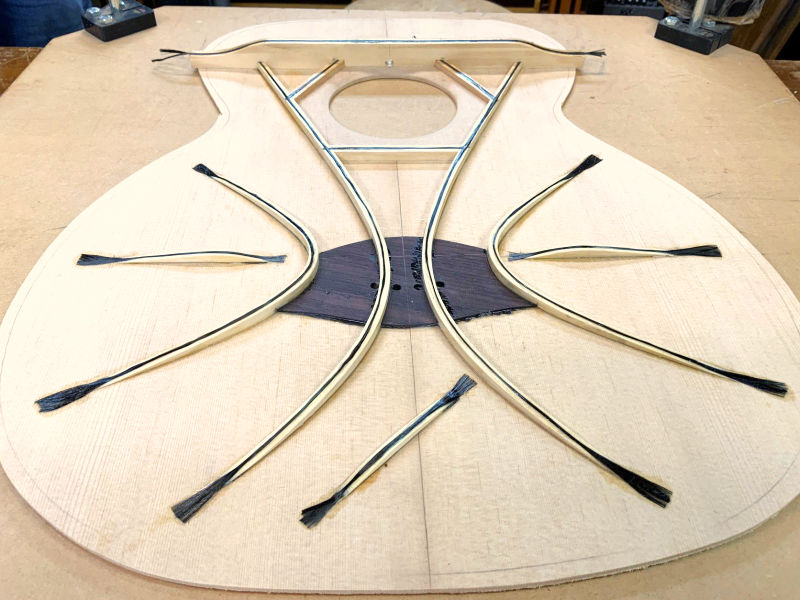
(image credit: https://lutherieacademy.com/courses/falcate-bracing)