
FLSUN SR LIGHTING
Obliczymy ostateczną cenę na podstawie wybranego pliku. Sprawdzisz ją i zaakceptujesz przed płatnością.
Zapisane na tym urządzeniu.

LED lights with switch for the Super Racer printer with instructions. (Soldering Required)
- Ocena
- 5 / 5
- Polubienia
- 27
- Pobrania
- 106
- Wydruki
- 1
- Wyświetlenia
- 2447
- Oceny
- 1
Aktualizacja u źródła:
Informacje o modelu
- Źródło
- Printables
- Kategoria
- Other Printer Parts & Upgrades
- Licencja
- Creative Commons — Attribution — Noncommercial — Share Alike
DISCLAIMER: Make this upgrade at your own risk, always do your research and make sure to solder in a well ventilated area and always make sure to have the power turned off on the printer before installation!!!
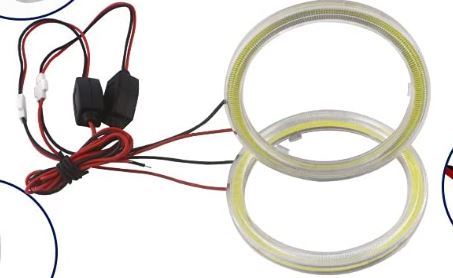
Description: There are times where I got sick of using my phone light to see the important first layers. This design uses two 103mm LED ring lights with a 12-24 buck converter and switch using the Flsun's onboard 24V source located on the top of the printer for power. No more are the days of me holding my phone up against my enclosure. Soldering and installation is relatively straight forward but read instructions unless you're feeling a bit adventurous.
Parts list at the bottom!
Everything is built to be compatible with my enclosure. Link here: https://www.printables.com/model/405015-flsun-sr-enclosure
Instructions:
You only need 1 ring for good lighting (but I used two since the lights come in a pack of 2), the print uses at least 2 M4x8 screws for mounting each of the lights.
The Board
Notice below that the board that my Flsun SR came with is the robin nano v3.1. However, some SR's may not use this board so make sure you do your research to see what type you have what connector type you need.
For this board, there is only one 12/24V output on the top left we can use. I have split this source into two outputs with a separate buck converter each (one for a fan filter in the future). For this project, you will only need buck converter so ignore the second one that I will be using.

The Switch(s):
There are two switches shown, but you will only need to look at the light switch, ignore the other one (future project). We will be using the grills on the printer as screw holes for mounting the switch with M3 short screws (Only need 1 screw). INSTALL THE SWITCH BEFORE SOLDERING. IT IS NOT POSSIBLE WHILE SOLDERED TO CIRCUIT!!!


The LED's
You will only need one LED ring for good illumination, however mine came as a pair, so I designed it with a optional second ring. Each LED ring comes with a regulator. I de-soldered the output and fitted it with JST connectors for easy installation and removal.

Circuitry and Soldering
Below are a few images (it may be confusing so I added a (not good, sorry, but hopefully readable) schematic of the circuit). Again the 2nd buck converter is for a different project so ignore that. The input comes from a female JST connector that goes from the board into the buck converter. The output connects the switch and then the 2 output male JST connectors (1 if you only want to make 1 ring light) which then connect to the previously soldered on female JST connectors. Optionally use the buck converter to adjust light levels (You can see a small Philips screw that can be adjusted). BE CAREFUL NOT TO SHORT THE CONVERTER OR SPARKS WILL OCCUR AND ALWAYS BE CAREFUL AROUND HIGH VOLTAGE SOURCES.


Installation:
After the circuitry is done, simply mount the rings to the prints (I did not peel the tape since it is friction fitted). Thread the wires through the center hole and use at least 2 M4x8 screws to mount the LEDs anywhere you want on the grills. And after turning the the printer, the LEDs should turn on after flipping the toggle switch.

I hope all this helps, if you have any questions or suggestions, leave them in the comments and I will try my best to get back. Thanks for the support and feedback I really appreciate it! :)
PARTS I USED
DISCLAIMER: (These are Amazon affiliate links, which means you can help support me at no extra cost to you if you make a purchase through these links.)
- https://amzn.to/3ZAhVyU - 103 MM 12/24V Led Rings
- https://amzn.to/3K1TRPN - 24V Buck converter (6 pack)
- https://amzn.to/3JVdpp6 - Round Toggle Switches
- https://amzn.to/3GxEE8v - 5 Pairs of JST-XH 2.54MM Pin Connectors (Important to connect to printer power source)
- https://amzn.to/3IgufxZ - M3 and M4 Screws I used (Comes with M3, M4, M5 screws of various sizes)
- https://amzn.to/40rbM9H - CCTREE PLA+ Black Filament. (Filament I used. Find any you like)