
Guitar Hero/Clone Hero controller
Obliczymy ostateczną cenę na podstawie wybranego pliku. Sprawdzisz ją i zaakceptujesz przed płatnością.
Zapisane na tym urządzeniu.

Clone hero controller made with RPi Pico
- Ocena
- 5 / 5
- Polubienia
- 183
- Pobrania
- 395
- Wydruki
- 2
- Wyświetlenia
- 8199
- Oceny
- 2
Aktualizacja u źródła:
Informacje o modelu
- Źródło
- Printables
- Kategoria
- Video Games
- Licencja
- Creative Commons — Attribution — Noncommercial
Clone hero guitar assembly manual
This is the assembly manual for clone hero guitar.
Needed parts
- All the printed parts (the amounts can be found in the description of every model)
- Parts you need to buy:
- 1 x Raspberry Pi Pico (Raspberry Pi Pico – Raspberry Pi)
- 2 x Microswitches; I bought microswitches from the local store, but they are the same as microswitches on link with 17mm lever
- 2 x Roller bearing 606-2RS or any 606 bearing will do; I have bought one of the cheapest in local store and it is pretty smooth (606 bearing)
- Aluminum pipe 8x1 mm - 2pcs of around 30-40 cm depending on guitar size
- Screws / nuts:
- 4 x DIN 912 M2x5
- 4 x DIN 912 M2x12
- 9 x DIN 912 M3x8
- 12 x DIN 912 M3x12
- 10 x DIN 912 M3x16
- 4 x DIN 912 M4x16
- 20 x DIN 562 M3
- 4 x DIN 934 M4
- Threaded inserts:
- 8 x M2 x 3 (Image for reference)

- 11 x M3 x 3 (Image for reference)
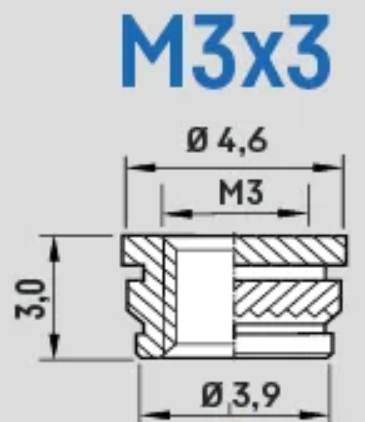
- 8 x M2 x 3 (Image for reference)
- The wires for connecting switches to Raspberry Pi Pico;
- Tools:
- Allen wrench (1.5, 2.5, 3) - for tightening all the screws
- Soldering iron and all the equipment needed for soldering.
- Pliers for cutting the wires and removing insulation.
- Blade for cutting aluminum pipes
Printed Parts
All of the parts were printed in PETG with layer height of 0.2mm.
Assembly
Nuts and threaded inserts
Image shows position of different nuts and threaded inserts
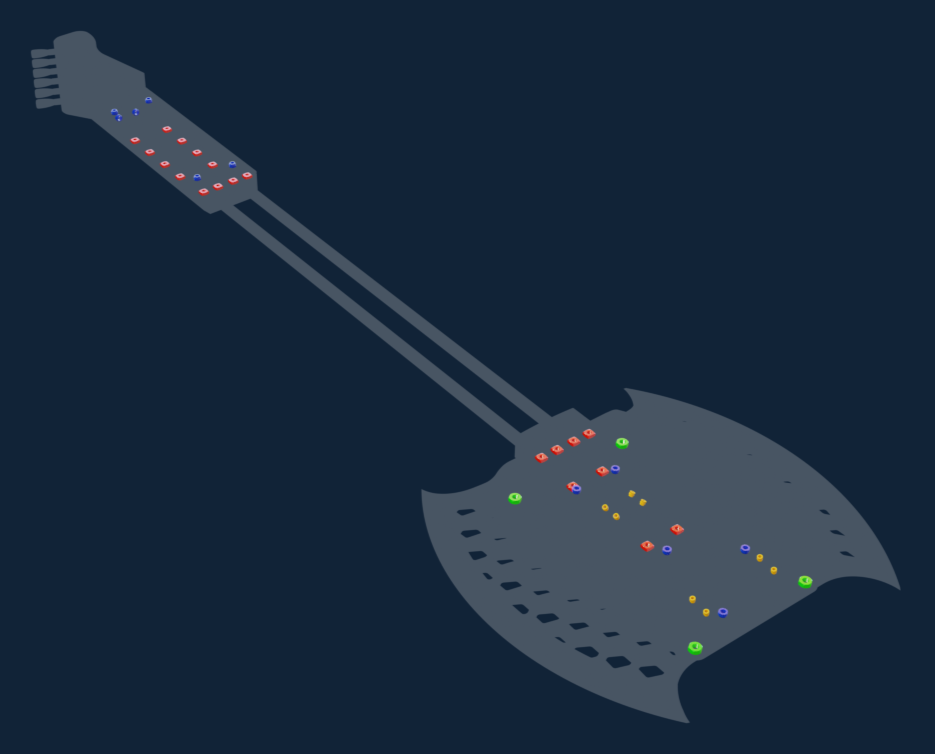
Legend:
- Orange - Threaded insert M2 x 3
- Blue - Threaded insert M3 x 3
- Red - Square nut DIN 562 M3
- Green - Hex nut DIN 934 M4
Screws
Image shows position of different screws

Legend:
- Orange - DIN 912 M2x5
- Purple - DIN 912 M2x12
- Blue - DIN 912 M3x8
- Green - DIN 912 M3x12
- Red - DIN 912 M3x16
- Teal - DIN 912 M4x16
Electronics
Raspberry Pi Pico is used as the “brain” of this guitar for a simple reason - it is cheap, can be recognized by PC as USB HID and is locally available.

Raspberry Pi Pico pinout (Pico-R3-A4-Pinout.pdf (raspberrypi.com))
For purpose of the guitar pins 7-20 (not all of them I think) have been used as they were the pins easiest to approach. One GND for frets one GND for other buttons in body, 9 GPIOs 5 for frets, 2 for strum (up and down) and 2 for select and start button.
As we need to connect Mechanical switches and limit switches to Pico there is some soldering.
For strum limit switches one of the terminals, in this case NO, has to be connected to GND (ground) on the Raspberry Pi Pico and the other terminal of the limit switches, in this case C/COM, has to be connected to the GPIO (general-purpose input/output) on Raspberry Pi Pico.
All other buttons (frets and start/select buttons) use keyboard mechanical switches. Mechanical switches has 2 terminals so you have to connect one of them to GND and other to GPIO.
Wires:
- Frets 6 wires - 1 GND and 5 wires for GPIO goes from pico to frets trough aluminum pipe. 1 end of fret switches have to be interconnected and that is the end where you connect 1 GND wire
- Strum 3 wires - 1 GND and 2 wires for GPIO. GND connected between switches.
- Start/Select 3 wires - 1 GND and and 2 wires for GPIO. GND connected between switches.
Strum and Start/Select GND can be connected as well but I left it separate no special reason.
GPIO wiring :
- GPIO6 - Strum up
- GPIO8 - Start
- GPIO9 - Select
- GPIO10 - Strum Down
- GPIO11 - Green Fret
- GPIO12 - Red Fret
- GPIO13 - Yellow Fret
- GPIO14 - Blue Fret
- GPIO15 - Orange Fret
In case of using different GPIO you have to make changes in code and in case of using those GPIO but not for same button you will probably have no problem because you have to map controls inside game anyway.
The GND can be interconnected between switches and in case of fret switches it is recommended because there is only so much space in aluminum pipe, but every microswitch needs a wire for GPIO.
WARNING: Soldering can be dangerous if safe operating procedures are not followed.
Programming
First you have to flash CircuitPython on Raspberry Pi Pico (Installing CircuitPython).
After flashing CircuitPython onto the Raspberry Pi Pico extract Guitar_Code.zip and place all the files on the Raspberry Pi Pico.

Files on Raspberry Pi Pico after flashing and copying files onto it
In the case of not using same GPIOs there are some changes that have to be done in code.py.
fretGreen = DigitalInOut(board.GP11)
fretGreen.switch_to_input(pull = Pull.UP)
In code.py every button is defined something like this and board.GP11 is defining which GPIO is used for a button. Depending where you solder the wire from switch you have to change board.GP{number of GPIO}.
Preflight check
Go to Control Panel → Devices and Printers → Right click Pico → Game controller settings → CircuitPython HID Properties
Here you can check if all buttons works by pushing them.

Sample of clicking green fret
If you made it this far you will have a fully functional Clone Hero guitar for gaming.
Happy gaming!