
LYNX 300FPS NERF Blaster 2023 - EU Edition (metrisch)
Obliczymy ostateczną cenę na podstawie wybranego pliku. Sprawdzisz ją i zaakceptujesz przed płatnością.
Zapisane na tym urządzeniu.

Original LYNX Blaster v. ORION Blasters umgezeichnet auf metrische EU Maße bzw. Hardware aus dem DIY Handel
- Ocena
- 4,938 / 5
- Polubienia
- 754
- Pobrania
- 1891
- Wydruki
- 20
- Wyświetlenia
- 19 427
- Oceny
- 16
Aktualizacja u źródła:
Informacje o modelu
- Źródło
- Printables
- Kategoria
- Outdoor Sports
- Licencja
- Creative Commons — Attribution — Noncommercial
LYNX DIY Blaster - EU Edition
HINWEIS! Bitte druckt diesen Blaster recht Farbenfroh, so dass er sich stark von echten Waffen unterscheidet.
Nachdem ich bereits vor ein paar Wochen meine EU Version des CALIBURN 4 Blasters veröffentlicht habe, folgt nun meine umgezeichnete Version des Orion Blasters LYNX. Es gab bereits eine metrische Vorlage, jedoch konnte ich dennoch kaum Teile aus dem DIY Handel oder diverser Onlinehändler verwenden, weshalb diese Version entstand. Darüber hinaus habe ich noch die folgenden Add-Ons mit integriert (in STEP File enthalten):
- EX-BCAR inklusive Barrell Mount - Dateien wurden angepasst um sie mit 3x12mm PINS verwenden zu können, da mir die Schraubenvariante zu locker erschien
- Shade Vertical Foregrip
- Remixed Railshroud, Thumbhole Grip, Cheek Rest von Tacticool Mods to Lynx by EnderSavesTheDay
- Ergo Stock
Alle integrierten Dateien wurden auf mein Modell angepasst.
Für alle die den LYNX Blaster noch nicht kennen, kann ich diesee Video nur empfehlen.
Vorbereitung:
Einige der Alu Flachprofile müssen noch gebohrt werden und benötigen ein M3 Gewinde geschnitten um sie miteinander verschrauben zu können. Ich empfehle die STEP Datei als Hilfestellung für die genauen Maße zu verwenden.
Die 457 mm Transfer Bar muss zusätzlich noch ausgeklinkt werden. Ich habe hierfür eine Schablone zum Anzeichnen angefertigt und das Ganze mit dem Dremel und einer Trennscheibe bewerkstelligt. Zusätzlich muss die Feder noch gekürzt werden. Dies lässt sich ebenfalls sehr gut mit dem genannten Dremel Setup bewerkstelligen. Für den Rest des Aufbaus kann man sich an die Anleitung von Out of Darts halten. Jedoch habe ich anders als in der Anleitung den Plunger von hinten eingesetzt, da von vorne der Rail Shroud stört.
Wie schon bei der Caliburn, habe ich weitestgehend versucht mit Einschmelzmuttern der Größe M3 zu arbeiten und darauf geachtet, dass ihr die Hardware komplett im DIY Handel bekommt um den Preisrahmen nicht zu sprengen. Das Alurohr und sämtliche Schrauben, Muttern und kleine Federn habe ich beim regionalen HORNBACH einzeln gekauft oder im Onlineauktionshaus geordert.
Anbei die komplette Bill of Material (BOM):
gekürzt auf folgende Maße:
- Profil = 1x 233 mm (2x M3 Gewinde schneiden) + 1x 533 mm (1x M3 Gewinde schneiden)
- Profil = 1x 233 mm (2x M3 Gewinde schneiden) + 1x 533 mm (1x M3 Gewinde schneiden)
- Profil = 1x 457 mm (2x M3 Gewinde schneiden) + 1x 273 mm
zugeschnitten auf:
- 1x 203mm
zugeschnitten auf:
- 1x 470 mm (Lauf)
- 1x 89 mm (Plunger Distanzhülse)
- 2x Dichtring 36/30 - 3mm Strichstärke - alternativ amazon.de
- 2x Dichtring 19/15 - 2mm Strichstärke - alternativ amazon.de
- 2x Dichtring 13/6 - 3,5mm Strichstärke - alternativ amazon.de
- 1x Feder - falls ausverkauft alternativ diese beiden Federn #1 - K25 + Feder #2 - K31, optional K25 (2 x 25mm) auf AliExpress kann mit dieser K31 (1.8 x 20mm) für mehr Power gestacked werden
Die beiden Federn (K25 & K31) werden ineinander gesteckt um so möglichst nah an der Original angebotenen zu sein.
- 3x Druckfeder 0.5 x 5 mm Länge 20 - 25mm (kürzbar) evtl. auch aus alten Kugelschreibern - alternativ amazon.de
- 18x M3x8 Linsenkopf (Halbrundkopf) - alternativ als Stückware bei Hornbach
- 2x M3x10 Linsenkopf (Halbrundkopf) - alternativ als Stückware bei Hornbach
- 2x Mutter M3 - alternativ als Stückware bei Hornbach
- 10x Einschmelzmuttern M3
- 1x M5x10 Linsenkopf (Halbrundkopf) - alternativ als Stückware bei Hornbach
- 2x Flansch Sicherungsmutter M5
- 1x Gewindestange M5
gekürzt auf:
- 137 mm
Optional für EX-BCAR:
- 9x Pass Stift 3x12mm (EX-BCAR)
- 9x F683ZZ (3x7x3mm) (EX-BCAR) - ACHTUNG korrektes Lager aus Liste auswählen!!
Optional für Shade Vertical Foregrip:
- 1x M5x30 Halbrundkopf oder Zylinderkopf - alternativ Stückware bei Hornbach
- 1x Mutter M5 - alternativ Stückware bei Hornbach
Die sehr gute Aufbauanleitung von Out of Darts kann problemlos verwendet:
Zur besseren Übersicht und für mögliche Anpassungen hänge ich meine STEP Datei ebenfalls mit an.
PRINT SETTINGS
Gedruckt aus ABS von CR-3D
Blau = ABS Wasserblau Magic
Grau = ABS Carbon
Orange= ABS Neon Orange
4 Wände
4 Boden
4 Top
40% GITTER / GRID
0.2 Layerhöhe
Übersicht der Einschmelzmuttern:
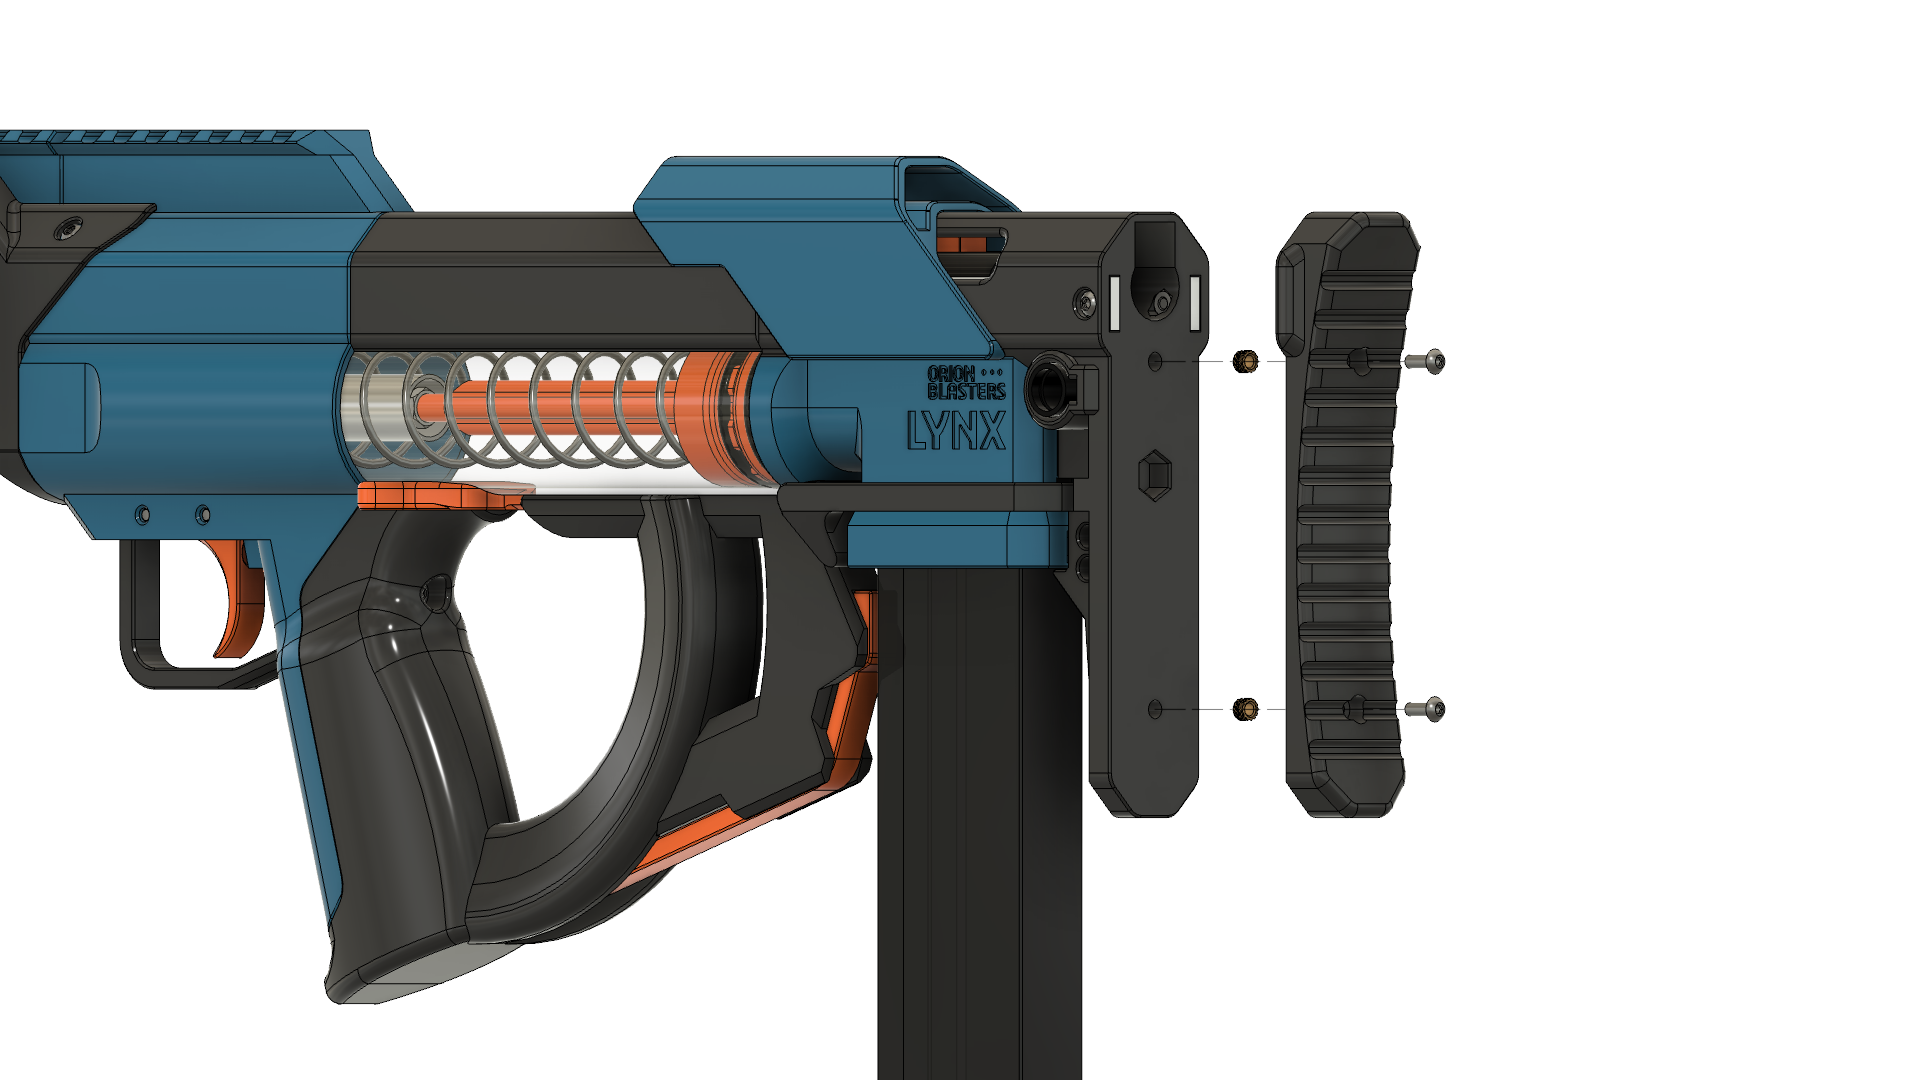


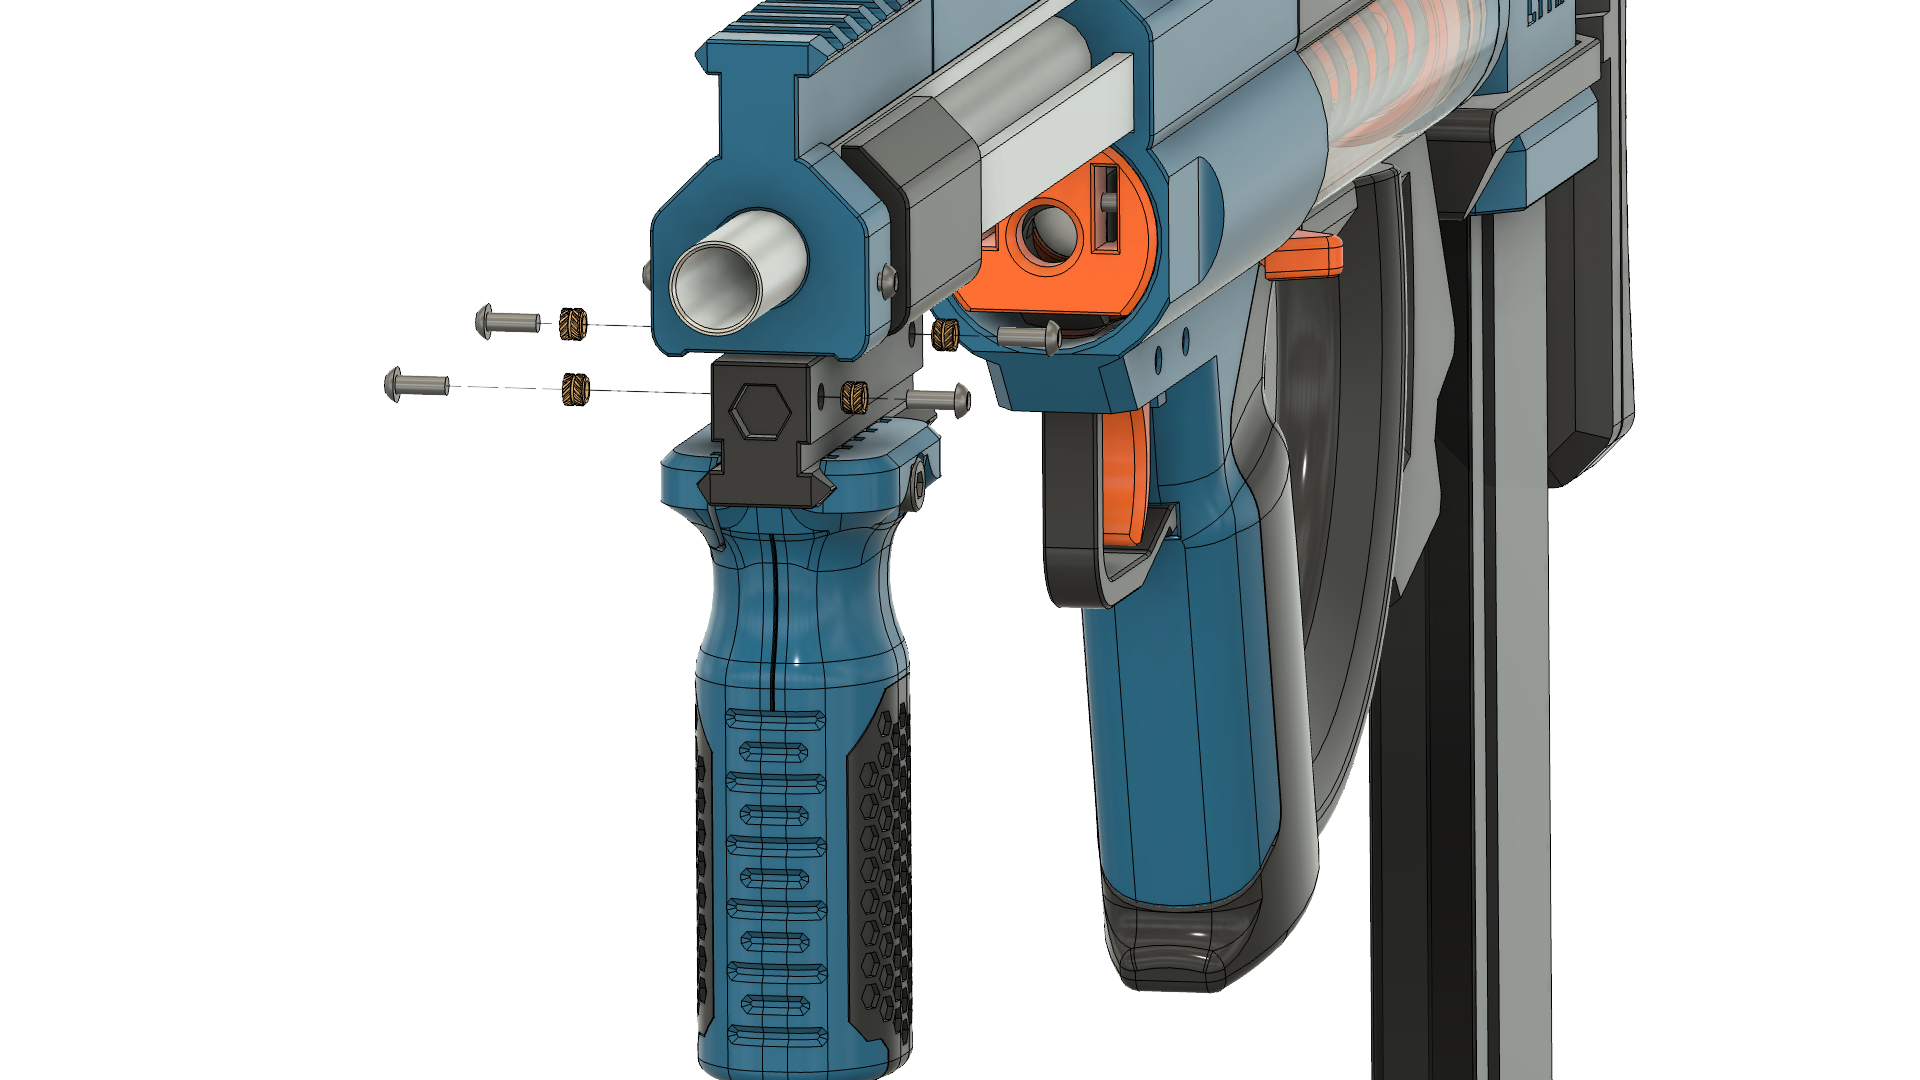
Übersicht Ausrichtung auf dem Druckbett:


Bei Fragen dürft ihr mich gerne Anschreiben!
Bin schon sehr auf eure Makes gespannt.
Wenn ich dem einen oder anderen mit meiner Arbeit helfen könnte, würde ich mich ebenfalls sehr über einen Kaffee freuen.
https://www.buymeacoffee.com/printstructor
English Description:
LYNX DIY Blaster - EU Edition
NOTE! Please print this blaster quite colorful, so it will differ a lot from real weapons.
After I already published my EU version of the CALIBURN 4 Blaster a few weeks ago, now follows my redrawn version of the Orion Blaster LYNX. There was already a metric template, but I still could hardly use parts from DIY stores or various online retailers, which is why this version was created. Furthermore I integrated the following add-ons (included in STEP file):
- EX-BCAR inklusive Barrell Mount - files were adapted to be able to use them with 3x12mm PINS, because the screw version seemed too loose to me.
- Shade Vertical Foregrip
- Remixed Railshroud, Thumbhole Grip, Cheek Rest from Tacticool Mods to Lynx by EnderSavesTheDay
- Ergo Stock
All integrated files were adapted to my model.
For all those who do not know the LYNX Blaster yet, I can highly recommend this video.
Preparation:
Some of the aluminum flat profiles still need to be drilled and need a M3 thread cut to be able to screw them together. I recommend using the STEP file as a guide for the exact dimensions.
The 457 mm transfer bar also needs to be notched. I made a template for this and did the whole thing with the Dremel and a cut-off wheel. In addition, the spring must be shortened. This can also be done very well with the aforementioned Dremel setup. For the rest of the setup, you can follow the instructions from Out of Darts. However, unlike the instructions, I inserted the plunger from the rear, since the rail shroud interferes with the front.
As with the Caliburn, I tried to work with M3 heatset inserts and made sure that you can get all the hardware in DIY stores so as not to break the price range. The aluminum tube and all the screws, nuts and small springs I bought individually at the regional HORNBACH or ordered in the online auction house.
Attached is the complete Bill of Material (BOM):
shortened to the following dimensions:
- Profile = 1x 233 mm (2x M3 thread cutting) + 1x 533 mm (1x M3 thread cutting)
- Profile = 1x 233 mm (2x M3 thread cutting) + 1x 533 mm (1x M3 thread cutting)
- Profile = 1x 457 mm (2x M3 thread cutting) + 1x 273 mm
cut to:
- 1x 203mm
cut to:
- 1x 470 mm (barrel)
- 1x 89 mm (plunger spacer tube)
- 2x sealing ring 36/30 - 3mm line width alternativ amazon.de
- 2x sealing ring 19/15 - 2mm line width alternativ amazon.de
- 2x sealing ring 13/6 - 3,5mm line width alternativ amazon.de
- 1x Spring, if sold out alternatively these two springs #1 - K25 + spring #2 - K31, optional you can buy these K25 (2 x 25mm) AliExpress combined with K31 (1.8 x 20mm) for even more power. ATTENTION choose the right one out of the list if buying on Aliexpress!
The two springs (K25 & K31) are inserted into each other to be as close as possible to the original offered.
- 3x compression spring 0.5 x 5 mm length 20 - 25mm (can be shortened) possibly also from old ballpoint pens - alternativ amazon.de
- 18x M3x8 BHCS - alternatively as piece goods at Hornbach / DIY stores
- 2x M3x10 BHCS - alternatively as piece goods at Hornbach / DIY stores
- 2x M3 Nut - alternatively as piece goods at Hornbach / DIY stores
- 10x M3 heatset inserts
- 1x M5x10 BHCS - alternatively as piece goods at Hornbach / DIY stores
- 2x flange lock nut M5
- 1x threaded rod M5
cut to:
- 137 mm
Optional for EX-BCAR:
- 9x dowel pin 3x12mm (EX-BCAR)
- 9x F683ZZ (3x7x3mm) (EX-BCAR) - ATTENTION choose the right one out of the list on Aliexpress!
Optional for Shade Vertical Foregrip:
- 1x M5x30 BHCS oder SHCS - alternatively as piece goods at Hornbach / DIY stores
- 1x M5 Nut - alternatively as piece goods at Hornbach / DIY stores
Excellent assembly instructions from Out of Darts can be used without any problems:
For a better overview and for possible adjustments I also attach my STEP file.
PRINT SETTINGS
Printed from ABS by CR-3D
Blue = ABS Water Blue Magic
Grey = ABS Carbon
Orange = ABS Neon Orange
4 walls
4 bottom
4 top
40% GRID / GRID
0.2 Layer height
4/4/4/40% GRID 0.2 ABS
Overview of the heatset inserts: :

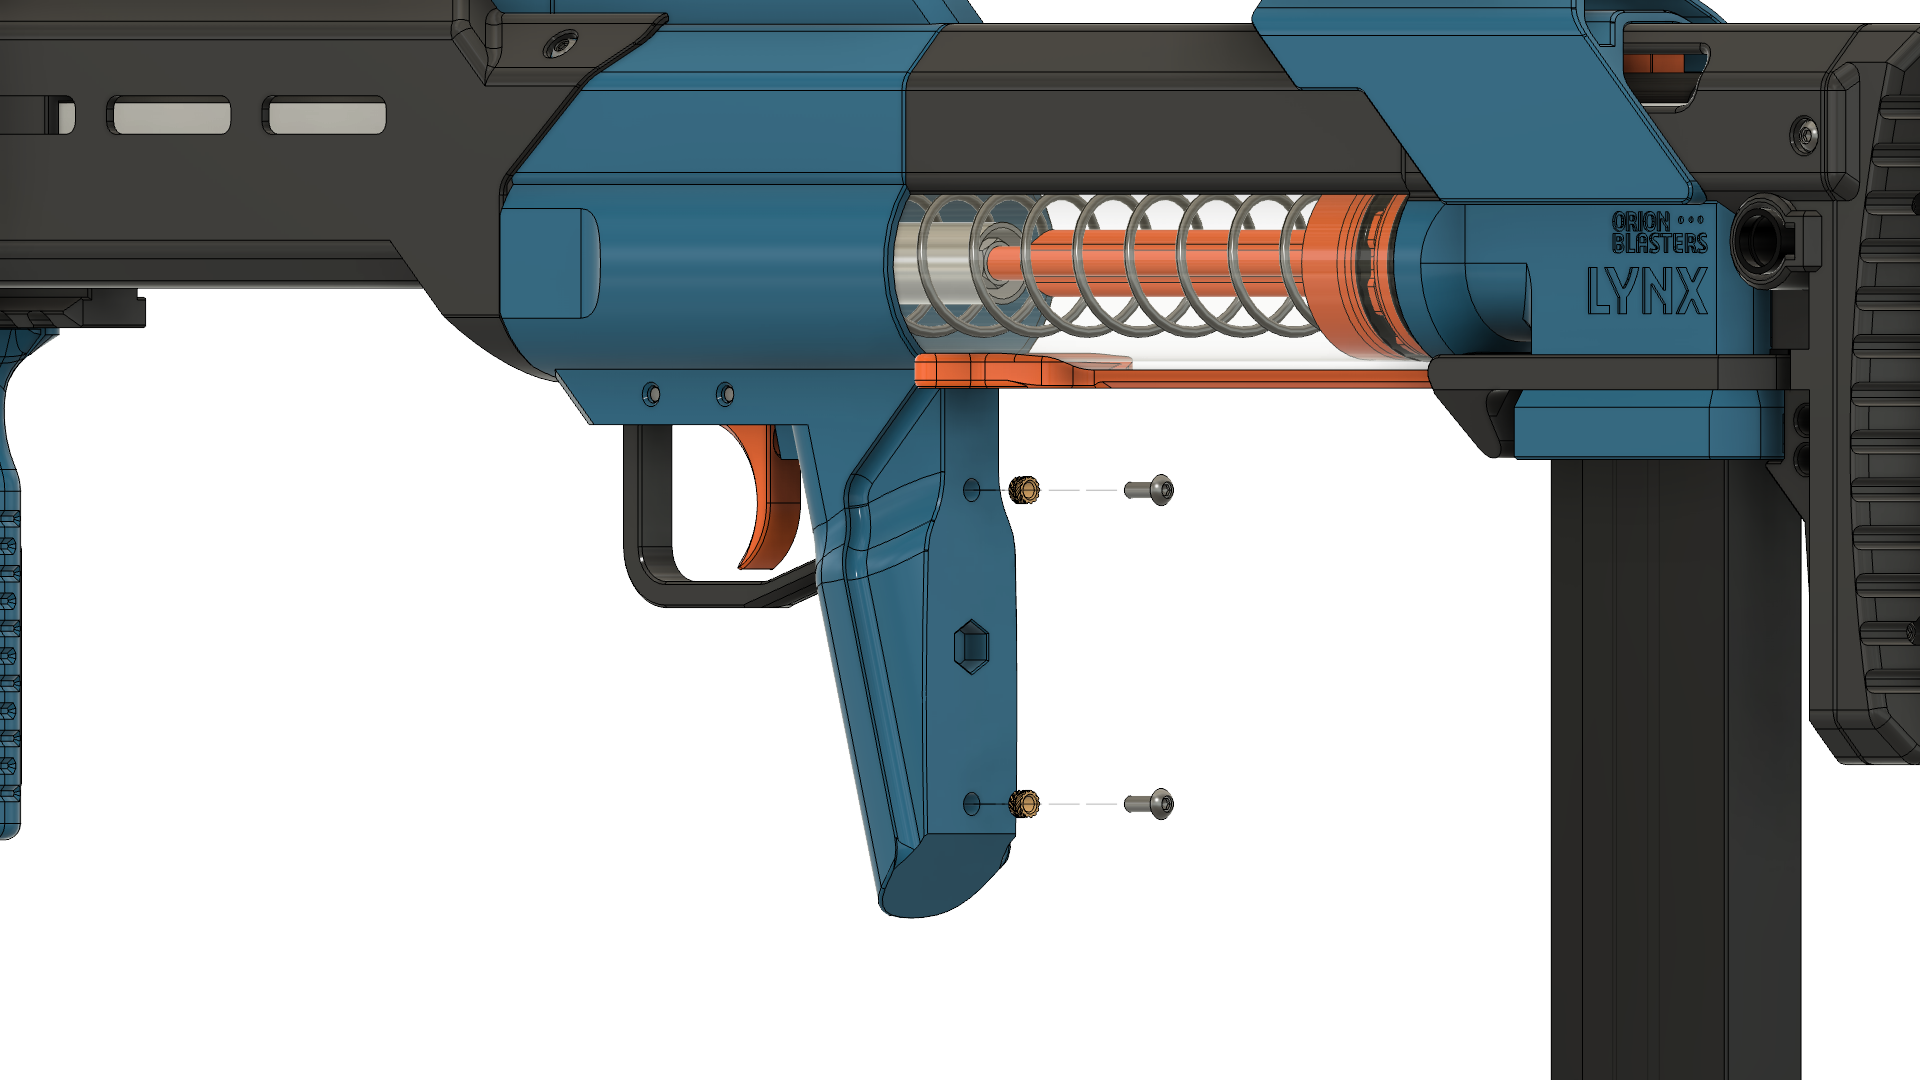

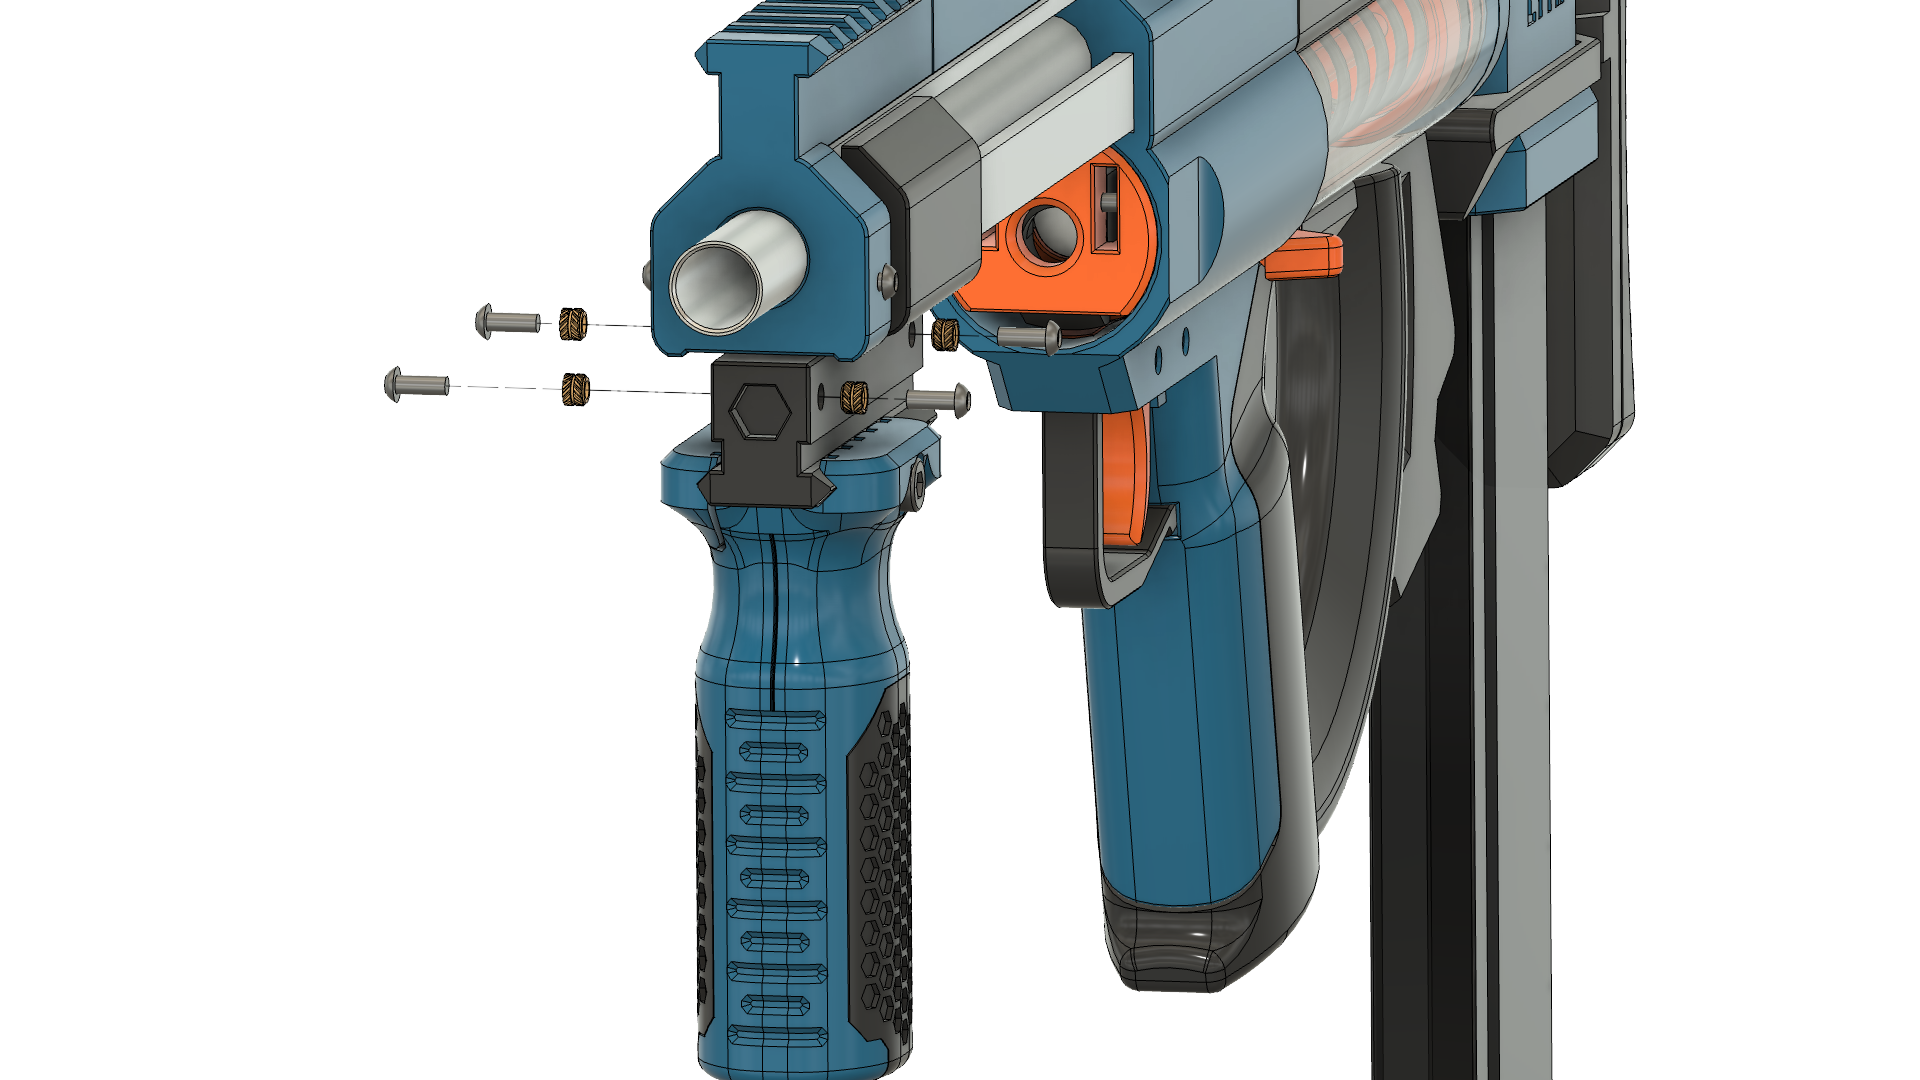
Overview Printplate Alignment:


Bei Fragen dürft ihr mich gerne Anschreiben!
Bin schon sehr auf eure Makes gespannt.
If I could help one or the other with my work, I would also be very happy about a coffee.
https://www.buymeacoffee.com/printstructor