
LW-PLA calibration cubes
Obliczymy ostateczną cenę na podstawie wybranego pliku. Sprawdzisz ją i zaakceptujesz przed płatnością.
Zapisane na tym urządzeniu.
Calibration cubes with imprinted text to test LW-PLA foaming in multiple nozzle temperatures and flow rates.
- Ocena
- 5 / 5
- Polubienia
- 14
- Pobrania
- 720
- Wydruki
- 2
- Wyświetlenia
- 2014
- Oceny
- 4
Aktualizacja u źródła:
Informacje o modelu
- Źródło
- Printables
- Kategoria
- Test Models
- Licencja
- Creative Commons — Attribution — Noncommercial — Share Alike
Models and gcodes are created based on colorFabb tutorial HOW TO PRINT WITH LW-PLA (colorfabb.com)
In order to calibrate LW-PLA prints you should:
I. Check filament layer width in range of nozzle temperatures and pick temp with highest expansion.
You can do it using LW_PLA_temp_calibration_cubes… gcode. It prints sequentially 6 cubes in temp range from 220°C to 270°C with 10°C step.
2. Check filament layer width in range of flow rates using nozzle temp picked in 1st step. Then pick flow rate where width is closest to nozzle size.
You can do it using LW_PLA_flow_calibration_cubes… gcode. It prints sequentially 6 cubes in 240°C nozzle temp with following frow rates (0.7, 0.6, 0.5, 0.45, 0.4, 0.35).
I got best results with 240°C nozzle temperature and 0.4 flow rate. What's your result?
How to slice it/ modify temperature ranges or flow rates in PrusaSlicer?
For start, I did not find a way to generate entire gcode in PrusaSlicer 2.6.1.
It does not allow adding custom G-code in sequential mode and there's no modifier for nozzle temp or flow rate. Please correct me if i'm wrong.
My solution was to slice model with single temp and flow rate and adding change commands manually in gcode.
You can find print setup in 3mf files. Most important are:
- Spiral vase ON, Layers and perimeters | Prusa Knowledge Base (prusa3d.com)
- sequential printing ON, Sequential printing | Prusa Knowledge Base (prusa3d.com)
- 0 top and bottom solid layers, Layers and perimeters | Prusa Knowledge Base (prusa3d.com)
- 1 layer skirt heitght, Skirt and Brim | Prusa Knowledge Base (prusa3d.com)
- layer height 0.2mm
Slice the model and export gcode.
Now comes the manual part. Changing temperature and flow rate between cubes.
It can be done using following commands:
- change nozzle temperature M109 S230, means change temp to 230
- change flow rate M221 S60, means change flow rate to 60%
How to find the line in code where printing moves from one cube to another?
I used the fact that slicer switches off the fan before printing first layer in new cube. It is done with M107 command.
So you can open gcode. Search for M107 and place change nozzle temperature or flow rate commands under it. It is also good to check if there's change of printed objects. Here's example
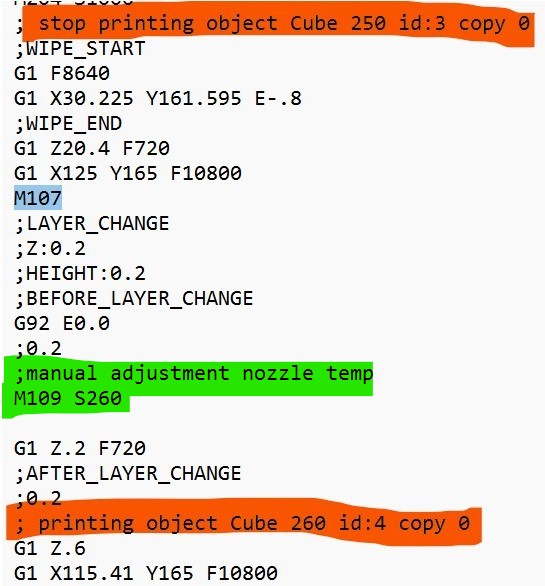
I found M107 command (blue), there's “stop printing object Cube 250 id:3 copy 0” comment at the top and “printing object Cube 260 id:4 copy 0” at the bottom (orange).
I've added 2 lines to the code (green). This had to be done for every cube.
Again, happy to learn that someone found a way to do it all in PrusaSlicer.