
1 / 1
Abyssal Mirror / Infinity Mirror
Zamów wydruk tego modelu
Obliczymy ostateczną cenę na podstawie wybranego pliku. Sprawdzisz ją i zaakceptujesz przed płatnością.
Zapisane na tym urządzeniu.

10CM*10CM Abyssal Mirror
- Ocena
- 0 / 5
- Polubienia
- 356
- Pobrania
- 350
- Wydruki
- 0
- Wyświetlenia
- 5578
- Oceny
- 0
Aktualizacja u źródła:
Informacje o modelu
- Źródło
- Printables
- Kategoria
- Electronics
- Licencja
- Creative Commons — Attribution
SzczegółyPliki (4)Wydruki i komentarze (Wydruki: 0) (Komentarze: 3)Remiksy (0)Kolekcje (373)Powiązane
This is a fun little electronic ornament with programmable light effects and "infinite" depth!
It can also be used as a small gift, or an abyss on the dinner table :D
Bill of Materials:
- WS2812B Programmable LED Strip Light (Number of beads optional)
Can be replaced by any 1cm or shorter width strip, or you can modify the model by yourself - WeMos D1 Mini ESP8266 Development Board
For controlling lighting effects
Note: I have tested that even the version with 144 beads can be powered only by D1Mini without additional power input.
All mirror inserts are designed with a 1mm tolerance and can normally be inserted directly.(101mm*101mm square recess)
WLED is recommended for lighting control, for more information please visit: https://kno.wled.ge
Fabrication Guide:
- Print the three-part shell
- Paste the WS2812B light strip to the inside of the center model, and lead the wire from the pre-determined 8mm hole
- Solder the WS2812B light strip to the corresponding pins of the D1Mini as shown in the picture
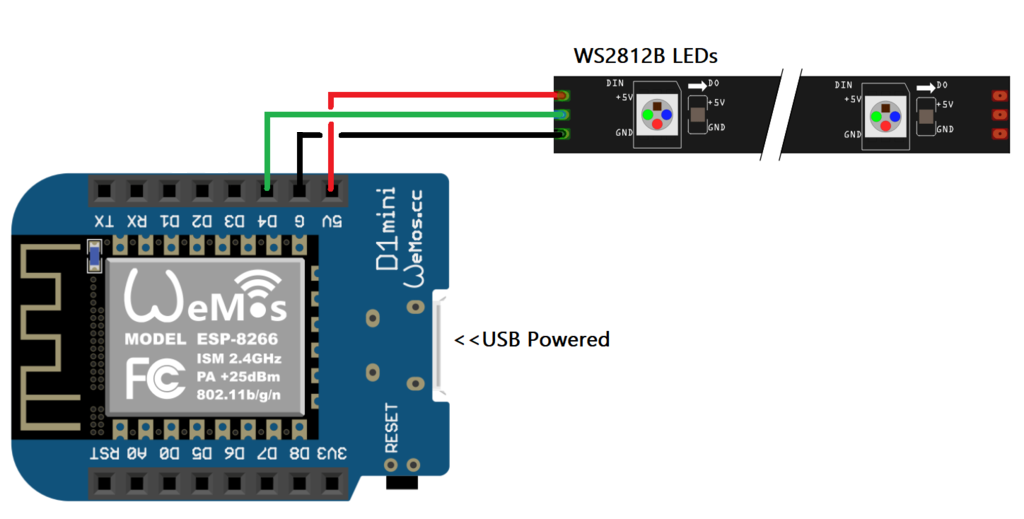
- Light up the strip and test it to see if it is correct, then proceed to the next step.
- Embed a 1mm thick single sided mirror at the bottom, you can use glue to fix the mirror further.
- Put the middle model and the bottom model together, depending on the tolerance of the printer may be difficult to embed, please fine-tune your printer or slicing software, you can also modify the model directly.
- Embed 10cm*10cm double sided mirror with 2mm thickness into the groove on the top side of the middle model, and merge the top model to complete the installation.