
#0128 Basic Board Cover for the Original Prusa Enclosure (Completely New Design)
Obliczymy ostateczną cenę na podstawie wybranego pliku. Sprawdzisz ją i zaakceptujesz przed płatnością.
Zapisane na tym urządzeniu.

While the original basic board cover is functional, it's time to upgrade on the ergonomics and aesthetics a bit.
- Ocena
- 5 / 5
- Polubienia
- 95
- Pobrania
- 301
- Wydruki
- 17
- Wyświetlenia
- 1665
- Oceny
- 13
Aktualizacja u źródła:
Informacje o modelu
- Źródło
- Printables
- Kategoria
- Prusa Parts & Upgrades
- Licencja
- Creative Commons — Attribution — Noncommercial — Share Alike
*** Thanks for checking out this model! ***
If you appreciate what I'm doing, consider buying me a coffee, and check out my other models for something else you might like!

**********
[UPDATE April 18 2024]: 5x “b” Versions added, where the Power LED is omitted. Now you have even more choices! ;-)
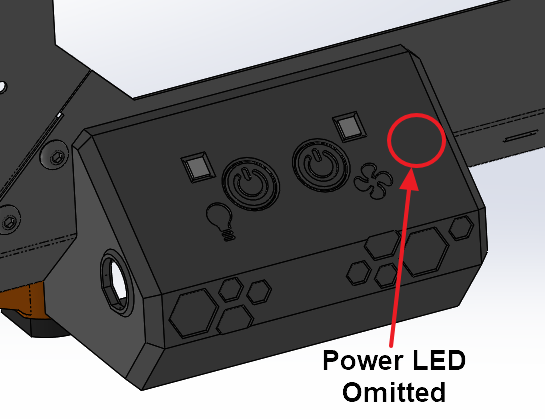
- Version 1b - has light and fan icons spread out to visually balance the layout.
- Version 2b - has light and fan icons below each button.
- Version 3b - has light and fan icons inside each button.
- Version 4b - is like Version 3 but with no hex pattern - for all you minimalists. :-)
- Version 5b - is completely blank. It has button and light pipe features but nothing else.
**********
This model is a significant redesign of the Basic Board cover to make it easier to use, with the original Prusa cover being heavily referenced. The basic board allows you to control the White LED Strip and Advanced Filtration System, and the original cover is completely functional; however it's pretty “basic”.
After using it a few months, I think it's time to give it an upgrade. :-)
Features:
- The control panel now matches the LCD panel angle for easier viewing and better user experience.
- The buttons are now larger and spaced out further apart for better aesthetics and ergonomics - this is made possible using a novel print-in-plate approach that hides the very visible “leaf spring” from Prusa's design - so the buttons LOOK like buttons. :-)
- Icons replace the “Light” and “Filter” labels.
- Optional LED diffusers to better distribute light are provided - print in transparent material.
- The LED indicating power is now visible.
- A .stp file of a generic model of the housing (in addition to the 5 listed below) is provided for you to remix/re-purpose it to house other controls.
5 Versions are provided - take your pick:
- Version 1a - has light and fan icons spread out to visually balance the layout.
- Version 2a - has light and fan icons below each button.
- Version 3a - has light and fan icons inside each button.
- Version 4a - is like Version 3 but with no hex pattern - for all you minimalists. :-)
- Version 5a - is completely blank. It has button and light pipe features but nothing else.
NOTE: Please indicate which version is your favorite when you post your make! :-P
Printing recommendations:
- Print using PETG or ABS. PLA will not be as robust, but you can try it if you want. I printed using Polymaker Polylite PETG.
- 0.2mm layer thickness and 2 walls will work fine, 0.4mm nozzle. 15-20% infill.
- Print using Prusa's textured print sheet to match the texture of the LCD control panel.
- TIP: print the first 0.4mm thickness in a contrasting color from the rest of the cover, to highlight the icons.
A Note about the pocket size for the square nut:
The nut pocket was sized to fit most square nuts (I get mine from multiple sources). In my experience, the ones provided by Prusa tend to be smaller and thinner, so they will fit a bit loose; just use something to wedge it in there, like a piece of paper or tape, or even a dab of CA glue. If I make them smaller, others will complain that it's too tight, so this was a compromise to make it usable to a wider audience.
Other parts you'll need:
- 4x M3 square nuts.
- Reuse the 2x M3x10 screws that was used to mount the original Basic Board Cover.
- 2x additional M3x8 or M3x10 screws.
NOTE: if you'd like to find the .stp file of the Basic Board itself, I've published it here.
Assembly Instructions:
- Press in the 3x diffusers printed with transparent material - it should sit below flush depending how hard you push it in - no glue required.
- Install the 4x M3 square nuts in their place.
- Connect the LED Strip and Filtration cable ends to the Basic Board.
- Reuse the M3x10 screws from the original housing - screw the Basic Board to the new cover.
- Use the additional 2x M3x8 or M3x10 screws to fasten the new cover to the left front sheet metal of the Original Prusa Enclosure (see pics for exact location).
- Plug in the power cord on the left side, same as before.
**********
If you add this to your collection and/or download the model, please click the LIKE button and give it some STARS!
Remember, you can earn some Prusameters if you post a pic of your make! Plus, it would make my day to see it. ;-D
Happy Printing!
P.S. Please post some constructive feedback if you'd like to see something improved.