
Filament Spool Labeling System
Obliczymy ostateczną cenę na podstawie wybranego pliku. Sprawdzisz ją i zaakceptujesz przed płatnością.
Zapisane na tym urządzeniu.
Labels for Filament. Attaching to the filament itself and lays flat within the spool. Friendly to vacuum seal bags
- Ocena
- 5 / 5
- Polubienia
- 4
- Pobrania
- 22
- Wydruki
- 1
- Wyświetlenia
- 344
- Oceny
- 1
Aktualizacja u źródła:
Informacje o modelu
- Źródło
- Printables
- Kategoria
- Accessories
- Licencja
- Creative Commons — Attribution — Noncommercial
Note: Do Not use the rotate function, only use the “Lay on Face” button to flip these over to edit text, and then back downward for printing. Otherwise the Bambu Studio gets all messed up with editing text. I'm not sure why or how to use Bambu Studio better, i'm only 2 months into using FDM printers, i've just found that using lay on face just works.

So i was looking for Filament labels i could use with my vacuum sealed bags, there were options out there but i ended up making my own simple design with a way to mount the tag you just took off your spool to the front of the ams so its not sitting around.
Its a fairly basic design, leveraging your slicer for the text on your labels consisting of a label blank and a mount to secure to the front of your ams with 3m VHB tape (or any double sided tape)
My 3mf file has a lot of labels from my last batch i made, so you can edit the text on those, delete the remaining etc.
You will want to print these face down, but they need to be upright for the text to attach to the model surface properly while editing each of the labels.
- Select the label.tile that you want to change, you must be in objects, not global. But once you select the tile, it will highlight the blank itself along with the 2 or 3 text objects. You can right click a text object and choose Edit Text
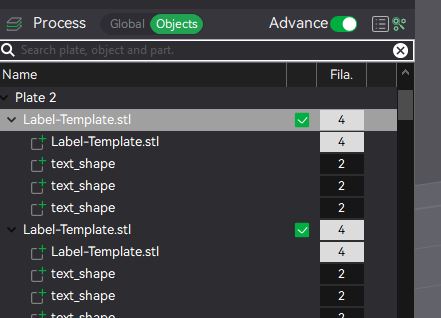
- Make note of the text settings, specifically thickness and embedded depth. (To limit color changes in the ams, make the embedded depth 2 layers deep, So .4 if you are using .2mm layers (the images shown, i was using my .6mm nozzle)

- After you have your tiles situated, you need to flip them face down on the build plate by pressing “F” and selecting the center face like this:

- Slice and print and you're done.
I found that if i tried to edit the tiles while they were face down, bambu studio did all sorts of crazy things with the text, so if you need to make more changes, just select the tile you need to modify, and rotate it on the Y axis, back to zero. and repeat the process
Enjoy!