
RotorHazard - Box for Individual FPV Timer
Obliczymy ostateczną cenę na podstawie wybranego pliku. Sprawdzisz ją i zaakceptujesz przed płatnością.
Zapisane na tym urządzeniu.

This is a box to house a simple FPV timer based on RotorHazard design.
- Ocena
- 5 / 5
- Polubienia
- 19
- Pobrania
- 80
- Wydruki
- 2
- Wyświetlenia
- 1493
- Oceny
- 2
Aktualizacja u źródła:
Informacje o modelu
- Źródło
- Printables
- Kategoria
- RC & Robotics
- Licencja
- Creative Commons — Attribution
SoloHazard FPV Timer
This is a box to house a relatively cheap home built FPV timer perfect for indoor use such as Whoop training or RaceGOW timing.
It has three components: Raspberry Pi Zero, Arduino Nano, and RX5808 receiver (approximate total cost £25 to £30 ($30 to $37).
Brief overview of steps:
- First make a Rotorhazard USB Node following these instructions (ensure you wire the rx to the opposite end to the USB with enough flex to install as per the images above)
- You will need to compile and upload the node code with the Arduino IDE as per these instructions
- Wire the Node to the Raspberry pi (use 4 ~60mm lengths of wire) :
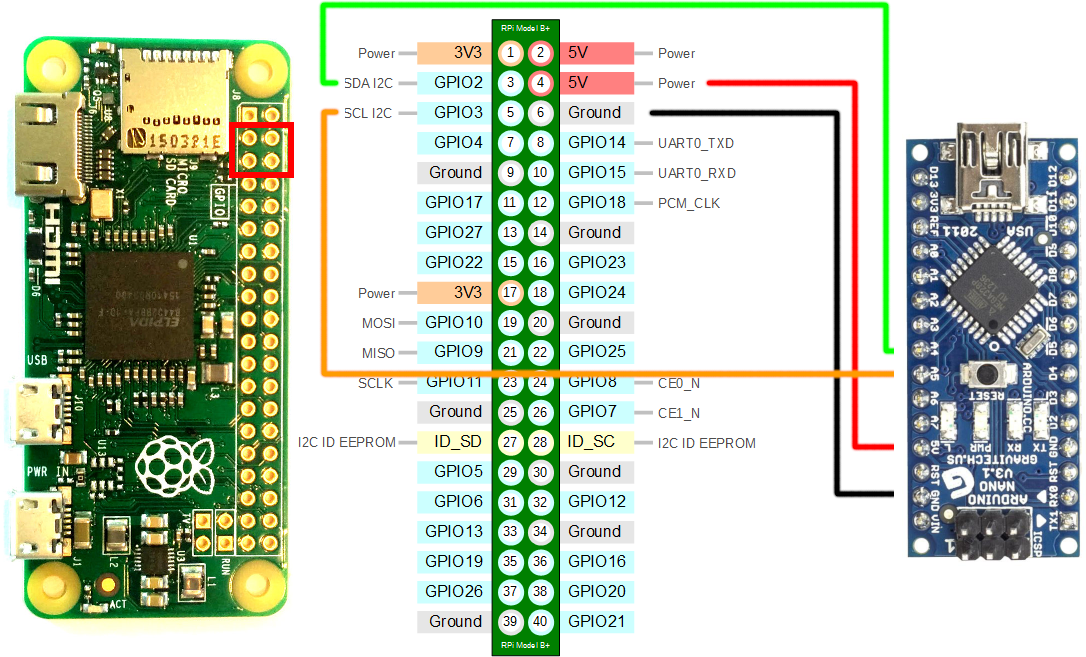
pin 4 to 5V
pin 6 to GND
pin 3 (SDA) to A4
pin 5 (SCL) to A5
- Install the pi OS onto an SD card using the Raspberry Pi Imager - chose the lite version and set up ssh and your home WiFi details in the extra settings.
- Power the device using the Micro USB PWR port on the Raspberry Pi, a portable USB Power bank is perfect to make it mobile.
- SSH onto the pi and Install Rotorhazard using the RH Install-Manager - During process select Arduino based and 1 node, all other settings can be default.
Lots of resources are available on the above pages and the wider internet for more detail on each of the steps.
Usage - there's a Bardwell for that:
BOM
- Raspberry Pi Zero 2W (Header optional)
- Arduino Nano (Without headers installed)
- RX5808
- Wire
- Solohazard 3D print
Printing
Print requires no supports or brim, 100% infill and fine settings, it should be orientated so lid and base of the box are on the print bed. No post processing required. I printed in PLA+.