
Electronegativity Periodic Table
Obliczymy ostateczną cenę na podstawie wybranego pliku. Sprawdzisz ją i zaakceptujesz przed płatnością.
Zapisane na tym urządzeniu.

Periodic table scaled in Z according to the Pauling electronegativity scale. Useful as an electronegativity reference.
- Ocena
- 0 / 5
- Polubienia
- 115
- Pobrania
- 211
- Wydruki
- 0
- Wyświetlenia
- 3177
- Oceny
- 0
Aktualizacja u źródła:
Informacje o modelu
- Źródło
- Printables
- Kategoria
- Chemistry & Biology
- Licencja
- Creative Commons — Attribution — Noncommercial — Share Alike
UPDATE
updated 2024-May-09 with ‘Extras’ which includes
- ‘a title peice’
- tiles for ‘period’ and ‘group’
- 'key' for explaining the different aspects of each element
- ‘corner guide’ for the packing board,
- ‘hangers’ for hanging the finished periodic table.
files and instructions can be found below
Background
I wanted a periodic table in my study to reference for when i'm doing uni work, so i decided to design one using NASA ‘The Worm’ font, and scaled it in the Z direction according to the Pauling scale of electronegativity.
For the unfamiliar here is a link to more information about electronegativity https://en.wikipedia.org/wiki/Electronegativity#Pauling_electronegativity
The elements which are too unstable for a electronegative measurement to be taken are scaled 3mm, this represents the ‘base line’. All other elements are scaled by 1mm for every 0.1 increase in electronegativity.
Because I don't have an MMU, the file has been split up so that the lettering is all seperate from the base, so that only one colour change is necessary. The base pieces have ‘seats’ for the inserts sit on, and be glued in place.
The files for all the base pieces are in the folder ‘Base Files’ , and the files with all the lettering are in the ‘Insert Files’ Folder.
Print Settings (0.4mm nozzle)
- Base Files -
All of the base pieces have been split up to fit conveniently on a mk3 build plate, each having locator pins to help hold them together. There is also a 'complete base' if you wish to split it up differently. For info how how the pieces are split, see the photo below.
I printed all of the base sections with a 0.3 mm layer height, using supports for the locator pins. All other settings were standard PrusaSlicer settings. Filament was white PLA.
- Insert Files -
The inserts are a little bit difficult to print in order get good clarity on the letting. I trailed a bunch of different settings, and found I got the best results by reducing the layer height to 0.1 mm, and then reducing the perimeter width to 0.2 mm. I know this isn't best practice, but its non structural, and reducing layer height any further (to get thinner perimeters) increased the print time too much.
Each insert is 1.3 mm thick. The letting is 0.3 mm, and the insert itself is 1 mm thick. So if you use 0.1mm layers, you can insert a colour change at the 10th layer, and choose another colour for the lettering.
Feel free to experiment further with settings, and leave a comment in a make if you managed to get better results than me.
Extras
These are not necessary per se, but do add to the visual appeal in my opinion.
- Group Numbers and Rows -
Print these with the exact same print settings as the inserts. Using a colour change at the layer height that the text begins.
- Key -
This one is a little bit different to the inserts and group numbers ect. Because I wanted to have a black ring to circle portions of the ‘key’. Use the same print profile / settings to the inserts. Then add a colour change at layer 14 (this is for the red text) and then another colour change at layer 16 (this is for the black circles).
Assembly
If you are unfamiliar with the organisation of the periodic table, assembly may be a little bit confusing, so I suggest you familiarise yourself with it here. https://en.wikipedia.org/wiki/Periodic_table
As previously mentioned, the base files are arbitrarily split up according to how they fit best on my build plate. the picture below depicts how they are split up, and how they can be reassembled.
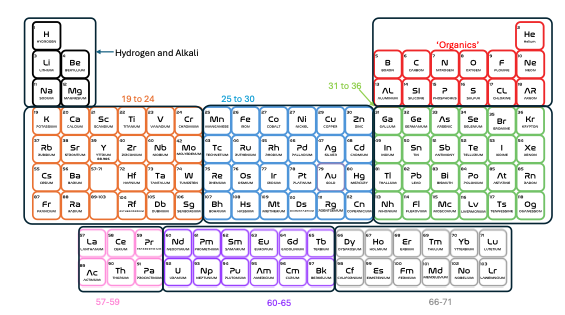
Please note that each section is arbitrarily named, and i'm aware that the naming convention i've chosen is wrong.
I used superglue to glue each piece together and waited for it to dry. Once dry, I laid out all the inserts from 1 to 118, taking great care, and using a periodic table as a reference, superglued each insert into place.
Backing Board
This part really is optional. But here what I did, incase anyone would like to copy it.
For the backing board, I used large piece of anodised aluminium backed with laminate (3mm) because it was on sale at my hardware store. But you could use whatever is cheapest / best for you, acrylic, MDF, flute core, plywood ect. Just make sure its at least 730mm x 430mm.
I cut the sheet down to 730mm x 430mm. I used a jigsaw with a sheet metal blade.
Using the ‘Corner guide v2’ I rounded the corners, and then drilled 2x6mm holes on the top of the board, using the template as a guide.
After that, I simply used command strips to hold the periodic table to the sheet. Use the guide below for placement on of the periodic table on the backing sheet. 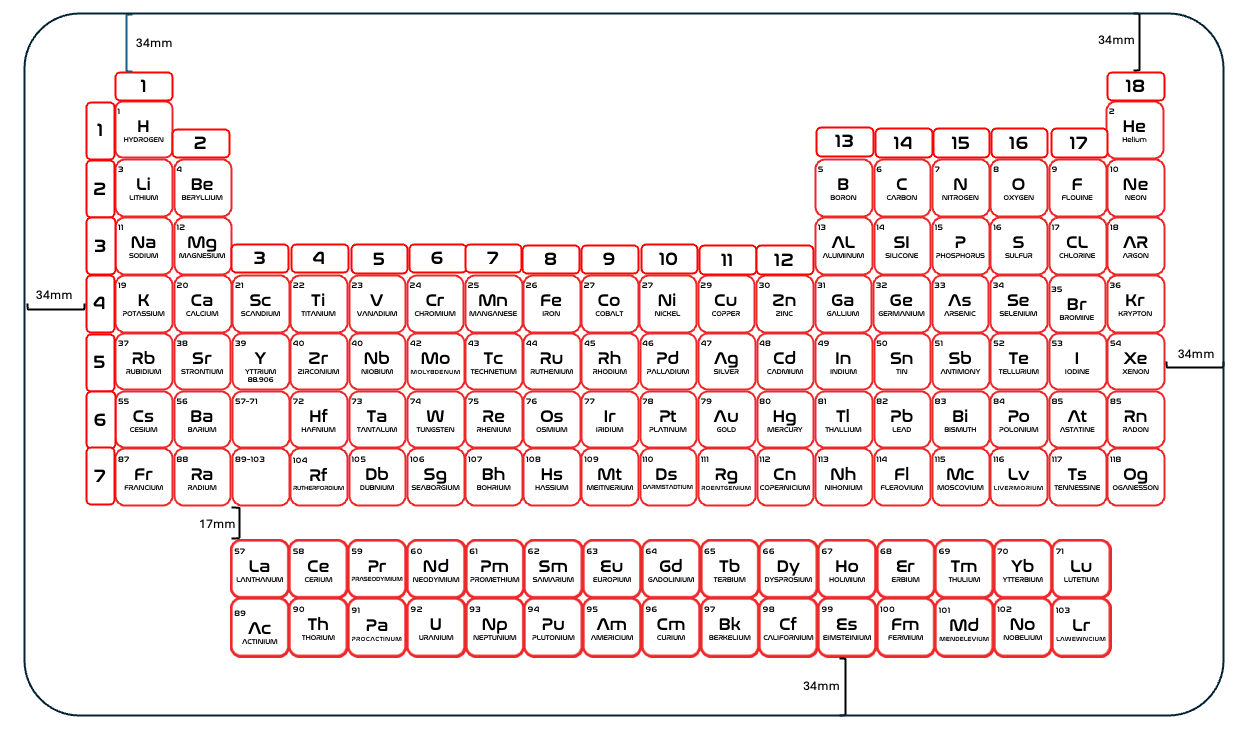
As far as the placement of the title and the key goes, i just placed them arbitrarily according to where i thought they looked best.
Hangers
Print 2x 'hangers v4' file, take note to reorientate each part so that there is minimal overhangs, so that less support material is needed. - Print using 0.15mm layer heights with maximum supports.
- Insert a Mx18mm bolt into ‘Hanger 3 Nut side’, put the nut through one of the holes drilled in the Backing Board step.
- Slide the ‘Hanger bolt side’ over the bolt from the back of the board.
- Use an M5 nut to fasten everything to the backing board.
- Use the ‘Hanger 2 Dome’ piece to cover the head of the bolt on the front side.
- 1.0 mm string or wire can then be tied to the Hanger piece on the back, and the periodic table is ready to hang.
I hope you enjoy my model!