
Filament Dispenser/ Abroller (V2) für PrecisionWinder NT / Filament dispenser (V2) for PrecisionWinder NT
Obliczymy ostateczną cenę na podstawie wybranego pliku. Sprawdzisz ją i zaakceptujesz przed płatnością.
Wstępna wycena dla PETG
3,88 € – 4,75 € netto (bez VAT)
Dla pliku: Universal Feeder Axle_0.4n_0.15mm_PETG_MK4IS_4h48m.bgcode
To wstępna wycena jednego pliku. Dokładną cenę poznasz przed zamówieniem.
Plik i założenia wyceny
Plik użyty do wyceny
Średnia wycena orientacyjna: 4,31 € netto (środek widełek).
- Masa podana przez autora
- 47 g
- Czas druku podany przez autora
- 4,8 godz.
- Materiał u źródła
- PET
- Materiał wyceny
- PETG
- Drukarka wyceny
- Bambu Lab P1S - 0.4 nozzle
- Proces wyceny
- 0.20mm Standard
Orientacyjna wycena wyłącznie wybranego pliku, oparta na masie i czasie druku podanych przez autora. Warianty plików nie są sumowane. Ostateczna cena zostanie obliczona po analizie pliku.
Zapisane na tym urządzeniu.

Filament Abroller m. einstellbarer Bremse für Filament Aufwickler& LACK Gehäuse/ Dispenser for winder and LACK enclosure
- Ocena
- 5 / 5
- Polubienia
- 13
- Pobrania
- 223
- Wydruki
- 3
- Wyświetlenia
- 1475
- Oceny
- 2
Aktualizacja u źródła:
Informacje o modelu
- Źródło
- Printables
- Kategoria
- Accessories
- Licencja
- Creative Commons — Attribution — Noncommercial
for English Documentation see below
Intro

Diese gebremste Filament Zuführung passt unter anderem zu meinem Filamentspooler. und zum PRUSA LACK Enclosure. Sie ersetzt meine erste Version und ist geeignet für Spulen bis zu 200 cm Durchmesser und einer Breite von 130 cm also z.B. auch für die 2 kg Prusa Spulen.
Die Zuführung ist kompatibel zu meinen Universal Spulenadaptern und zum Motormodul
Diese Zuführung zeichnet sich durch eine über einfache Gummiringe einstellbare Bremse aus, so dass das Filament beim Wickeln immer unter einer definierten Spannung steht. Die konstante Spannung ist für eine möglichst präzise Wickung mit meinem Filamentumpsuler hilfreich.
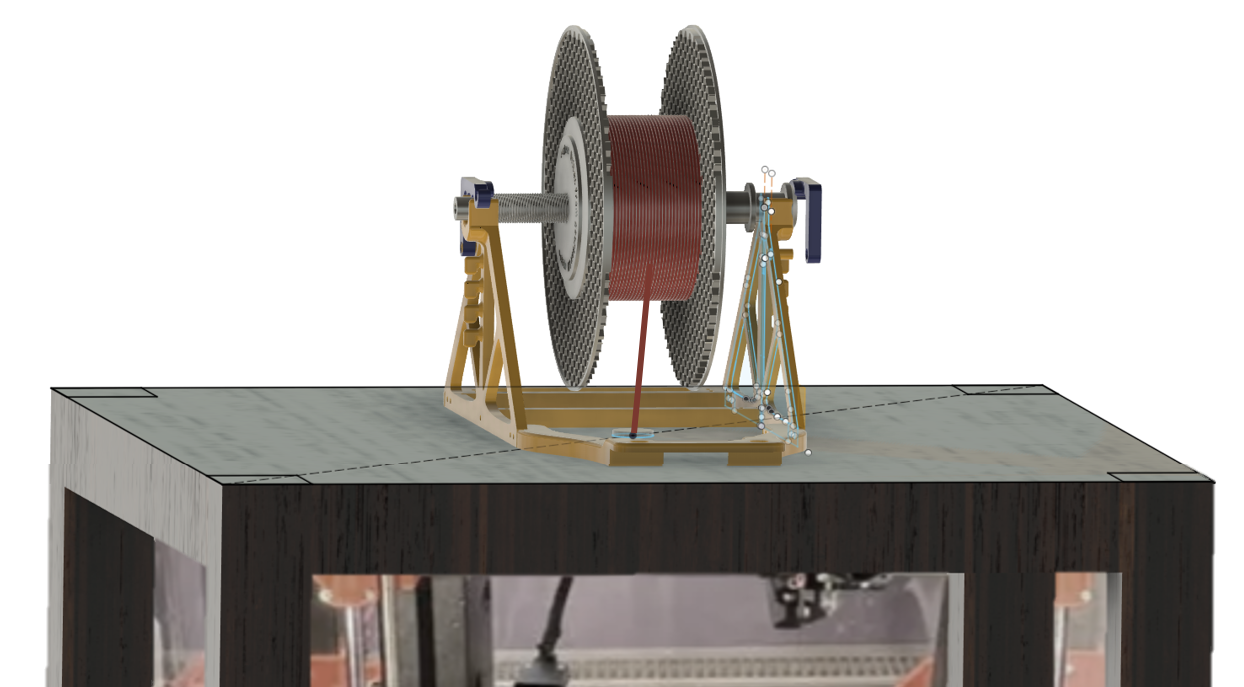
Stellt man den Feeder auf das LACK Gehäuse um das Filament von oben einzuspeisen, verhindert die Bremse das unkontrollierte Abwickeln.
Ansonsten hat er die die Gleiche Funktion wie meine erste Version , es gilt alles dort gesagte, auch das dort gezeigte Video passt generell.
Verbesserung im Vergleich zu Version 1
| Version 1 | Version 2 |
| Durchsteckachse wird mit dem Feeder verschraubt | Durchsteckachse wir einfach aufgelegt |
| Prusa MMU Spuleninnenkörper oder ähnliche Achse nötig | Kompatibel mit den Spool Kappen bzw. dem Universal Adapter |
| Filament wegen Connector nicht sicher nach unten abrollbar. | Klappbarer, offener bzw. abnehmbarer Connector, daher kann der Feeder auch auf das LACK Gehäuse gestellt werden. |
| Zusammenbau mittels M3 Schrauben die direkt ins PETG geschraubt werden | Stabilerer Zusammenbau mittels eingelassener Vierkantmuttern. |
| Die gesamte Spule wird gebremst, schwierig bei Pappspulen: keine konstante Bremskaft | die Achse wird gebremst. Konstante Bremskraft, leichter zu implementieren da Gummiringe genügen. |
Benötigte Teile
Ich habe mich beim Amazon Partnernet registriert, verdiene daher als Amazon-Partner an qualifizierten Verkäufen und bedanke mich daher, wenn ihr die Links nutzt.
Alle Teile habe ich selbst verbaut, d.h. die Maße sollten exakt passen, vorausgesetzt es gibt keine (Qualitäts)-Unterschiede zwischen unterschiedlichen Lieferbatches.
| Item | Anz | Zweck | Quelle |
|---|---|---|---|
| Schrauben, M3 x 20 | 6 | z.B Set von Amazon | |
| Schrauben M3 x 16 | 2 | siehe oben | |
| Scheiben M3 x 7 | 2 | Bremshebel | siehe oben |
| Muttern M3 | 2 | siehe oben | |
| Vierkant Muttern M3 | 6 | Streben | z.B: Amazon |
| Gewindestange 200mm M6 | 1 | Achsverstärkung | Baumarkt oder Amazon |
| Muttern M6 | 2 | Achsverstärkung | |
| Filz selbstklebend | Auflage für die Achse |
Druckteile
Zunächst die Folgenden Teile aus PETG drucken.

Zusammenbau des Halters
Zunächst werde die beiden Streben vorbereitet, indem die 6 Vierkantmutter eingesteckt und bis zum Anschlag eingepresst werden.

Danach werden die rechte und linke Seite mit insgesamt 6 M3x20 Schrauben befestigt.

Jetzt werden die beiden Brembacken. wie gezeigt mit einer je einer M3x14 Schraube, einer Scheibe und einer Mutter befestigt.

Zuletzt werden die Gummiringe für die Bremse angebracht#
Zusammenbau der Achse
Vorweg ein Satz zur Konstruktion: Ich habe die Achse mittels einer M6 Gewindestange von vornherein verstärkt, da ich diese ohnehin im Fundus hatte. Eventuell kann die Gewindestange nebst Muttern einfach weggelassen werden.
Die Achse wird in 2 Teilen gedruckt, zusammengesteckt und verklebt. Damit dies gut zentriert werden kann, steckt ihr einfach den Conjecturing dazwischen, insbesondere, wenn ihr auf die Gewindestange verzichtet.
Die Endkappe wird aufgesteckt, diese liegt später in Auflieger des Dreiecksständers.
Der Center Ring kommt bei kleinen Spulen zum Einsatz, zusammen mit der Rändelmutter kann damit die Spule mittig platziert werden.
Das Folgende Bild zeigt 3 Darstellungen der Achse.

Operation
Kleine Spulen werden mit dem Centerring und der Rändelmutter fixiert. Prusament Spulen werden mit den Kappen verwendet. Ander Spulen mit den Universal Adaptern, wobei es gleichgültig ist ober ihr dann den RH oder LH Adapter verwendet. (Sie Universal Adapter für Präzisen Filament Spuler)
Die große Prusament Spule wird einfach mit den beiden Spulenkappen aufgesteckt.

Das Linke Bild zeigt eine schmale Spule unter Verwendung des Universal Spulenadapters, das rechte Bild die 2 kg Prusamtere Spule mit den original Spulenkappen aus dem Projekt Präziser Filament Umspuler

Dieser Feeder kann einfach auf das LACK Enclosure gestellt werden. Er garantiert eine kontrollierte Filament Zuführung.
Für die Zuführung habe ich ein Loch in die Tischpappe gebohrt und eine gedruckte Tülle eingesteckt.


Das Modulsystem
Das folgende Bild zeigt alle Module zum präzisen Filamentaufwicker und die zugehörigen Links:

- (A) Präziser Filamentumspuler
- (B) Motor Modul
- (C) Universal Spulenrollenadapter, für alle Spulen statt nur Prusament
- (D) Neuer Filament Abroller (dieses Projekt)
- (E) Motorsteuerung in der Box
ENGLISH ENGLISH ENGLISH ENGLISH ENGLISH ENGLISH ENGLISH
Introduction

This braked filament feeder fits my Filament Spooler and the PRUSA LACK Enclosure. It replaces my first version and is suitable for spools up to 200 cm in diameter and a width of 130 cm, e.g. also for the 2 kg Prusa spools.
The feeder is compatible with my universal bobbin adapters and the motor module
This feeder is characterised by a brake that can be adjusted using simple rubber rings so that the filament is always under a defined tension during winding. The constant tension is helpful for the most precise winding possible with my filament pumpsuler.
If you place the feeder on the LACK housing to feed in the filament from above, the brake prevents uncontrolled unwinding.
Otherwise, it has the same function as my first version, everything I said there applies, and the video shown there is generally correct.
Improvement compared to version 1
| Version 1 | Version 2 |
| Through axle is bolted to the feeder | Through axle is simply attached from abov |
| Prusa MMU coil inner body or similar axis required | Compatible with the spool caps or the Universal Adapter |
| Filament cannot be safely unrolled downwards (for LACK Enclosue) due to connector. | Folding, open or removable connector, so the feeder can also be placed on the LACK housing. |
| Assembly using M3 screws that are screwed directly into the PETG | More stable assembly by means of recessed square nuts. |
| The entire coil is braked, difficult with cardboard coils: no constant braking force | the axle is braked. Constant braking force, easier to implement as rubber rings are sufficient. |
Parts required
I have registered with the Amazon partner network and therefore earn money as an Amazon partner from qualified sales, so thank you if you use the links.
I have installed all parts myself, i.e. the dimensions should fit exactly, provided there are no (quality) differences between different delivery batches.
| Item | Anz | Zweck | Quelle |
|---|---|---|---|
| Screws, M3 x 20 | 6 | e.g Set von Amazon | |
| ScrewsM3 x 16 | 2 | ||
| Washers M3 x 7 | 2 | Brake lever | |
| Nuts M3 | 2 | ||
| Square nuts M3 | 6 | Struts | e.g Amazon |
| Threaded rod 200mm M6 | 1 | Reinforcement of the axle | e.g Amazon |
| Nuts M6 | 2 | Reinforcement of the axle | |
| Self-adhesive felt | Support for the axle |
Parts to be printed
Zunächst die Folgenden Teile aus PETG drucken.

Assembling the triangle Stand
Firstly, the two struts are prepared by inserting the 6 square nuts and pressing them in as far as they will go.

The right and left sides are then fastened with a total of 6 M3x20 screws

Now fasten the two brake shoes as shown, each with an M3x14 bolt, a washer and a nut.

Finally, the rubber rings for the brake are fitted

Assembling the axle
First of all, a sentence about the construction: I reinforced the axle from the outset using an M6 threaded rod, as I had this in my stock anyway. If necessary, the threaded rod and nuts can simply be omitted.
The axle is printed in 2 parts, plugged together and glued. To ensure that it is well centred, simply insert the conjecturing in between, especially if you do without the threaded rod.
Attach the end cap, which will later rest on the triangular support.
The centre ring is used for small coils; together with the knurled nut, the coil can be positioned in the centre.
The following picture shows 3 representations of the axle.

Operation
Small coils are fixed with the centre ring and the knurled nut. Precision coils are used with the caps. Other spools with the universal adapters, whereby it does not matter whether you use the RH or LH adapter. (They are universal adapters for precision filament spoolers)
The large precision spool is simply attached with the two spool caps

The picture on the left shows a narrow spool using the universal spool adapter, the picture on the right shows the 2 kg larger spool with the original spool caps from the Precise Filament Rewinding project.
This feeder can simply be placed on the LACK Enclosure. It guarantees a controlled filament feed.


The modular system
The following image shows all the modules for the filament rewinder and the associated links:

- (A) Precise filament winder
- (B) Motor Module
- (C) Universal reel adapter, for all coils, more than Prusament
- (D) New filament dispenser (for Winders and LACK Enclosure) (this Project)
- (E) Motorsteuerung in der Box