
Filament wall mount brackets for duraline f-system
Obliczymy ostateczną cenę na podstawie wybranego pliku. Sprawdzisz ją i zaakceptujesz przed płatnością.
Zapisane na tym urządzeniu.
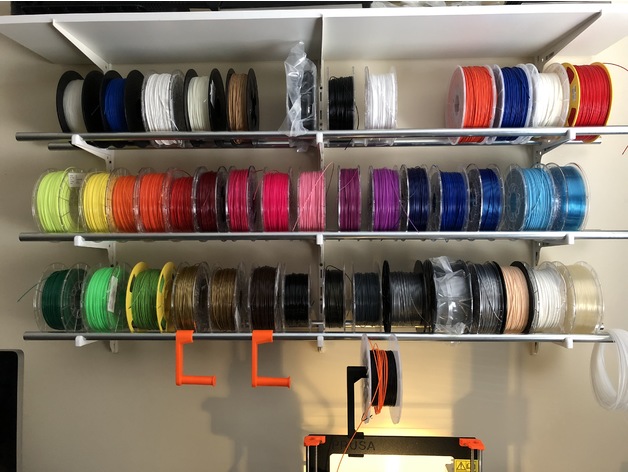
So I was looking for a nice, clean and cheap way to store my 40+ filaments spools.
- Ocena
- 5 / 5
- Polubienia
- 44
- Pobrania
- 174
- Wydruki
- 3
- Wyświetlenia
- 2991
- Oceny
- 2
Aktualizacja u źródła:
Informacje o modelu
- Źródło
- Printables
- Kategoria
- Accessories
- Licencja
- Creative Commons — Attribution — Noncommercial — Share Alike
So I was looking for a nice, clean and cheap way to store my 40+ filaments spools.
I came up with a solution to fit a spool on two metal central heating tubes.
The tubes are mounted on what's called a 'F-System' flexible shelf/storage solution. It's sold all over the world, goes by the name of 'Duraline F-system' in some countries.
Cool thing is, you can swap any spool you want, without removing a whole tube of spools.
You could also run filament directly from this mount. Although I would advise my other design to prevent under extrusion (see the orange spool holders):
https://www.thingiverse.com/thing:2856675
Update November 25 2018
Added 3/4 inch version. Can't test this myself, so please leave a comment if there's a problem with it
What do you need?
- F-System rails, I used 3 pieces of 150 cm (height)
- F-System hooks, 20 cm long. I bought 9 for 3 shelfs of 150 cm (wide) with extra room to add some wooden shelfs.
- Central heating tube, or anything suitable. 22 mm diameter, 150 cm long.
3d printed brackets for use on these F-system hooks. I printed 9 in PETG.
DIY
- Mount the rails, I opted to use 3 and leave 60 cm in between. Leaves 15 cm of tube on each side.
- Mount the hooks, you need to leave 3 empty slots between each shelf. So each shelf uses 5 slots (2 for the hooks themselves). This way you can still remove all spools with ease (2 in between fits, but almost locks them in place).
- Put the brackets on the hooks, it's a tight fit, so make sure it's all the way in.
- Add the tubes, be gentle on them as they fit quite tight as well.
If you really like to, you could give the tubes a screw from underneath (between the hook and bracket). I added this in the design, but it's not needed.
Print instructions
Category: 3D Printer Accessories Print Settings
Rafts: No
Supports: No
Resolution: 0.200
Infill: 40%
Notes:
I printed them in white PETG, use a higher infill to prevent cracks around the snap-fit for the pipes. No supports needed.
The wall side hole tends to break easily if there's too less infill, you could keep your hand on while snapping the pipe in, that works as well.
How I Designed This
Designed this in like 50 minutes in OnShape.
Only had to redesign it once to accommodate for one partly thicker side of the hook, and to make it a bit longer to make this really sturdy.