
Filter for North Pi case
We calculate the final price from your selected file. You review and accept it before payment.
Estimated printing price per file
€0.12 – €0.15 net (excluding VAT)
For file: Filter_Project_0.4n_0.2mm_PLA_MINIIS_10m.bgcode
This is an estimate for one file. You’ll confirm the exact price before ordering.
File and estimate settings
File used for this estimate
Average indicative estimate: €0.14 excluding VAT (range midpoint).
- Weight reported by the author
- 1 g
- Print time reported by the author
- 10.2 min
- Source material
- PLA
- Estimate material
- PLA
- Estimate printer
- Bambu Lab P1S - 0.4 nozzle
- Estimate process
- 0.20mm Standard
Indicative estimate for the selected file only, based on the author’s weight and print time. File variants are not added together. The final price is calculated after file analysis.
Saved on this device.

A filter for the Fractal Design North Pi Case that can be 3D printed Please read the description for instructions.
- Rating
- 0 / 5
- Likes
- 4
- Downloads
- 28
- Makes
- 0
- Views
- 232
- Reviews
- 0
Updated at source:
Model information
- Source
- Printables
- Category
- Computers
- License
- Creative Commons — Attribution
A filter for the Fractal Design North Pi Case that is fully 3D printed. It will fit directly into the back of the Front-Inner-Frame.
The main North Pi files and instructions can be found here
https://www.fractal-design.com/north-pi-3d-files/
This filter is designed using a modifier file for the actual filter element. Below are the instructions for using it with Prusa Slicer, but It should be pretty similar with other slicers as well.
First import the “Filter.3mf" as usual. and set “Print settings” to 0.2mm Structural
Then right click on the filter and select “Add Modifier”. Select the “Load” option.
Choose the "Filter Modifier".3mf and open.
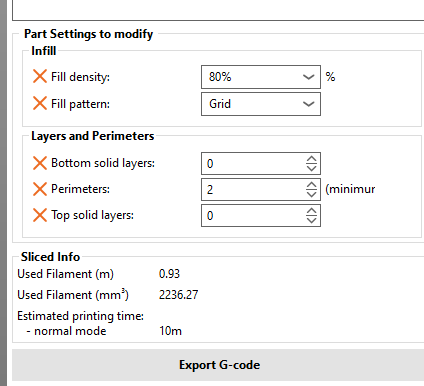
On the right side of the screen, right click on “Filter Modifier” and select “Layers and Perimeters”. On the bottom, set top and bottom layers to 0
Right clock “Filter Modifier, and select ”Infill" and set to 80% Fill density, and Grid Fill pattern
Here is what the settings on right side of the screen should look like.
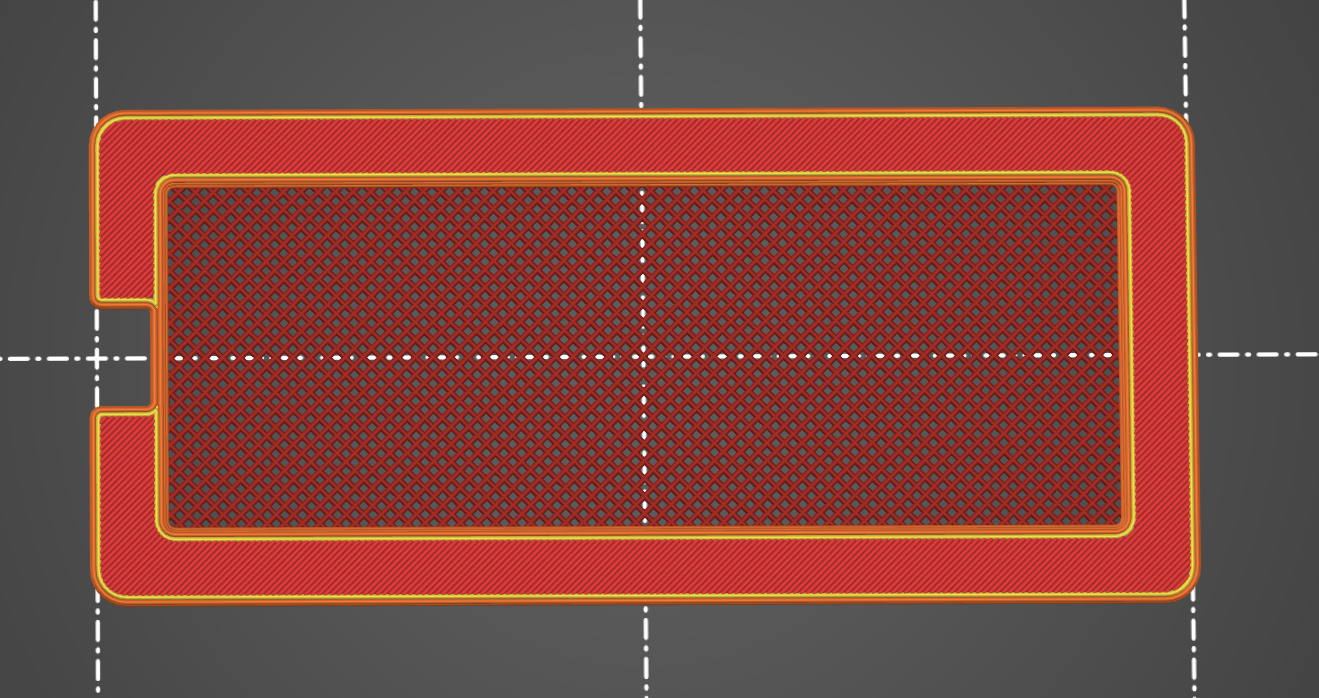
Slice the model, and it should look like the below image, with exposed infill on the middle part of the filter.
Happy Printing!