
PolyBriX planetary spinner (3 planets)
We calculate the final price from your selected file. You review and accept it before payment.
Saved on this device.
Model information
- Source
- Printables
- Category
- Other 3D Objects for Learning
- License
- Creative Commons — Attribution — Share Alike
It's a simple planetary spinner built with the PolyBriX construction kit. One may learn how geared transmission works.
Printing instructions:
Walls count: 5
Infill pattern: Zig-Zag
Infill density: 10%
No supports.
I've used PETG, but PLA will probably work as well
Print the provided STLs in this project or download the individual parts from the PolyBriX project.
Assembly instructions
The parts should be assembled according to this picture
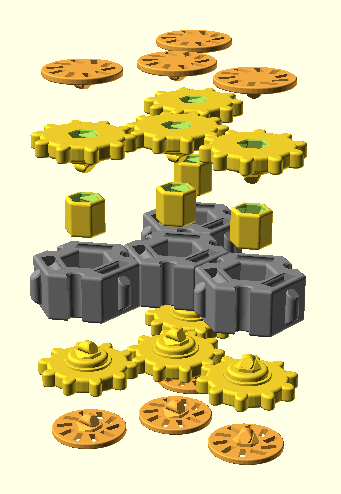
Parts list:
4 x hex_brick_all_sockets
4 x gear_connect_shaft
8 x 10_teeth_counter_gear
8 x spinner_addon
What to print:
- spinner_3_planets_bricks.stl
- spinner_3_planets_gears.stl
- spinner_3_planets_addons.stl
Note: If the standard bricks are too loose, try the ones from spinner_3_planets_bricks_tight_tolerance.stl
Assembly steps:
- Clean all the contact areas of each part
- Assemble the 4 hex bricks as shown in the picture
- Insert the 4 shafts into their corresponding holes in the bricks
- Press firmly 4 of the gears into the shafts
- Turn the whole thing on the other side and press the remaining 4 gears into the shafts
- Attach the add-ons to all the gears
Now you have a PolyBriX spinner to play with!