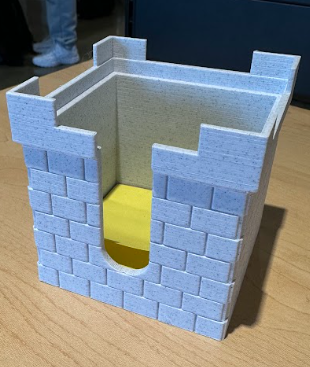
Castle Sticky Note Holder
We calculate the final price from your selected file. You review and accept it before payment.
Saved on this device.
Come make this cool sticky note holder that looks like a medieval castle and serves a great purpose!
- Rating
- 0 / 5
- Likes
- 2
- Downloads
- 8
- Makes
- 0
- Views
- 61
- Reviews
- 0
Updated at source:
Model information
- Source
- Printables
- Category
- Office
- License
- Creative Commons — Attribution — Noncommercial
Does old Europe interest you? Do you like medieval castles? If yes, you should make this cool castle sticky note holder for your desk!
Summary
My project partner, Colin, and I worked on brainstorming ideas, designing and creating our 3D model, a sticky note holder, for our Office Supply project for our Engineering class. We came up with the idea to make this medieval castle Sticky Note Holder. Not only does it function like a store-bought holder, but it looks aesthetic and something that can't be found in stores.
This sticky note holder is:
- (8.4 cm x 8.4 cm x 7 cm) (L x W x H)
- This project does not require assembly
Lesson Plan and Activity
A recent analysis by the Staples finance department has concluded that sales for desktop organization products have declined in recent years. The company would like to ramp up their profits in this area by enhancing the aesthetic nature of these products.
Your group of two has been hired to design a set of theme-based organizational products. Your team will design a set of office supplies that are tied together with a common theme. You must be able to justify the theme that connects the products together. The idea is that the customer will not want to buy just one; they will want to buy the whole set.
Design Choices
Both Colin and I, went on the internet to search for ideas for this project. We both thought that the idea of a medieval castle is really cool and would be interesting to make. Since we were already making another castle pencil holder we thought it would be a good idea to have a see of castles and make a Sticky Note Holder. I loved this idea because I, have a lot of sticky notes and I am in need of a sticky note holder.
The first step was to plan the design on paper to figure out the constraints and step-by-step planning of our model. Then, we transferred the information and planning from the paper to a planning doc on the computer.
Moving forward, me and Colin began making it in Solidworks.
We began by using the Boss Extrude feature, on the top plane, I made a square measuring
(8.4 cm x 8.4 cm). Then it was extruded by (7 cm) upwards.

Then I created a reference plane on top of the cube, (1 cm) above the top of the cube. Connecting from the top of the cube to the reference plane, measuring (9cm x 9cm x 1cm).

The next step was using the shell feature to make this cube hollow, for the purpose that it will hold a sticky note stack on the inside. Leave (0.3 cm) thickness of the walls.
I made the corner using the Boss Extrude. On top of the shape, which is made on a reference plane.


Following through, It all went pretty smoothly, however, we were faced with the challenge of doing a circular pattern feature on a cube shape. So to help, use the Reference Geometry feature.
After consulting with my teacher, I made a reference axis connecting the front and the right planes together, which will help me use the circular pattern feature. Using the mirror and the circular pattern features I was able to make corners of the castle.

Doing another boss extrude on the side of the cube, I made a “brick” measuring (1cm x 1.5 cm)
I circular patterned this design around all four walls.

After making this first pattern around the cube, I used the linear pattern feature to raise the pattern up to the top of the shape.
Then I created the second set of bricks that will go in between the first pattern. Same measurements as the first set of bricks, however, it is going to be placed in the middle of 2 bricks.

Following this pattern, I used the linear pattern feature the same way as the previous set of bricks was made.

Just as I did earlier, using the circular pattern feature, circle this pattern around the cube.
Going into the Extrude Cut feature, on the front side of the cube, I drew a slot using the Slot feature in Sketch. I started from the midpoint of the top line and extended the slot down and outwards to the size I desired the cut to be. This measured (2.01 x 4.98 cm).
Cut this slot through the all to make a cut out for where your finger can fit through, to grab a sticky note. This is the final step of creating this sticky note holder.

This is what the final shape should look like.
The 3D model came out very closely to what we had originally planned.


Originally, for the top part, the rim, there was going to be 3 rectangles on each side, however, we decided to make a change. It doesn't make a functional difference, but aesthetically, we liked it better the way we designed it in Solidworks.