
Red Robin Model Set - (1:64 Scale Diorama)
We calculate the final price from your selected file. You review and accept it before payment.
Saved on this device.
Model information
- Source
- Printables
- Category
- Other Toys & Games
- License
- Standard Digital File License
A while ago, I received a request for a Red Robin model set. Red Robin is a burger chain serving up gourmet burgers and bottomless fries! They are a step up from fast food burger joints, and offer a fun atmosphere perfect for families or large groups.

I referenced the location pictured above for the overall design of the model. This location has some really great design features like the main door and entrance under the large round awning, red brick walls, and the large logo sign and round structure on the roof. The roof has a metal, industrial look to it, and the red color really makes the building stand out.
I wanted to make this model compatible with the A1 MINI build plate size, so I made some modifications to the design. The model stays true to the overall aesthetic of the building, but made tweaks to some features like the size of the windows and entrance.
- I used super glue for the windows. I also used super glue to attach the door to the entrance frame.
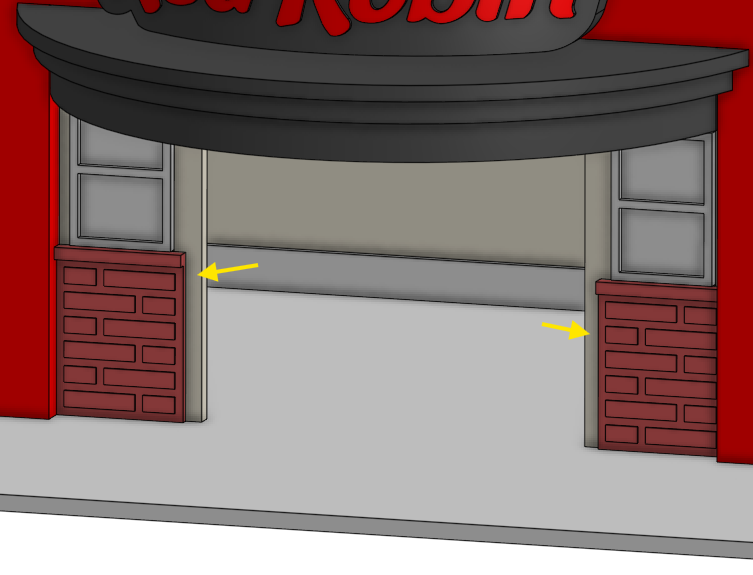
- Assemble the building facade before adding the brick walls which will help line up the brick walls better. I used hot glue for the brick walls. Make sure the small brick walls are lined up against the red facade piece so that there is room to glue on the entrance frame (see image below).
- The small awnings press fit into the building body. They require a little bit of force, but they snap in nicely and I didn't have to use any glue. The large round awning may need a bit a glue for a better hold.
- The round structure on the roof may need some hot glue to hold in place.
- Surprisingly, the longest print was the Red Robin logo sign due to the AMS and the fact that the logo is wrapped around a curved surface. I printed this part multiple times at different orientations and found that orienting the part up on an angle gave the best result. Just be prepared for a bit of filament waste from the supports, prime tower, and AMS poop.
- As always, an assembly guide is posted. I'll have a short assembly video posted on YouTube as well.
Filament used:
- BL PLA Matte Scarlet Red
- BL PLA Matte Terracotta
- BL PLA Matte Desert Tan
- BL PETG Translucent Clear
- eSun Black
- eSun Gray
- eSun Cold White
This model brings back so many memories from when my parents took us out on a Friday night for dinner. I had a ton of fun designing and printing this model, and it fits very nicely into the mini city. Feel free to reach out with any questions. Stay tuned for even more models coming!