
1 / 7
Smart Wi-Fi Thermometer USB-C Rechargeable
Order a print of this model
We calculate the final price from your selected file. You review and accept it before payment.
Saved on this device.

Smart Wi-Fi thermometer powered by a 21700 lithium battery (5 Ah)
- Rating
- 0 / 5
- Likes
- 1
- Downloads
- 3
- Makes
- 0
- Views
- 67
- Reviews
- 0
Updated at source:
Model information
- Source
- Printables
- Category
- Other Ideas
- License
- Creative Commons — Attribution — Noncommercial — Share Alike
This project is a smart Wi-Fi thermometer powered by a 21700 lithium battery (5 Ah) and recharged via USB-C.
It’s designed to offer very long battery life, easy assembly, and low cost — with no need for programming, only a few simple solder joints.
I use it in my country house, where very long battery life is needed.
With standard AA batteries, the sensor used to last about 3 months; with this 21700 lithium setup, it now runs for almost a full year on a single charge.
⚙ Features
- Up to ~1 year of battery life with a 21700 Li-ion cell (≈5000 mAh)
- Rechargeable via USB-C using a TP4056 charging module
- Stable 3.3 V regulated output from a TPS63020 boost/buck converter
- No programming required, just simple wiring and soldering
- Compact, printable case for protection and easy mounting
- Low-cost and easy to build, ideal foreveryone
🧩 Required Components
- 1 × TP4056 Lithium Battery Charger Module (USB-C version) https://it.aliexpress.com/item/1005006043031985.html
- 1 × TPS63020 3.3 V Boost/Buck Step-Up/Down Module https://it.aliexpress.com/item/1005007967030664.html
- 1 × Smart Wi-Fi Temperature & Humidity Sensor (wifi version - no hub required) https://it.aliexpress.com/item/1005006859951460.html
- 1 × 21700 Li-ion Battery (5 Ah) – Samsung, LG, or similar
- 4 × M3 Threaded Inserts https://it.aliexpress.com/item/1005004535859664.html
- 4 × M3x10 Countersunk Screws (m3x8 and m3x12 should also fit)
- Some wires/cables for connections – 20-24awg is fine
🛠 Assembly
- Power routing:
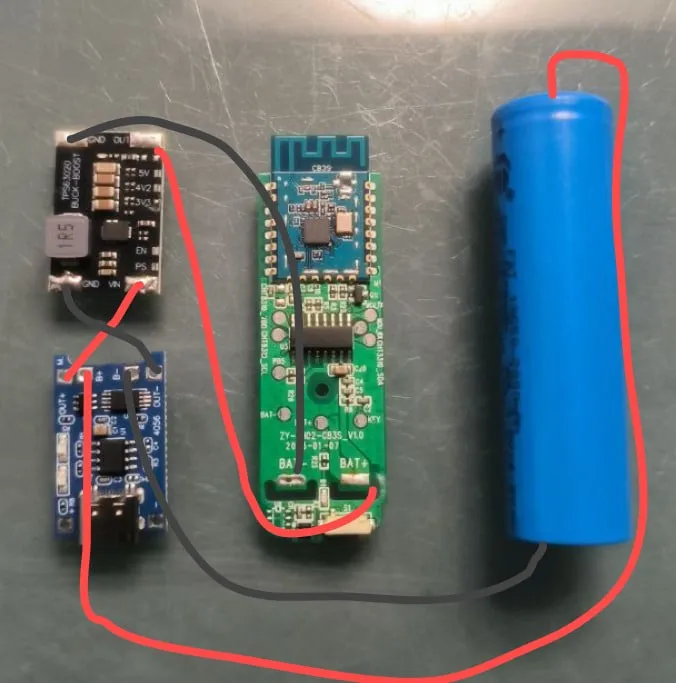
Start with the TP4056 charging module (USB-C) and the TPS63020 boost/buck converter.
Connect OUT+ and OUT− from the TP4056 to the TPS63020 input. On the TPS63020, VIN is the positive (+) input and GND is the negative (-) input. - Sensor connection:
Connect the Wi-Fi thermometer’s BAT+ to the 3.3 V OUT of the TPS63020, and the Wi-Fi thermometer’s BAT- to GND OUT of the TPS63020the converter - Battery connection (last step):
Finally, solder the 21700 Li-ion cell to the TP4056 module. Connect B+ to the positive terminal of the battery and B− to the negative terminal of the battery.
This should always be done last to avoid accidental short circuits. - Final assembly:
Place all components inside the 3D-printed enclosure, glue them with som hot glue, ensuring the USB-C port is accessible for charging, and close the lid with M3 countersunk screw. - Power up:
Charge the battery via the USB-C port, and enjoy months — up to nearly a year — of continuous operation!
3D Printing
- Fast print, no supports required
- Material: PLA or PETG
- Optimized for quick and clean assembly