
Drybox filament bushing
We calculate the final price from your selected file. You review and accept it before payment.
Preliminary estimate for PETG
€0.10 – €0.13 net (excluding VAT)
For file: CAP_0.2mm_PETG_MK3S_8m.gcode
This is an estimate for one file. You’ll confirm the exact price before ordering.
File and estimate settings
File used for this estimate
Average indicative estimate: €0.12 excluding VAT (range midpoint).
- Weight reported by the author
- 1 g
- Print time reported by the author
- 8.4 min
- Source material
- PET
- Estimate material
- PETG
- Estimate printer
- Bambu Lab P1S - 0.4 nozzle
- Estimate process
- 0.20mm Standard
Indicative estimate for the selected file only, based on the author’s weight and print time. File variants are not added together. The final price is calculated after file analysis.
Saved on this device.

open source angled filament bushing with a magnetic cap
- Rating
- 0 / 5
- Likes
- 17
- Downloads
- 68
- Makes
- 0
- Views
- 594
- Reviews
- 0
Updated at source:
Model information
- Source
- Printables
- Category
- Accessories
- License
- Creative Commons — Attribution
Materials
- 4x countersink M3 bolts
- 4x M3 nuts
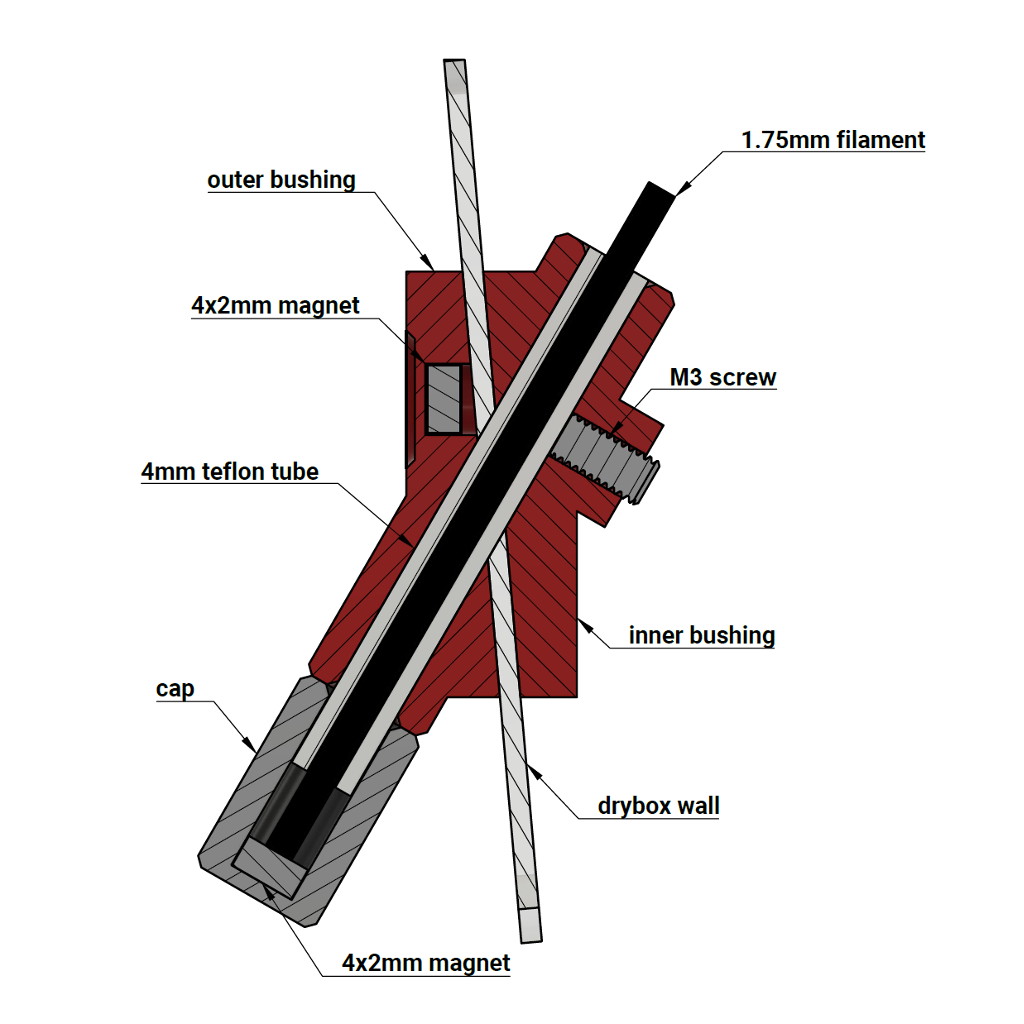
- 4mm teflon tube
- (optional) 2x 4x2mm magnets
- (optional) M3 set screw
Assembly
- mark and drill holes for the M3 bolts into the drybox wall
- insert the M3 nuts into the inner bushing
- insert one of the magnets into the outer bushing
- bolt both sides of the bushing to the drybox wall
- run a 4mm drill bit through the hole for the teflon tube
- cut a 35mm long piece of teflon tube, insert it into the bushing from outside of the box and keep pushing it in until it's flush on the inside
- insert the other magnet into the cap; the polarity has to align with the first magnet so that the cap can stick to the recess in the outer bushing
- run some filament through the tube, push the cap onto the teflon tube, then take it off
- there should be a short piece of filament sticking out of the teflon tube; if that's not the case, shorten the teflon tube so that you can comfortably pull out the filament again
- if the teflon tube doesn't sit firmly in the bushing, retain it using the M3 set screw
Adjustments
This bushing was designed for a box with tapered sides, situated just above the printer. The design takes into account two main angles: one between the wall and the bottom of the box, and the other between the wall of the box and the filament path. Look at the mechanical drawing for reference. You can adjust these angles in the f3d file. The fastest way to approximate what angles you need is to take a picture of your box from the side in its final position, preferably along with the filament running from the spool to the printer. You can then import this picture into the Fusion 360 design to make the appropriate changes.
Don't forget to adjust the thickness of the wall as well, otherwise the screw holes will be misaligned.