
Kraken - Revolutionary Bambu Lab AMS
We calculate the final price from your selected file. You review and accept it before payment.
Saved on this device.

Kraken - Revolutionary Bambu Lab AMS
- Rating
- 5 / 5
- Likes
- 21
- Downloads
- 126
- Makes
- 1
- Views
- 567
- Reviews
- 1
Updated at source:
Model information
- Source
- Printables
- Category
- Bambu Lab Parts & Upgrades
- License
- Creative Commons — Attribution — Noncommercial
Notice!
This is only compatible with the original AMS. Please view my other designs for designs supporting other AMS systems, there are plenty.
Buy Kraken
I've teamed up with a few different stores around the world offering the printed parts and everything you need for the build so you won't need anything outside of the kit:
Kraken has a strict non-commercial license, it can only be sold with licensing through Hume Beam Engineering Solutions.
About
Kraken is a revolutionary, highly reliable and enhanced drop-in main body replacement for the Bambu Lab AMS, a multi filament companion to the Bambu Lab X1/P1, H2 and A1 series printers. It combines the advantages of both Hydra and Python and uses a similar spool system as Python. You could say Kraken is a compact version of Python, fitting inside the original AMS box.
The Bambu Lab AMS internals are used, you just need to move over the parts; the four feeders, the rear motor, the RFID boards and the main board as well as the PTFE tubing and cables.
It features self-centering Double Helical gears from the small drive gear on each feeder to the enlarged spool gear. It's using the Bambu AMS internals only, no modification or additional parts are required, it's fully reversible.
As the spools fully rest on standard 608 bearings on both sides of the spool holder, both the feeders and the AMS hub motor are offloaded, avoiding premature wear or AMS overload errors.
Cardboard spools, refills and various size spools are all compatible including 250 g sample spools and other odd-sized spools. Maximum spool width is around 70 mm with Kraken.
Kraken is fully printable; no extra parts are needed apart from the screws that come with your AMS.
Kraken supports all standard functions as well as PTFE tubes replaceable from the top.
The name Kraken is inspired by the mythological creature from Norse Mythology. I have other designs with names from Greek mythology (Hydra / Python / Icarus / Hercules) so I thought it was fitting.
The main changes / improvements over the standard AMS are:
"Compact Python" - Uses Python tech but inside stock AMS box
Compatible with all types of spools and sizes, up to around 70 mm wide.
All spool diameters fit, from tiny sample spools up to 202 mm diameter spools.
No need for spool weights.
No need to rely on roller grip or worry about stuck spools.
High torque self-centering double helical gears.
Fully supports RFID in all spool slots.
Perfect for odd-sized spools and cardboard spools
If you download the individual 3MF files in the files section, they are design files only and can be easily printed on any printer / slicer. If you get a warning that they do not come from Bambu Lab just ignore the warning, they were exported directly from my design software.
Leave feedback in the comments. Thanks!
Recommended Add-ons
These are all optional but recommended to maximize the capability of your Kraken AMS.
There is also a Kraken spool holder with a TPU edge for even more quiet operation made by official Kraken tester RifRaf:
Discord Support
If you need any help with the build or want to leave feedback you can join us on Discord:
Our server is named “(Unofficial) QIDI Tech 3D Printers” so don't get confused when you join as it was initially setup for that brand of printers but we've expanded it to other brands and 3D printing in general as well as channels for some of my mods, it's where I generally hang out.
Support
All my designs and mods on Printables are free to use and remix. They have a non-commercial license. If you enjoy this or any of my other designs you can send me a small donation using the link below. Thanks :)
https://www.paypal.me/humebeamengineering
If you prefer Crypto/BTC you can send me a message.
If you send a donation, be sure to mention "Kraken - Revolutionary Bambu Lab AMS" in the comments box so I know which design it's from and you will be added to the list below.
Official Supporters
If you have donated $5 or more you will be added to this list as an official thank you from me and you will also be assigned a serial number, the list will be updated as often as possible.
You can request a custom serial number if you send a $20 donation or more. Cheers!
If you've bought Kraken from one of the authorized resellers you can also request a serial number by submitting a proof of purchase.
Hume Beam #0001, Hume Beam #9999, Robert Schwinn #6767
Guy H #0002, Kevin Pereira #0003, RifRaf #0004, eibo68 #0005, Vitek #0006, dowbridg #0007, Kurt Hays #0008, Ray Holmes #0009, 3D Creations of Rhode Island #0010
Get a Silica Dry Box with your serial number here:
Thanks again!
If you want to remain anonymous, leave a note with your donation. If I've missed your donation let me know.
FAQ and Technical Specs
“Does this work like an AMS?”
Absolutely, it works just like the stock AMS except the spools are sitting in spool holders, driven by double helical gears rather than on top of rollers. This highly increases the reliability and versatility.
“Can I use multiple Krakens?”
Yes, you can daisy chain up to four of them for a 16 spool AMS.
“Can I hot plug an AMS to a printer?”
Normally this works fine but to be sure please shut down your printer before plugging in Kraken (or a stock AMS for that matter!), it is much safer for the electronics. It avoids electricity spikes that can potentially happen if there is a poor connection between the AMS bus cable (black cable from printer to AMS) and the AMS power board, which in turn can damage the AMS main board.
Hot-plugging can actually damage the electronics (AMS main board) so plug everything in before you boot up the printer.
“Do I need a stock AMS?”
Yes. You use those parts and transfer over to Kraken. All of the parts can be bought individually but it might be cheaper to just get an AMS rather than sourcing the parts individually, I haven't compared the prices.
“Does it support RFID tags?”
Kraken fully supports the Bambu Lab spool RFID tags in all four spool slots.
“Can I use “AMS Savers / Filament Guides" with Kraken?”
Absolutely, all AMS Savers and so called Filament Guides are supported.
“My spools do not retract fully and I get an error”
This is not related to this mod but a general AMS issue but we get the question quite often. This is due to the yellow retract gear inside the feeder slipping so it won't fully retract the spool.
Please join us on Discord and view the stickies for a video walkthrough on how to fix it, it's easy.
“I get an AMS overload error”
It could be that the feeder screws are overtightened, forcing it too close to the roller. If so, untighten a few turns.
Check so that your spools run freely in the spool holder without restriction.
Check the spool holder slots (at the spool holder columns) for debris from printing it and clean it.
Make sure the bearings rotate normally. If you use the printed version, ensure they rotate smoothly as well.
Ensure you don't get any binding between the large spool gear and small feeder gear.
If you still can't sort it, please join us on Discord and we'll be happy to help.
“Can I get the source design files in step format?”
The main Kraken step files are not available publicly. However, some files are available in step format, please view the remix tab.
BOM - Bill of Materials
You can print Kraken in just about any filament you like. However, if you plan on keeping the AMS directly on top of the printer it's best to print it in PETG, ABS or ASA as the heat from the printer can soften the printed Kraken parts if they are printed in PLA for example.
For this reason and for reliability I recommend placing the AMS next to the printer.
Around 1100-1400 g of filament is required at the recommended print settings for the full build including four spool holders, depending on which filament you use.
I've printed most of the test builds in Prusament ASA, PLA and eSUN PLA+, both brands and filament types work great. PETG is also a great option.
Filament
Bearings (Optional, you can use the 3D printed version instead)
PTFE tubes (Optional)
You need about 1.5-2 m PTFE tube to cut to length but if you're upgrading you can just keep the old PTFE tubes, make sure they're not worn though. I recommend the stock Bambu PTFE tube which has an inner diameter of 2.5 mm and an outer diameter of 4.0 mm. Go for the AMS Hub / Custom Cut which is a single piece 4 m tube.
The Hex Tools are superb for any 3D printer; I've had mine for years. They are particularly useful for the Kraken assembly.
Warranty
Kraken does not void your warranty but be careful, especially with the AMS main board, use an antistatic wrist band. Although the mod is completely reversible and you can't tell the parts have been installed in Kraken, I take no responsibility and you're on your own. Be careful and take it slow, read this page twice before you start.
Before Printing Kraken
Make sure you dial in flow correctly before you start so that you are not over extruding. The problem then is you can't join the dovetail joints and assemble properly.
The Bambu Lab printers usually do a pretty good with automatic flow calibration but it's best to confirm flow anyway, sometimes it is inaccurate. There are ways to do manual flow calibrations directly from Bambu Studio and Orca Slicer so you can use those.
Once you have done that, print these dovetail test joints. They're intended for another design but the tolerances are the same so it will work well:
Print Settings
Most parts print without supports and I recommend using 4 walls and 30% infill for the main parts and 3 walls and an infill of around 15% for the rest of the parts. Print all parts in the direction I have set them. The spool rings can be printed with 2 walls and 10% infill to save some material.
The support boxes should be printed with 1 wall only and 5% infill. All this is prepared in the Print Profiles, including supports so you I recommend using these. There's a version without the support boxes available as well, in case you want to create your own custom supports.
PLA and PETG builds can most likely be printed completely without the support boxes so if you like you can delete them before printing by going into the per object setting in the print profile:

Both versions of the front roller sleeves are included, if you know which version you have you can delete the extra set from the print profile. The same goes for the printable bearings, if you use real 608 bearings you can of course delete them as well.
Tip: The drive gear sleeves can be printed in TPU 95-98A (tested by me) for a much more silent operation but normal “hard” filament is fine too but will be slightly louder when it's switching spools, you might not notice a difference though as the AMS box is quite well insulated.
Support Boxes
Although the support boxes may seem wasteful, they are highly recommended as they prevent warping of the tall thin parts, especially the sidewalls of Kraken. They're set to just 1 wall and 5% infill in the Print Profiles and do not waste too much filament but of course add to the print time. And once you've completed the full Kraken print you don't have to throw them away, they're usable, stackable boxes you can store things in.
The support boxes are likely not needed if you're printing Kraken in PLA or PETG so if you like can they can be removed in the slicer before printing, unless you want to keep them.

Assembly Instructions
If you've used Hydra or Python before it should be familiar, it's very similar.
Remove the Bambu Lab AMS internals from the standard AMS, follow this guide, it's not difficult:
https://wiki.bambulab.com/en/x1/maintenance/replace-the-ams-main-frame
Be sure to mark all cables and connectors before you remove them. I recommend marking each connector on the board and corresponding cable with a thin permanent marker pen as pictured below:
Precaution: Always wear an antistatic wrist band when working with electronics.
The RFID boards are secured with hot glue so pull that off before removing them, the same goes for the ferrite core on the cables between the AMS main board and the small board in the rear of the AMS. A user suggested some IPA to resolve the glue but I have not tested this myself.
Once that is done, you should have all the parts as pictured below. If you are unsure on how to remove the parts, just follow the assembly instructions in reverse.
Here are all the parts just before assembly.

You need the following hex tools. The 1.5 and 2.0 mm are needed for the AMS parts.

Main Parts Assembly
Slide the printed parts together. No screws are needed; the rear motor will keep the parts together as well as align them together with the screws for the AMS box. If you want to, you can add some silicon glue that's non-permanent to the dovetails but in our testing, it's not been needed. If there's a small gap it's nothing to worry about, it will sort itself once installed in the AMS box.
There is one thinner, long dovetail near the middle and one shorter and more robust below.


Mounting the motor
Flip the assembly upside down and install the motor, it secures with four (stock) screws and rubber bushings. Fully tighten but do not overtighten them.

RFID boards
Install the RFID boards. They are friction fit. Be careful when you slide them in, find the correct angle and they will slide all the way in.
The connector (circled in red) should face this direction, it's to ensure the surface soldered parts clear the printed parts.


Do the same for the other side as well (two RFID boards in total). It is facing the same way as the picture above.

You can tell if you've inserted the RFID boards correctly if all the hex cutouts are covered with the board in the background.

Front Rollers
Once that is all done, remove the rubber sleeve from the passive side of the front rollers, meaning the side without the gear. Do this for all four front rollers.
It's very easy. Just insert a thin pin between the rubber and the plastic casing and rotate the pin all around it, then it will pull off easily. I'm using a 1.5 mm hex tool, it takes less than 30 seconds to do one. Save the rubber sleeves in case you revert to stock later.


Continuing with the front rollers, grab the front roller sleeves and install it by pushing it fully in. It's a good idea to hold the plastic casing so it doesn't slide off the steel shaft as it's just pressed on.
You shouldn't need to use any glue but if they sit too loose you can use some silicone glue that's non-permanent.


Install the feeders
Sort the front feeder motors. The ones placed in the middle of the AMS have a shorter piece of PTFE so keep that in mind. If you accidently place them wrong you can just switch the tubing.

Slide the PTFE tube through the hole in the middle of the section:

When installing the feeder, I find it easier to install the front roller at the same time by tilting like below:
Take notice of the small drive gear! It must face the correct direction.

Once roller is in place, cross tighten the four small screws with a 1.5 mm hex tool.

Once done, connect the PTFE tubes to the rear motor (internal filament hub)
Proceed to install the other three front feeders and rollers, make sure they all move smoothly.

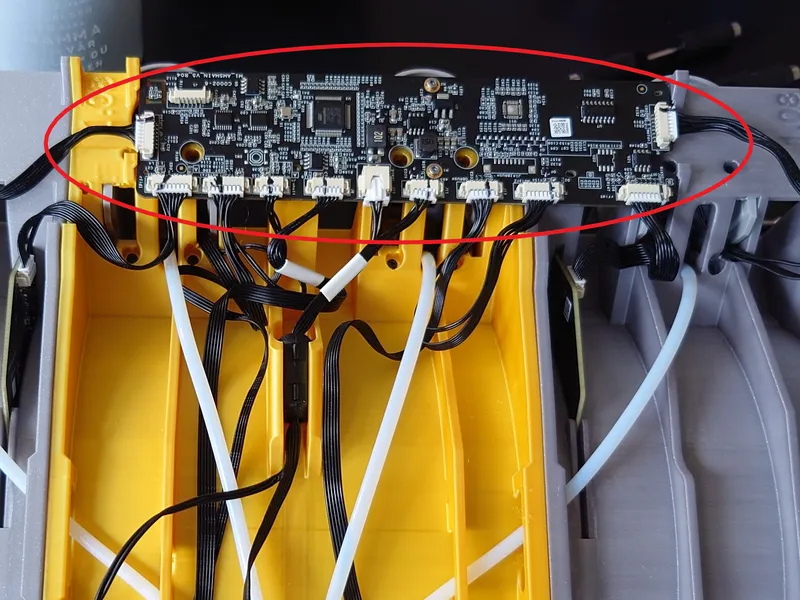
AMS main board
Almost done. Now we install the AMS main board. There are two tabs on each side it goes under and it is fastened with two small screws in the middle (use 1.5 mm hex tool). If the tabs don't reach the board, don't worry about it, it still sits firmly with the screws only.
There are slight variations of the hardware revisions of the AMS boards but the screw and capacitor locations are the same.
I find it useful to actually thread the small holes with the screws first, then remove the screws, place the board and finally install said screws.


Be careful with the capacitors on the board, they are located on the other side of the board in the pic below, these are guided through the holes in the printed part (see the picture just above).
Connecting the cables
Connect all the cables to the main board. Follow this section carefully and everything will be connected correctly. If you connect them wrong you can burn out the board so please don't skip this step. All cables are bidirectional.
Connect the first feeder (leftmost) here:

Connect the first (left) RFID board here:

Connect the second feeder here:

Connect the second (right) RFID board here:

Connect the third feeder here:

Connect the fourth feeder here:

Guide the three cables from the motor / internal filament hub here if you've not already done it.

Connect the wider (6-pin) cable coming from the actual motor of the internal filament hub here.

Connect the thinnest (4-pin) cable from the internal filament hub here, is the speed measurement cable:

Connect the hall sensor cable (5-pin) here:

The ferrite core with the cables between the main board and the small rear PCB sits in the little slot in the middle front, just behind the main board. It's just friction fit so slide it in. If the cable is still attached to your AMS box, remove it now and proceed below.
The cables are bidirectional (as are the rest) so it doesn't matter which in which way you plug them in.

Connect the thicker square plug in the red circled location, it's the power plug for the board.
Connect the slimmer cable in the green circled location, it's the bus cable from the main board to the rear power board.
Once both are connected, slide in the ferrite core into the friction fit mount (circled in purple). You can pull on the cables a little to tighten it up but make sure to leave enough slack.

If you want to double check once again, here are the schematics.
Picture Source: Bambu Lab Wiki

Time to install Kraken in the Bambu Lab AMS box. I find it easiest to stand it up at a 90-degree angle like pictured with the whole assembly moved as much forward as you can:

Connect the power cable from Kraken here:

And the bus cable here:

Next, fold down the Kraken assembly into the AMS box, ensure the front lock with the tabs of the box.

There is one tab on the front left and one of the front right of the box.


Fasten it with the two main frame screws. 2.0 mm hex tool is used.


Spool Holders
Just like Python, Kraken uses a geared spool holder system, rather than having the spools running on top of rubber and plastic rollers. This greatly increases reliability and you can use smaller spools and cardboard spools without worry.
To install, just press in the printed bearing (or 608ZZ/RS bearing, if you have some) on each side of the spool holder with the "peg" facing outward.


If you use the genuine 608 roller bearings, first press in the bearing then press in the plug, it snaps in place and secures on its own.


Do the same for the bottom of the spool holder.


You can use either version.
Spool Rings
With Kraken that's very compact, it's especially important for the spools to sit flat in the spool holder columns so the large gear doesn't scrape the side. The spool holder columns have slots where the bearing pegs align the spool horizontally.
Since it's so compact, it's also important that the spools are centered on the holder so I recommend using the spool rings to have them perfectly centered (concentrically) on the holder. They snap onto the spool holder top and bottom and can easily be removed when switching spools.
If the spool is not centered, it could scrape the bottom or the lid. Using the spool rings ensures it is in fact perfectly centered.
I recommend printing a bunch of spool rings for the spools you normally use, perhaps in different colours.
Bambu Lab uses the 55 mm spool ring and Prusament usually the 51 mm rings.
Using the Spool Holder
Measure the inner diameter of your spool. For example, Bambu Lab uses 55 mm inner diameter of the spools. Install the 55 mm spool ring to the top and bottom:


The spool ring should fit snugly over the top and bottom. If it doesn't, you can scale it a little without worry or increase the flow ratio.
Install the spool

Place the spool and tighten the spool holder top, it should also have a matching spool ring:
Notice: Don't overtighten or you can deform the large gear and get rubbing.

You can use the optional spool tightening tool (in grey below) here to get a better grip as the spool holder top is so narrow to maximize spool widths:

Install the spool in Kraken
Place the spool in the AMS and line up the large spool gear with the small gear on the front roller. It's using a self-aligning double helical gear so it will stay centered.

Kraken Adaptive Spool Holder
Rather than using Spool Rings, you can use the Kraken Adaptive Spool Holder if you like. It's a spring-based system for centering the spools and it uses the normal Kraken spool holder gear.
All done!
Precaution and some more tips
First of all, always have the printer fully shut down / off when plugging in the AMS. This is not mentioned nearly enough but a power spike or poor connection can damage the main board. So do yourself a favour and do that first.
Next, make sure the front feeders are fully inserted and tightened. Also make sure the bearings on the rollers are fully inserted over the shaft. Finally, 70.0 mm wide spools is the absolute max, else the spools will not turn like they are supposed to.
I recommend using the High Capacity Silica Gel Box to keep humidity at a minimum, it's compatible with Kraken as well as all other AMS mods made by me as well as stock AMS:
That's it! Thanks for your support.


Renders
Just to showcase the different spool holder options, the two spool slots on the left use the spool rings while the right use the adaptive spool holder that's an optional add-on, it's linked near the top of the page.
The install also shows the set with heat deflecting covers for the feeders, PTFE tubes and the motor, these can be useful when a top mounted dryer is installed and running, for example the Eibos Tetras or Sunlu AMS heater. The cover set is also an optional add-on linked from this page near the top.
