
"Red Oak" Boomerang
We calculate the final price from your selected file. You review and accept it before payment.
Estimated printing price per file
€1.35 – €1.65 net (excluding VAT)
For file: Prusament PLA, Scaled down for Mini+ / red-oak_015mm_pla_mini_1h35m.gcode
This is an estimate for one file. You’ll confirm the exact price before ordering.
File and estimate settings
File used for this estimate
Average indicative estimate: €1.50 excluding VAT (range midpoint).
- Weight reported by the author
- 17 g
- Print time reported by the author
- 1.58 hr
- Source material
- PLA
- Estimate material
- PLA
- Estimate printer
- Bambu Lab P1S - 0.4 nozzle
- Estimate process
- 0.20mm Standard
Indicative estimate for the selected file only, based on the author’s weight and print time. File variants are not added together. The final price is calculated after file analysis.
Saved on this device.
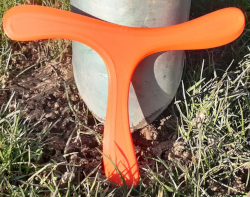
This boomerang design has become an instant favorite.
- Rating
- 4.867 / 5
- Likes
- 234
- Downloads
- 2,617
- Makes
- 33
- Views
- 6,636
- Reviews
- 30
Updated at source:
Model information
- Source
- Printables
- Category
- Outdoor Sports
- License
- Creative Commons — Attribution
This boomerang design has become an instant favorite. I modeled it after a wooden boomerang that I made a while ago, which happens to be made from quarter sawn oak and it is dyed red, hence the name.
It takes a good hard throw, and then it will do some nice medium range (40-ish for the 85 percent print I made) with a great hover and easy catch at the end.
The model in the STL may be a little to thick for optimal performance. I chose to scale the boomerang to 85% in X and Y, but only 80% in Z in the slicer to slim it down a little.
EDIT: I added a video demonstrating this boomerang design: https://www.youtube.com/watch?v=t\_kwJoYnxjU
How I Designed This
You will find the model in Onshape.
Designing this was pretty straightforward. I brought in a reference image of the wooden boomerang and traced its outline with splines. On a second plane offset by the thickness of the boomerang, I traced the shape of the insides of the airfoils on the top plane of the boomerang. Connect the two by a loft, and add some fillets on the top and chamfers on the bottom.
Print instructions
Printer Brand: Creality
Printer: CR10S PRO
Rafts: No
Supports: No
Resolution: 0.24
Infill: 30%
Filament: 3dk Berlin PLA Crystal Violet
Notes:
Printed with a .6 mm nozzle, which works great for boomerangs since they don't require a lot of detail, and the .6 mm will push about twice as much filament as a .4 mm one.
Post-Printing
Make sure the boomerang is flat. When I pop my prints off of the build plate, they tend to warp such that the wingtips face downward a little. This is called negative dihedral (or anhedral). We don't want that.
What I usually do is to warm up my build plate to 50 °C, wait for the wings to warp upwards a little due to the heat, and then weigh the middle of the boomerang down. Let things cool and the anhedral should be corrected. Repeat if necessary.