
Penrose P1 arc+node tiles
We calculate the final price from your selected file. You review and accept it before payment.
Saved on this device.

Tessellation tiles with aperiodic tiling, based on Penrose P1 tiles, with arcs and nodes to enforce the pattern
- Rating
- 0 / 5
- Likes
- 10
- Downloads
- 28
- Makes
- 0
- Views
- 368
- Reviews
- 0
Updated at source:
Model information
- Source
- Printables
- Category
- Puzzles & Brain-teasers
- License
- Creative Commons — Attribution
About Penrose tiling
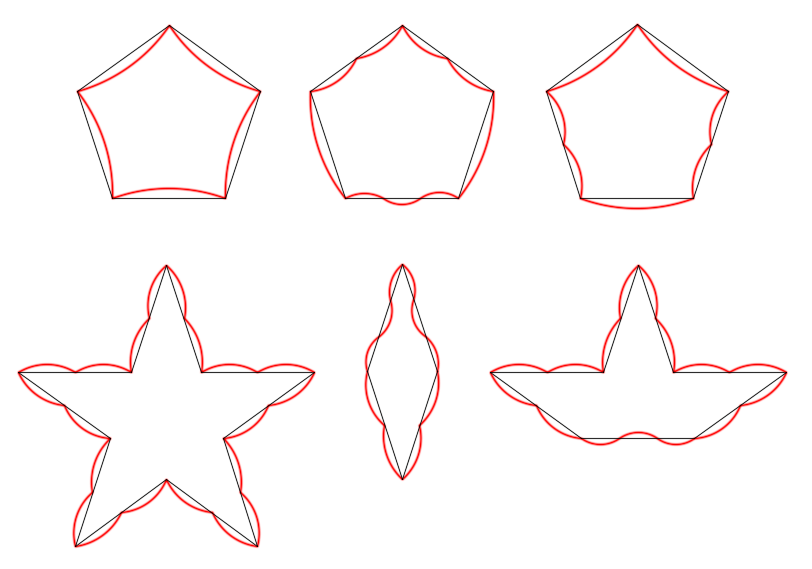
Penrose tiling is a non-periodic tessellation using two shapes to create intricate and interlocking designs. There are a few Penrose tile types, and this is based on the “P1” type.
Penrose tilings were first discovered/invented by Nobel Prize laureate physicist and mathematician Roger Penrose in the 1970s. The patterns have been significantly studied in the fields of mathematics and physics, leading to a better understanding of physical materials that form quasicrystals. Learn more about Penrose tiling at Wikipedia.
There are also a lot of great videos about Penrose tiling. I think the best one out there is this one by Numberphile. But there are many others, including this one by MinutePhysics, and this one by Veritasium.
There are six tile shapes in the P1 set, although in the original version three of the shapes are actually identical pentagons. The reason these are counted as different shapes is because of the rules for aperiodic tiling.
About my version
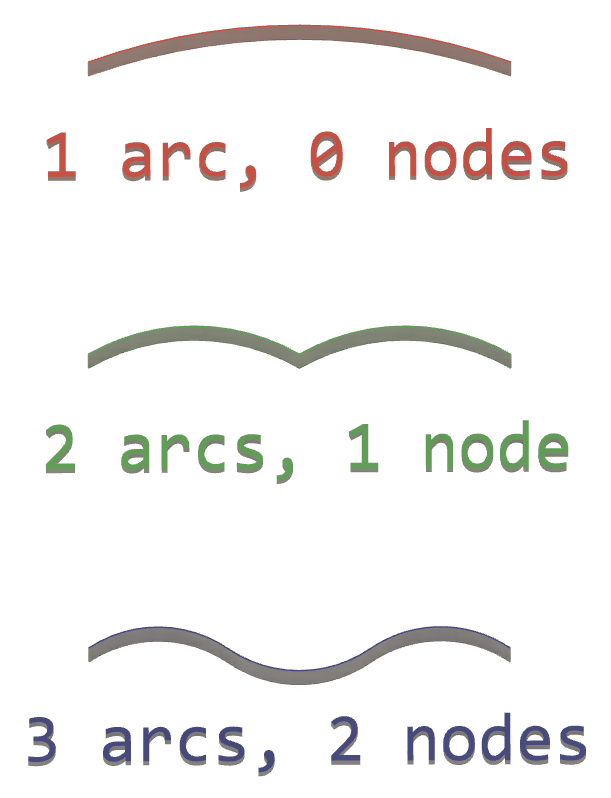
This rendition takes the basic shapes and adds curved perimeters that impose the aperiodic tiling rules. So instead of having three identical pentagons, there are now three distinctly different pentagons even though they have the same number of sides of the same length.
The curves are in the form of circular arcs and nodes. This gives each side a specific number of nodes and an orientation (inny or outy) that enforce the rules to ensure the aperiodic tiling pattern.
See also:
- Penrose P2 tiles
- Penrose P2 cookie cutters
- my curvy version of P2 tiles
- my curvy version of P2 cookie cutters
Printing and assembly
The .3mf file includes one of each type of tile, so you can print however many of each by copying and pasting them in your slicer app.
The photos shown here are from prints on my MK3/S+, with:
- 0.4 mm nozzle
- 0.2 mm layer height
- 20% infill, rectilinear (Prusaslicer SPEED mode)
- PLA
These are pretty simple, so you might be able to go with thicker layers and/or less infill to speed things up.
How many of each tile should you print? What I've found is there are never enough! But if you tile the entire universe with infinite tiles, here is a page with the ratios of numbers of each tile you'll need.
If you have any trouble that I can help with, please let me know, and I'll be happy to make modifications.
Please post your makes!