
Adaptive Cornhole for Spinal Cord Injury Patients
We calculate the final price from your selected file. You review and accept it before payment.
Saved on this device.

Innovative, modular, and fun assistive devices designed to allow patients with spinal cord injuries to play cornhole!
- Rating
- 0 / 5
- Likes
- 10
- Downloads
- 45
- Makes
- 0
- Views
- 1,348
- Reviews
- 0
Updated at source:
Model information
- Source
- Printables
- Category
- Outdoor Sports
- License
- Creative Commons — Attribution — Noncommercial — Share Alike
The “Hook” is a game-changing addition to your cornhole setup. With its sewn, reinforced loop and 3D printed, multi-material grip aid, it will revolutionize the way you play.
Specifically designed for patients with spinal cord injuries, the “Hook” is a unique and innovative accessory designed to make the game of cornhole more accessible. Whether you're a seasoned player or just getting started, the Hook can help you achieve greater accuracy, throwing distance, and consistency.
250,000 to 500,000 people suffer from spinal cord injuries (SCI) each year, 90% of which are due to a traumatic accident. Assistive devices, such as slings, braces, and foam enlargers currently help SCI patients participate in recreational activities, but nothing is tailored to cornhole.
The objective of this project is to design and produce an innovative, modular, and fun assistive device to allow patients with spinal injuries to play cornhole as an aspect of their physical therapy.
The device was designed to address the needs of two main user-groups:
- SCI patients who can grip a cornhole bag, but need throwing assistance
- SCI patients who cannot grip a cornhole bag but are capable of throwing
But, the “Hook” can also be used by any cornhole enthusiast to elevate your game!

How does it work?
The hook system provides mechanical advantage by turning a cornhole bag into a pendulum, allowing the user to “fling” the bag a further distance.
- Using one of the provided grips and flexible hook makes it easy to manipulate and throw a cornhole bag!
- If a user has enough dexterity, they can use their finger to hold the cornhole bag loop to throw the bag.
With several different ways to make and configure the Hook, cornhole becomes accessible to almost everyone!


________________________________________________________________________________________________________________
Options to Make the Hook:
We have created 3 options to make the Hook System, to address a wide-range of users:
- Entirely 3D printed (recommended for most users)
- PLA 3D printing + cast flexible hook (recommended for users not able to print TPU)
- Use finger as a hook! (recommended for users with more dexterity)
Detailed instructions are included below for each method! Enjoy!
________________________________________________________________________________________________________________
Option 1: Entirely 3D printed
Required Components:
- Any PLA filament
- TPU filament (Polymaker 95A-HF TPU recommended)
- Cornhole Bags (Amazon Link)
- Basic Sewing Supplies
- 0.5" Velcro (Amazon Link) or wrist strap (Amazon Link)
- 7mm Climbing Cordage - 2' length (REI Link)
- 1x - M3x35mm screw (McMaster-Carr Link)
- 1x - M3 Square Nut (McMaster-Carr Link)
Steps:
- Download files and print PLA Grip and TPU hook
- Modify cornhole bags for Hook (see “Modifying Cornhole Bags" section below)
- Assemble device (see “Hook Assembly Instructions” section below)
- Play cornhole!

________________________________________________________________________________________________________________
Option 2: PLA 3D printing + cast flexible hook
Required Components:
- Any PLA filament
- Cornhole Bags (Amazon Link)
- Basic Sewing Supplies
- 0.5" Velcro (Amazon Link) or wrist strap (Amazon Link)
- 7mm Climbing Cordage - 2' length (REI Link)
- 1x - M3x35mm screw (McMaster-Carr Link)
- 1x - M3 Square Nut (McMaster-Carr Link)
- SmoothOn Smooth-Cast 45D polyurethane (SmoothOn Link)
- Urethane mold release (Amazon Link)
- 400 Grit Sandpaper
- 2x - M5x75mm screw (McMaster-Carr Link)
- 2x - M5 Nut (McMaster-Carr Link)
Steps:
- Download files and print PLA Grip and PLA Mold
- Sand pieces, spray with mold release, and assemble mold (see image below)
- Follow instructions provided with polyurethane to mix ~15g of Smooth-Cast 45D, pour into mold and let cure for 30-45 minutes. Remove cast hook from mold.
- Modify cornhole bags for Hook (see “Modifying Cornhole Bags” section below)
- Assemble device (see “Hook Assembly Instructions” section below)
- Play cornhole!


________________________________________________________________________________________________________________
Option 3: Use finger as a hook!
Required Components:
- Cornhole Bags (Amazon Link)
- Basic Sewing Supplies
- 0.5" Velcro (Amazon Link) or wrist strap (Amazon Link)
- 1" wide, tubular nylon webbing (REI Link)
- Zip-ties
Steps:
- Modify cornhole bags for finger use (see “Modifying Cornhole Bags” section below)
- Play cornhole!
________________________________________________________________________________________________________________
Modifying Cornhole Bags:
We have created 2 options to modify cornhole bags, one optimized for use with a Hook grip assist, and one designed for optimal performance with the user's finger:
- Cord — for use with 3D printed grip assist
- Webbing — for use with finger
Detailed instructions are included below for each method! Enjoy!
 ________________________________________________________________________________________________________________
Option 1: Cord — for use with 3D printed grip assist


________________________________________________________________________________________________________________
Option 2: Webbing — for use with finger


________________________________________________________________________________________________________________
Hook Assembly Instructions:
Follow the same assembly process for all grip styles. Velcro slots and square nut hole may require some post processing depending on quality of 3D print.

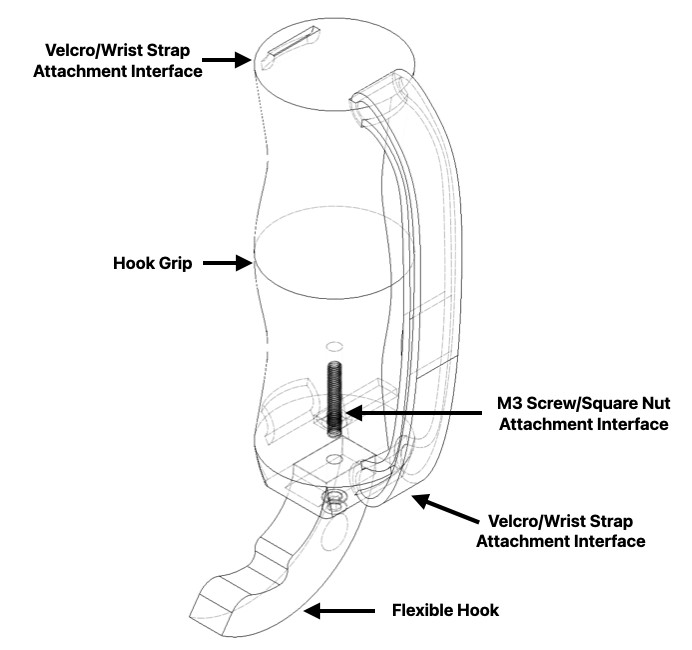
1. Thread velcro or wrist strap through appropriate slots for left-handed or right-handed user.

2. Insert square nut into slot. Align with hole.
- If having trouble aligning square nut, insert a toothpick (or similar) into the screw hole to ensure concentricity.

3. Insert M3x30mm screw through flexible hook and thread into square nut with 2.5mm Allen key.

4. Assembly complete! For optimal use techniques, see below:


________________________________________________________________________________________________________________
This is part of a semester-long Senior Capstone Design Project at the Georgia Institute of Technology. Devices developed with feedback from recreational therapists and patients at the Shepherd Center, a leading rehabilitation facility for spinal cord injuries, in Atlanta, GA, and with funding from the Nielsen Foundation.
Team: Jenna Holland, Adrian Neoh, Zach Vermeulen, Alex Wheeler, Tyler Young
CAD files/devices are not intended to be used as medical devices. Use at your own risk.