
Cap. Baxter Edit (RWS-AU Lady)
We calculate the final price from your selected file. You review and accept it before payment.
Saved on this device.
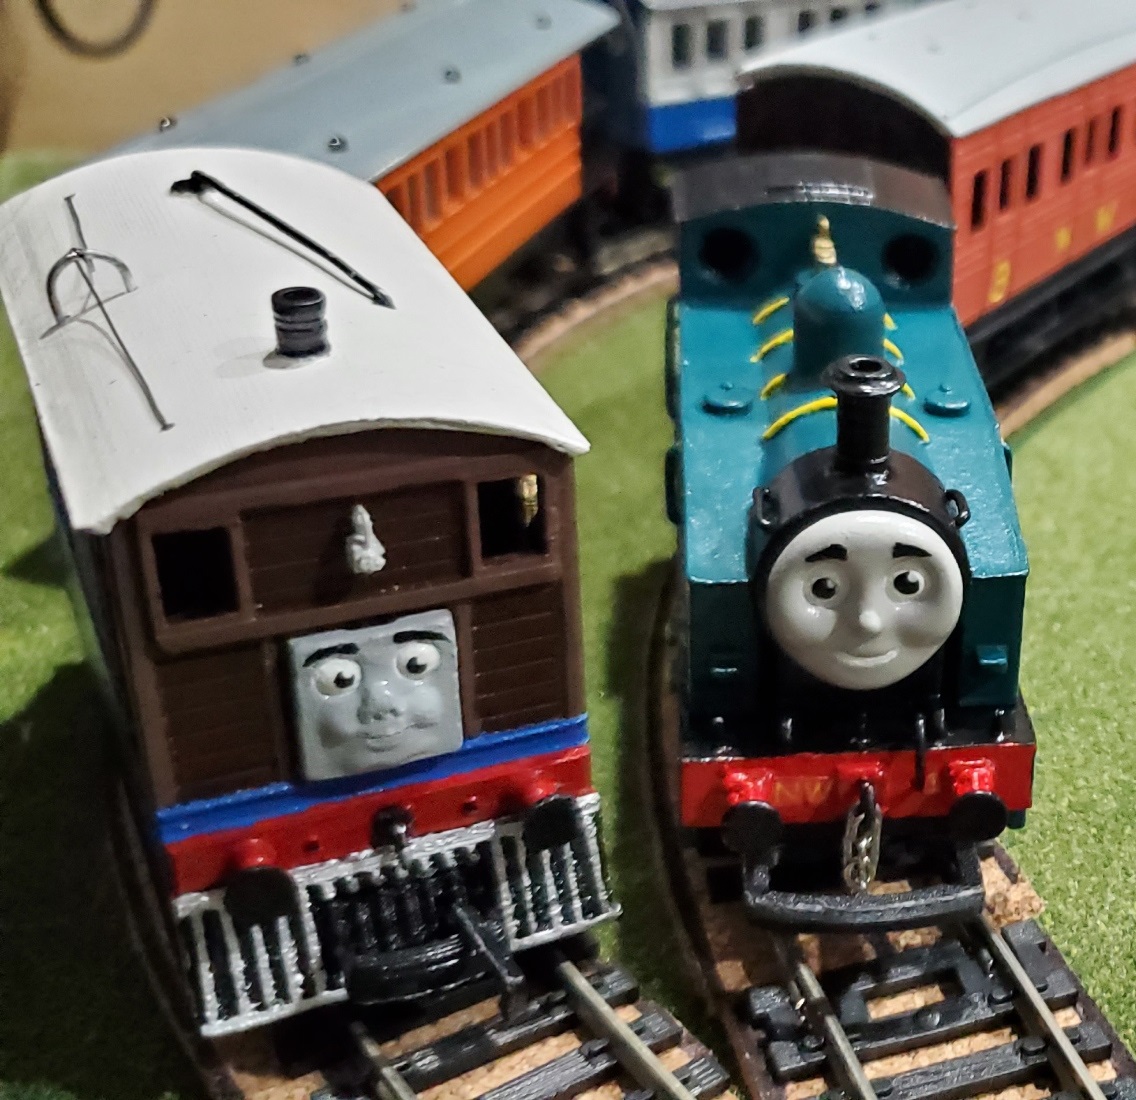
a rework of a previous design based on Lady from Thomas and the Magic Railroad. but I wanted an "Earlier version" of…
- Rating
- 0 / 5
- Likes
- 15
- Downloads
- 66
- Makes
- 0
- Views
- 732
- Reviews
- 0
Updated at source:
Model information
- Source
- Printables
- Category
- Other Ideas
- License
- Creative Commons — Attribution
a rework of a previous design based on Lady from Thomas and the Magic Railroad. but I wanted an "Earlier version" of the character. I envisioned her as another build of Fletcher Jenning's B class 0-4-0T, better known as "Captin Baxter" of the BlueBell railway.
I initially designed this model to be Baxter but with a bunker at the end. When sharing my model of Lady on my Twitter, some asked for a Baxter Variant. I haven't printed the parts for that variant as of yet, but it should print fine.
The intended chassis is a heavy cut-down Bachmann Bill/Ben chassis with the motor from Bachmann Edward/Emily and gear HTL46-00E01 (from the exploded diagram).
if you find another chassis works, please comment and I'll update the description to note. if you remix the file(s) for a chassis, please post a remix for others.
Print Settings
Printer Brand:
Prusa
Printer:
I3 MK3S
Rafts:
No
Supports:
Yes
Resolution:
~.01
Infill:
0%
Filament:
Post-Printing
Parts
For a complete model of Lady, you will need the following parts printed.
1x Top Shell1x Cab Roof
1x Smokebox door
1x Smokebox door Blank (optional)
1x Pistons Extra Small
2x Springs
2x Cab Window Frame
2x Hook Coupling (Decorative)
4x Buffers
for Lady, you'll want
1x Running Board
1x Bunker
2x Cab Steps
For Baxter, You'll want
1x Running Board (CB)
1x Cab Gard (CB)
1x CB cab step
1x CB cab step Mirror
assembly
Note: it will be easier to paint some areas if you glue the top shell assembly onto the running board last.
take the running board and feed 1mm dowels (or paper clip bits) through the small holes on the loco. the two to the front are two on the front are for lamp irons, and the two on the back are for longer dowels to go through the running board, bunker, and cab roof.
then fit the top shell onto the running board. mark where the springs would go and remove the top shell.
sand the bottom of the springs to be flat and square. then dab glue to the bottom of them and stick them just outside of where you marked earlier. this will ensure you clear the top shell.
take the bunker and peg it into dowels either in the running board or make sure the two nearest to the front of the bunker are clear for later.
Glue the cab windows to the top shell around the holes in the cab. this should help define them.
Glue the cab roof onto the top shell. it should be evident where they should go. You can now feed the longer dowels through the cab roof, bunker, and running board
Carefully peg the decorative couplings into the square holes on the front and back of the running board's buffer beam. if you press too hard you could bend it and cause it to break. As for the buffers, keep the support material on (if printed with it) it will help strengthen it for when you boar out the hole of in the buffers. use a drill bit ~1mm in diameter. DRILL BY HAND! use a pin vise and avoid using a power drill. if you have to, secure the buffer so you aren't touching it, then use a drill. feed a 1mm dowel or paper clip-in, cut flush at the front of the buffer but at the end leave 3-4mm sticking out to stick into the holes of the buffer beam. remove support and then glue them in.
on the dome, bend a 1mm dowel or paper clip to fit in both holes to act as a valve. just stick a paper clip into the hole in front of the cab for the whistle.
as for the smoke box door, you can glue the blank and door together, or just glue the smoke box door to the smoke box. For a swappable magnetic face, add a metal plate just onto the blank and then add a face or the door with small magnets inside the smoke box.
for the cylinders, take the dowels from the Bill/Ben pistons and put them on the new ones. paper clips also work. these will help keep the side rods in place when running. screw into the chassis where the original positions were.
paint everything and glue the top shell assembly to the running board assembly.
feel free to share any makes of this model.
Category: Hobby