
1 / 11
LED Riser for BambuLabs X1C
Order a print of this model
We calculate the final price from your selected file. You review and accept it before payment.
Saved on this device.
Model information
- Source
- Printables
- Category
- Bambu Lab Parts & Upgrades
- License
- Creative Commons — Attribution — Noncommercial — Share Alike
There are already a lot of other LED-Riser frames for the BambuLabs X1C out there. So here is what makes my version special:
- gives additional headroom for the bowden hose so filament will hopefully never again break at the extruder when pulled back
- it is for 10 mm LED strips
- you need 4 pieces of 300 mm long LED strips
- no bending of the led strips. The corners are connected with cables
- there is room in the corners to hide the cables
- there are grooves to slide the led strips in, so no glue is needed. These strips will never fall off.
- connection of the four frame parts is done with kind of an X-dowel. So if your printer/material is different than mine you just have to make the dowel fit. No need to reprint the whole frame.
- the leds are mounted in a downward angle so it is more of a indirect lighting
- optimized for printing. While support is still needed it is very easily removable.
- 2 mm foam rubber can be added to give a soft cushion for the top glas
- I have published the whole model on OnShape, so you can make your own modifications
- the BLLED-controller connects wireless to your printer and shows colors according to the printers status
You will need:
- the four printed frame parts (I used PETG)
- the 4 X-dowels (3 normal length and 1 short length)
- 4 covers to close the cutouts in the corners where the cables are to be tucked away
- 4 pieces, each 300 mm long of LED strip 10 mm wide
I used 4in1 RGBCW, 24V, IP20
(https://www.ebay.de/itm/224047212379?var=523055987018) - foam rubber 2mm thick. (usually in the crafting section of your hardware store) (Moosgummi-Blätter aus dem Bastelbereich)
(https://www.obi.de/weiteres-kuenstlerzubehoer/moosgummi-schwarz-2-mm/p/7615354) - a BLLED controller to connect the LED colors with your printer status
(https://dutchdevelop.com/bl-led-controller/) - a POWER TAP to get the necessary 24 Volts from the AMS power port
(https://www.ebay.de/itm/235255075265?var=535299128891)
If you buy the kit it comes with the additional cable to put this inbetween the printer and the AMS
Printing instructions

Use manual support
with strong tree type like so:
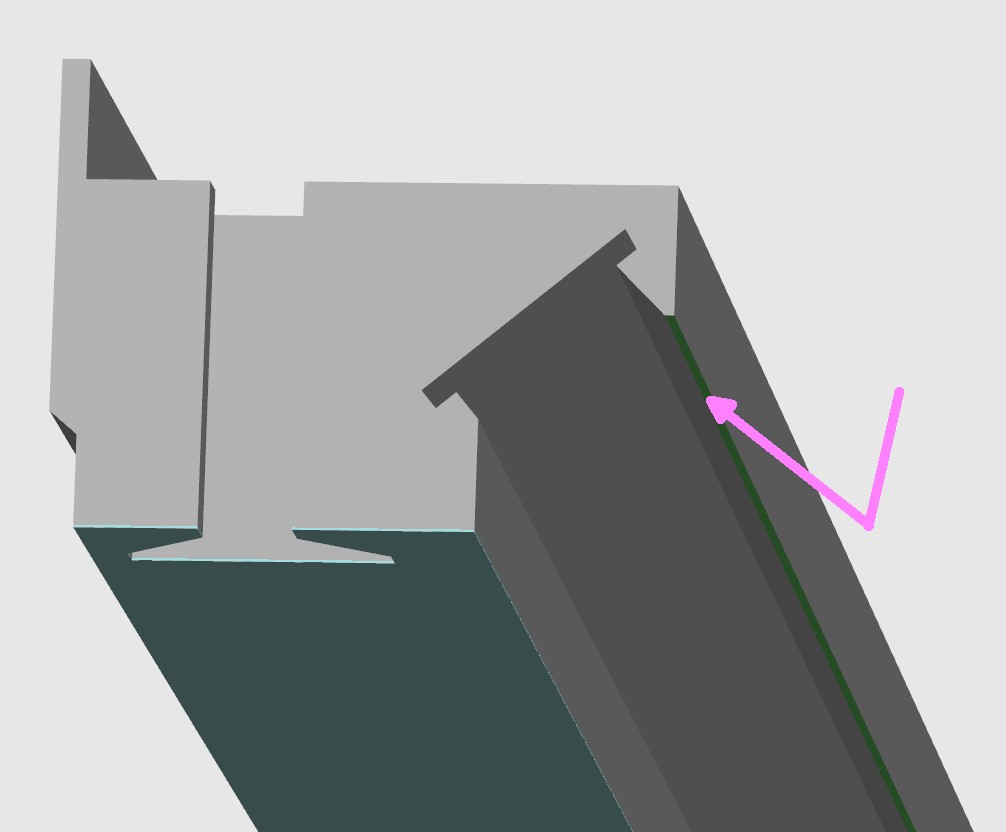
paint manually support on this smal lip all around
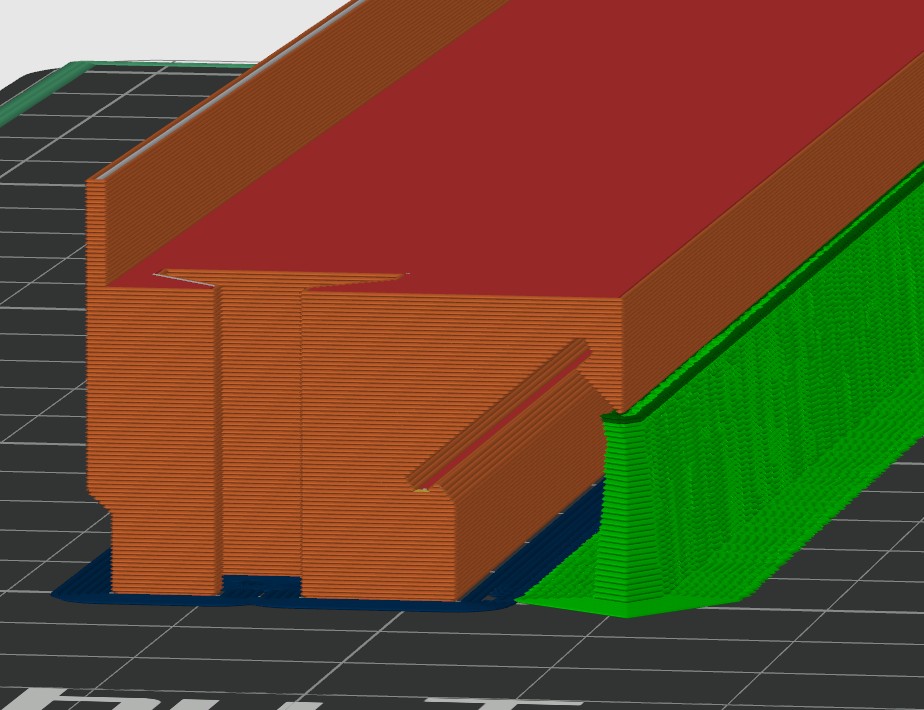
after slicing it should look something like this:
I used brim to make sure all parts stayed flat while printing.
Putting all together
- Two of the frame parts have an indentation on top. This is the front. Use the short plug to connect them. The top glas does have a handle with screws in this place.
- Connect the other 2 frame parts with the 3 other dowels
- Check, if it fits on your printer and if the glas fits on top of it
- Cut your led strips into 4 pieces of each 300 mm. If you bought the correct 60 LED/meter version, then you should be able to cut every 100 mm.
- Solder small cable strands of around 5 cm length to one end of each LED strip.
- Slide the LED strips into the grooves.
- Connect the strips at the corners with the cable strands to form a loop.
- Tuck away the excess cables into the corners.
- Glue the covers on the corner cutouts of the frame.
- Cut the foam rubber sheet into strips accordingly and glue them on top of the riser.
- Setup and connect your BLLED controller to the led strip. Give power via the POWER TAP.
- Let there be light!
Please give me a rating in the comments or aks if my instructions are unclear.