
QIDI X-Plus 3/X-Max 3 mount for BTT SFS V2.0 Filament Sensor
We calculate the final price from your selected file. You review and accept it before payment.
Saved on this device.

A mount for the BTT SFS V2.0 filament sensor to the QIDI X-Plus3/X-Max3 using the original filament sensor mount holes.
- Rating
- 5 / 5
- Likes
- 57
- Downloads
- 202
- Makes
- 4
- Views
- 2,986
- Reviews
- 5
Updated at source:
Model information
- Source
- Printables
- Category
- Other Printer Parts & Upgrades
- License
- Creative Commons — Attribution — Noncommercial — Share Alike
A mount to attach the BTT SFS V2.0 filament sensor to the QIDI X-Plus 3 using the original filament sensor mount holes.
It has holes to mount the BTT sensor vertically or horizontally and uses old filament sensor screws and the new BTT SFS V2.0 sensor screws, so no additional hardware is required.
Only tested on the X_PLUS 3. I have not tested this with the X-MAX 3 or X-Smart 3 but I believe the mount does fit the X-Max 3.
The BTT SFS V2.0 has four major detection functions, being Nozzle clogging, filament runout, filament entanglement, and extruder faults.
https://bigtree-tech.com/blogs/news/new-release-bigtreetech-sfs-v2-0
WARNING!! IF YOU WANT TO TRY THIS PLEASE KNOW WHAT YOU ARE DOING. YOU WILL ALMOST CERTAINLY VOID ANY WARRANTY AND COULD BRICK YOUR PRINTER. I AM NO ELECTRICAL ENGINEER AND TAKE NO RESPONSIBILITY FOR ANY ERRORS. I ALSO GIVE NO GUARATEES THAT THIS IS THE CORRECT WAY TO DO IT OR THAT IT WILL WORK. YOU SHOULD DO YOUR OWN RESEARCH AND PROCEED AT YOUR OWN RISK.
YOU MUST UPLUG THE PRINTER AND WAIT SOME TIME FOR THE PRINTER TO COMPLETELY SHUT DOWN BEFORE REMOVING THE BACK PANEL.
I understand that there is a large capacitor on the mainboard to allow the system to shut down properly when the printer is turned off. I would give it a good few minutes after unplugging before removing the back panel.
I had to cut off the original runout sensor connector and soldered the BTT motion sensor green wire to the old red wire and then the BTT 5v red wire to the QIDI to the old black wire as shown in the pictures.
I also swapped the BTT black (GND and blue) wires around onto the same 3-pin connector as shown and connected that to the empty connector for the z-axis end stop which is next to the filament sensor connector (to the left). The z-axis end stop appears to be a virtual sensor so presumably, that is why nothing is connected to it from the factory.
I then edited the printer.cfg file on the Fluidd web UI and replaced the old filament sensor settings with:## amended filament sensor settings for BTT SFS v2.0 runout sensor
[filament_switch_sensor fila]
pause_on_runout: False # factory default True
runout_gcode:
PAUSE
# SET_FILAMENT_SENSOR SENSOR=fila ENABLE=1
M117 Filament switch runout
insert_gcode:
M117 Filament switch inserted
event_delay: 3.0
pause_delay: 0.5
switch_pin: PC3 # factory setting !PC1
## inserted for BTT SFS V2.0 runout sensor
[filament_motion_sensor encoder_sensor]
switch_pin: PC1
detection_length: 2.88
extruder: extruder
pause_on_runout: False
runout_gcode:
PAUSE # [pause_resume] is required in printer.cfg
M117 Filament encoder runout
insert_gcode:
M117 Filament encoder inserted
Edit the M8029 macro to enable/disable the encoder sensor also:[gcode_macro M8029]
gcode:
{% if params.D is defined %}
{% if (params.D|int)==1 %}
SET_FILAMENT_SENSOR SENSOR=fila ENABLE=1
SET_FILAMENT_SENSOR SENSOR=encoder_sensor ENABLE=1 #BTT SFS v2.0 addition
{% endif %}
{% if (params.D|int)==0 %}
SET_FILAMENT_SENSOR SENSOR=fila ENABLE=0
SET_FILAMENT_SENSOR SENSOR=encoder_sensor ENABLE=0 #BTT SFS v2.0 addition
{% endif %}
{% endif %}
Add new macros to enable and disable the encoder sensor
## BTT SFS V2 Gcode MACROS to enable and disable SFS encoder ##
[gcode_macro SFS_ENABLE]
#description: Enable smart filament sensor
gcode:
M117 ENABLING the Smart Filament Sensor
G92 E0
SET_FILAMENT_SENSOR SENSOR=encoder_sensor ENABLE=1 # Put your filament sensor's name after SENSOR=
[gcode_macro SFS_DISABLE]
#description: Disable smart filament sensor
gcode:
M117 DISABLING the Smart Filament Sensor
G92 E0
SET_FILAMENT_SENSOR SENSOR=encoder_sensor ENABLE=0 # Put your filament sensor's name after SENSOR=
## End of BTT SFS V2 Gcode MACROS to enable and disable SFS encoder ##
Add the following to the PRINT_START macro:
[gcode_macro PRINT_START]
gcode:
SFS_DISABLE ## Disable BTT SFS v2.0 filament encoder before print starts to stop false positives in purge layer before print. Endable just before print starts in gcode
Add SFS Disable to the PRINT_END Macro:
[gcode_macro PRINT_END]
gcode:
SFS_DISABLE ## disable BTT SFS v2 encoder sensor
…
Then finally, in your slicer of choice add SFS_ENABLE to the end of your start G-Code and SFS_DISABLE to the beginning of the end GCODE
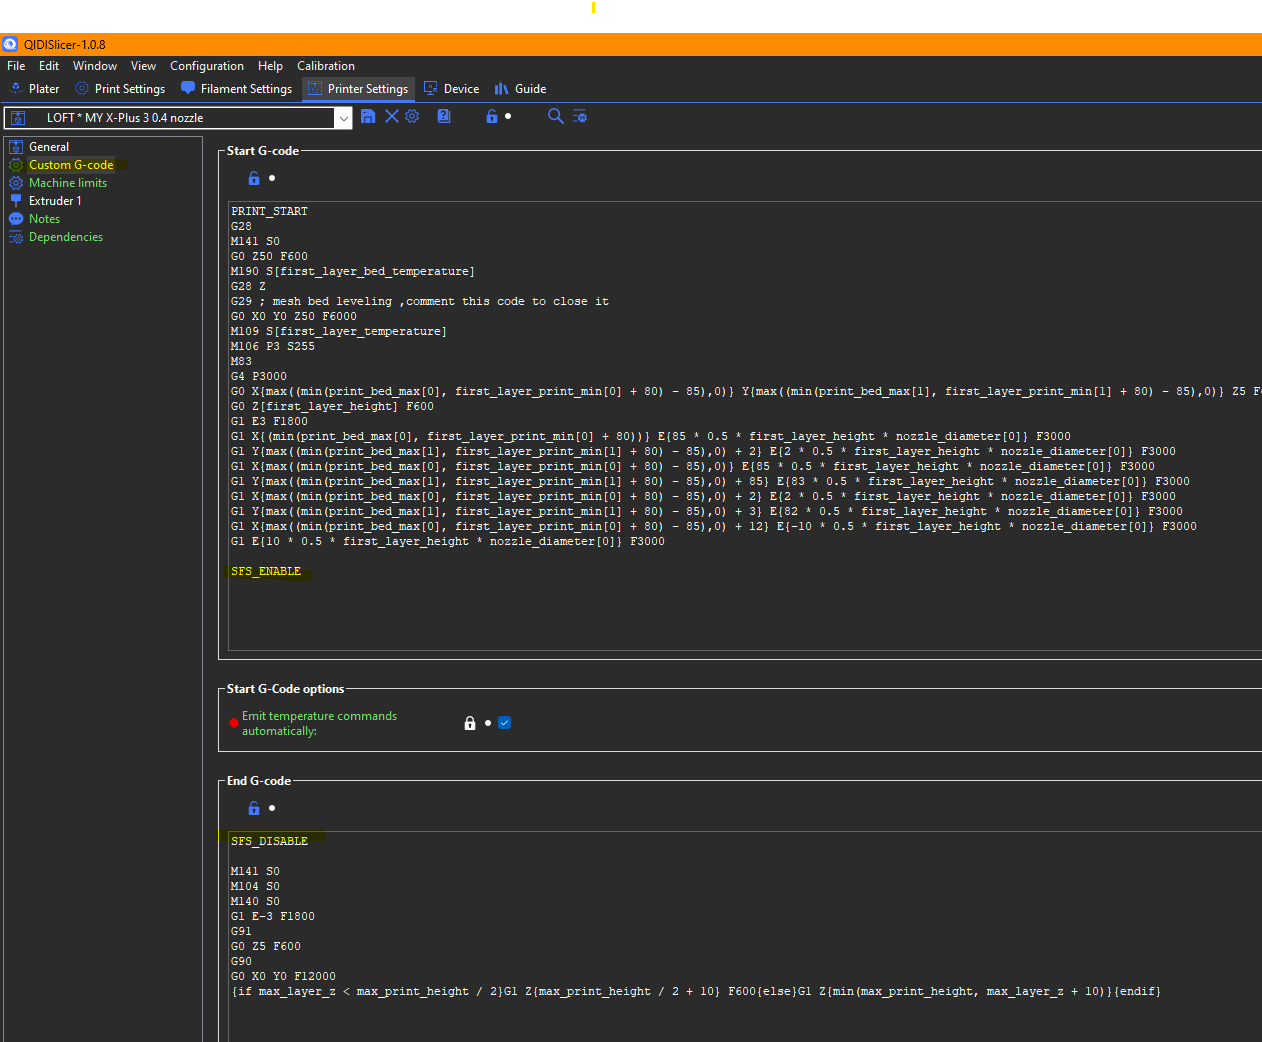
The SFS_DISABLE within the PRINT_START gcode stops the filament sensor from pausing the print during the purge block. Adding SFS_ENABLE after the start gcode then restarts the encoder sensor for the main print.
When I finished I saved the printer.cfg and restarted Klipper.
Then I put some filament in the sensor and, in the console, ran the following to check the runout sensor:
QUERY_FILAMENT_SENSOR SENSOR=fila
You should get a response like:
// Filament sensor Fila: Filament detected
And then run:
QUERY_FILAMENT_SENSOR SENSOR=encoder_sensor
You should get a response like:
// Filament sensor encoder_sensor: Filament detected
Then you should be ready to go.
I manually tried to print without filament in the sensor and it paused and then I tried it with filament in and physically held the end of the filament to stop it going through the sensor and again it paused.