
Linear / Pressure Advance test
We calculate the final price from your selected file. You review and accept it before payment.
Saved on this device.

This post-processing script for PrusaSlicer generates a test pattern for linear advance and pressure advance.
- Rating
- 0 / 5
- Likes
- 39
- Downloads
- 1,102
- Makes
- 0
- Views
- 6,158
- Reviews
- 0
Updated at source:
Model information
- Source
- Printables
- Category
- Accessories
- License
- Creative Commons — Attribution
"Linear advance" (also called "K parameter") controls how to compensate for the pressure difference between “slow” and “fast” extrusions. This value needs to be correct for clean high-speed prints and depends on the extruder model, nozzle size, temperature, and of course the specific filament – think “Prusa vs. Filamentum”, not just “PLA vs. PETG vs. ASA”.
Pre-made or web-built GCode scripts that produce a test pattern for linear advance frequently require tweaking and don't consider your printer's requirements (switch to the correct extruder, nozzle cleanup, bed levelling, size of your print, …).
This is a post-processor script for PrusaSlicer that works around all of these problems by replacing your model with a Linear Advance test pattern that's perfectly suited for your current print.
The script is written in Python. It doesn't need external modules.
How to apply:
- Do not use the sample file I included. It only exists because publishing a model without models or G-code doesn't work.
- Instead, download the ZIP file and unpack the included “k-test.py” file to someplace.
- Run “chmod +x /path/to/k-test.py” to make it executable (on Linux), then run “/path/to/k-test.py --help” to check that it works. (Without the quotes …)
- The above also works on a Mac.
- If somebody knows the equivalent Windows magic, please leave a note.
- Set up PrusaSlicer for your filament and nozzle size. Don't add a model.
- Right-click on the empty Parts area. Add a Box.
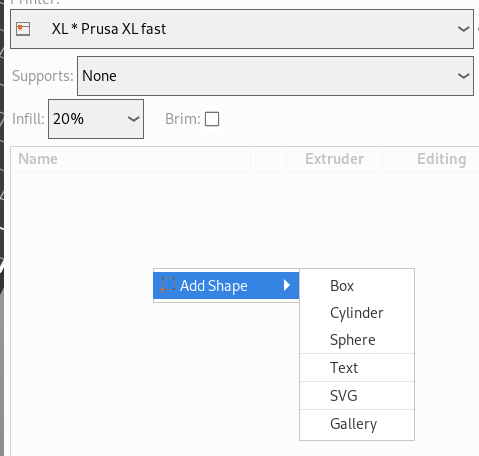
- Change the box size to X=200, Y=200, Z=height of first layer. You can use more space if you want, and/or move the rectangle to the side. The script will auto-adjust its output (within limits).
- Alternately, you can use the model from gareth.ky.
- Go to “Print settings”, “Output options”. Add the path to this script to the “Post-Processing scripts” box.
- The script requires speed values for “slow” and “fast”. If you don't add options (e.g. "-v 20 -V 100") it uses the settings under “Speed”: it takes the slow speed from Bridges and the fast setting from Perimeters.
- The tested K parameter ranges from 0 to 0.2,
- Go back to the Plater; click “Slice now" if you turned off auto-slicing in your Preferences.
- The preview shows a flat rectangle (or Gareth's unmodified output) because the postprocessor is only run when exporting. I consider that to be a bug; see issue 12237.
- Export or send to printer as usual.
- The printer should emit something like the pattern in the cover photo.
- Find the line that's best. In this print that's probably the line with "0.06" next to it.
- Go to the settings of your filament. Add a line or two like this:
M900 K{if nozzle_diameter[0]==0.4}0.06{elsif nozzle_diameter[0]==0.6}0.03{else}0.08{endif}; tested 0.4 nozzle on 2024-02-26
- If you have more than one printer model, this will be more complicated. Fortunately you can nest “if” statements. Prusa uses “and” clauses in these “if” conditionals; don't do that.
- Of course if there already is a “M900” line there you should remove it, or comment it off.
- Note that the conditionals refer to the first nozzle. If you have an XL with different nozzle sizes this is a problem. Currently need to modify this setting manually when the filament is on the second (or fifth) extruder. See issue 12238.
This concludes the Linear Advance part. Now, if you have an XL or MK4, there's a new “Pressure Advance” parameter, M572. The script's option “-f 0.06” (use the K factor you just determined) you tell this script to use a constant linear advance, and run a test with varying PA values instead. Use something like
M572 S{if nozzle_diameter[0]==0.4}0.05{elsif nozzle_diameter[0]==0.6}0.04{else}0.09{endif}; tested 0.4 nozzle on 2024-02-26
(note “S” not “K” in M572).
Linear and Pressure advance are related but not-quite-identical parameters which both influence the result of this test. Thus, for increased (but probably unnecessary) accurracy, you might want to repeat the Linear Advance test after adjusting the Pressure Advance, particularly when there was no setting for the latter in your filament's Start G-code.
The script does not have an option to fix the Pressure Advance. When testing Linear Advance it simply doesn't modify the value that the filament code has set.
Options
This script has quite a few. Use “--help” to list them.
Notably, you can use the “--corner” option to make a test graph with corners, and “--alt-pattern” or “-A” to alternate the nozzle's direction.
When you use corner mode, you might observe that the lines don't stick to the bed. In this case, reduce the max speed so that adhesion isn't compromised.
Sources
I used the Javascript code from http://github.com/MarlinFirmware/MarlinDocumentation (in tools/lin_advance), converted the code to Python, removed the printer setup code, and added code to embed the generated G-code in a regular G-code file from PruseSlicer.