
Personalized Windmill (Customizable)
We calculate the final price from your selected file. You review and accept it before payment.
Saved on this device.
Windmill adapting the leaf-count to the number of letters of your name. Printed in place & highly customizable
- Rating
- 0 / 5
- Likes
- 8
- Downloads
- 40
- Makes
- 0
- Views
- 302
- Reviews
- 0
Updated at source:
Model information
- Source
- Printables
- Category
- Outdoor & Garden
- License
- GNU General Public License v3.0
Yet another windmill.
This one is dedicated to the following design goals
- Print-in-place - with bearing(*) forged into the model
- Personalized - the model creates a leaf for every letter of a text you enter (e.g. “SOFIA”: 5 leafs)
- Manual color change possible - spool change just after the first layer
- Fast Printing - windmill leafs consist of a single layer
- Highly customizable - many parameters can be adapted to meet your bed size, resolution and taste
Customization, Tuning and Assembly
Step 1: Customization
There are two ways to customize the model:
- You can download Windmill X_X - release.scad and open it in OpenSCAD. Use the customizer (Windows >> Customizer) for changes.
- You can use an online tool like https://seasick.github.io/openscad-web-gui/
The most important parameters are
- imprint - the text on your Windmill
- part - create the Windmill and the Text in two different files, so you can first print the text in one color and then the rest of the windmill in another color. Most modern slicers can be convinced to pause the print and initialize the filament change automatically.
The part variable also has the options All (to visualize the model in OpenSCAD), Bearing (to tune the bearing settings) and First Leaf (to tune layer adhesion and flow on the leafs). - size - the Windmill's diameter
- stick diameter - hole diameter for the stick holding the windmill. For typical bamboo chopsticks common in my area, 6 mm work fine.
- orientation - the Windmill works vertically (the typical windmill you know) or horizontally. This parameter changes the text orientation and the hole position
There are some more parameters to explore, concerning
- text (font, text, size, etc.)
- leafs (leaf thickness, gap between leafs, etc.)
- leaf connectors
- bearing settings (you might need a few iterations to tune these to your filament and printer, but this can vastly improve the smoothness of your windmill)
- other settings (resolution and wall thickness for holding stick)
Once you have your parameters locked in, render the file and export .stls to use with your slicer.
Step 1.1: Fine Tuning (optional)
The default settings should be a working baseline for most printers and filaments. However, you can vastly improve the smoothness of your windmill by tuning the bearing and the first layer flow.
Tune the bearing
The bearing is a remix from a model released by radus(*). To tune it, set part: bearing and make your adjustments in the Bearing Settings.
The defaults should work on most printers, but the results might be a little “rough”. To get the most of the model, you might to approach the parameter bearingGap at 0.14 mm or even lower.
Another important parameter is bearingWallWidth.
The OpenSCAD output displays some "Bearing Data". I had good results with “Biggest Gap Share” somewhere at 40 % and “Average Gap Share” at 3-4 %.
Please share your optimized settings in the comments! This would help me to further improve the model!
Tune the leafs
The intention is to print the leafs in the first layer. While this is not difficult, it might be a little tricky to get some printing parameters right, mainly
- nozzle distance
- bed temperature
- first layer temperature
- first layer flow
- pressure advance
To make it easier to tune those settings, you can export only the first leaf with part: First Leaf and then have a test print.
Another important parameter is thickness under Leaf Settings. This parameter defaults to 0.30 mm. Make sure to adjust the first layer thickness in your slicer to this value!
Step 2: Slicer Settings
I found these Slicer settings to work best:
- First layer height: 0.3 mm (or equal to thickness under Leaf Settings).
- First layer line width: 0.45 (or a little bit more than your nozzle diameter)
- Layer height: 0.15 mm (but 0.2 mm also works)
- Z-Seam: Random
- Wall ourder: Outer Inner Outer (if available)
Also in most modern slicers you can load the text stl and the windmill stl simultaneously and let the slicer issue a filament change.
Step 3: Assembly
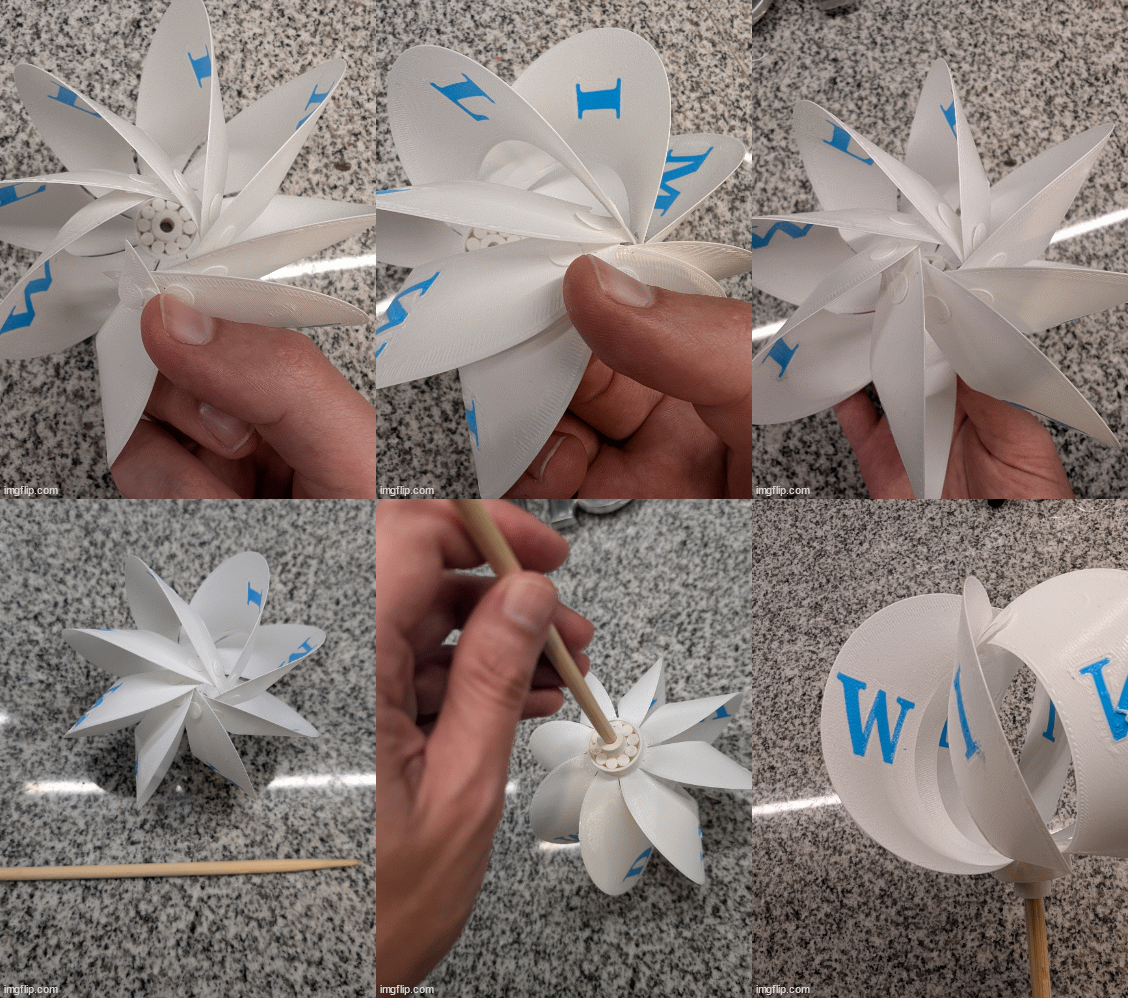
- Each leaf has the shape of a croissant. With the hand coming from the outside of the croissant, pick the first leaf and carefully bend it to the middle of the bearing. Make sure you bend it to the bearing side without the stick connector.
- With the other hand, pick the second leaf. That's the one on the inside of the first leaf. Bend this one to the middle as well.
- With the first leaf coming from below, move the connector snap of the first leaf in the slot of the second leaf.
- While making sure that the first two leaves do not unsnap, get the third leaf to the middle and repeat step 3.
- Repeat until all leaves are daisy chained.
- Finally, all leaves should form a chain. Now you need to connect the first and the last leaf in order to make it a ring. In order to do so, carefully connect the snap of the last connected leaf to the slot in the first leaf. Be aware that this step is more difficult for Windmills with only a few leaves (e.g. 3 or 4). The more leaves your windmill has, the easier it is to make this final connection. I found out, that Windmills with only 3 or 4 leaves also work without this final connection.
(*) Bearing:
For the bearing I remixed (and hopefully improved) the model “Parametric printed bearing openscad” by radus (Sascha Sudarkin). I might later release my remix here on printables.