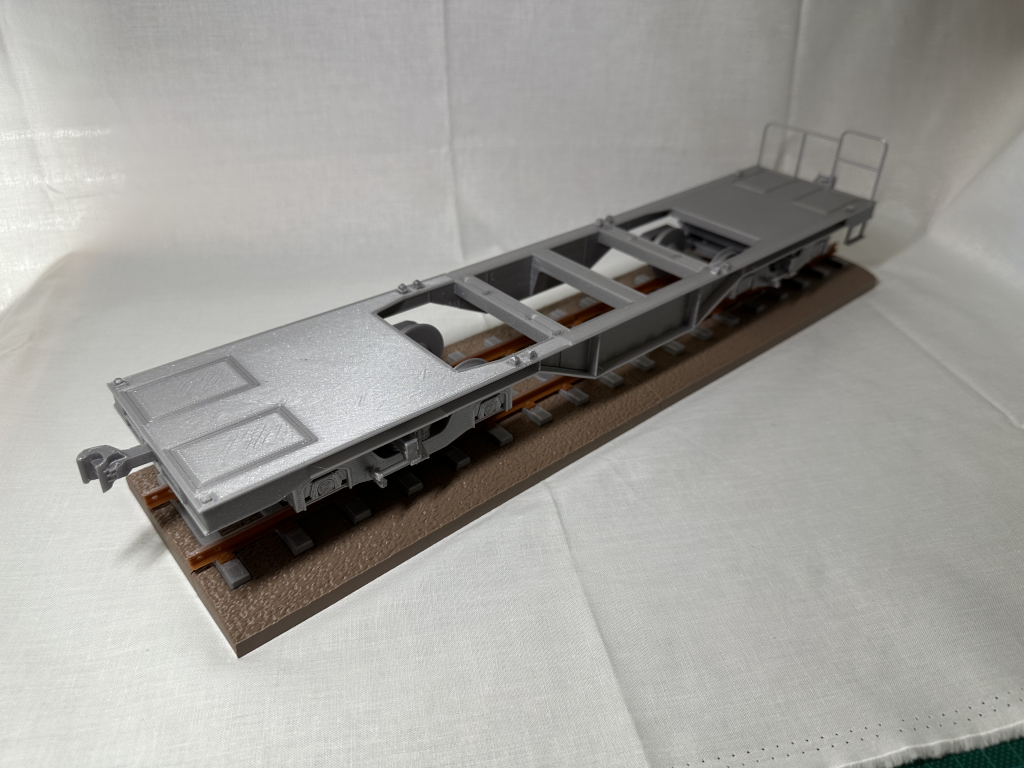
淡路屋JR貨物コンテナ弁当 コンテナ車/Flatbed Car Display for Awajiya Container Bento Boxes
Obliczymy ostateczną cenę na podstawie wybranego pliku. Sprawdzisz ją i zaakceptujesz przed płatnością.
Zapisane na tym urządzeniu.
Informacje o modelu
- Źródło
- Printables
- Kategoria
- Vehicles
- Licencja
- Creative Commons — Attribution — Share Alike
This is a display stand for the bento boxes from Awajiya/淡路屋 in Japan. It's not meant to be a model train that can roll around the tracks (despite the wheels do run 😉.)
I've had a chance to get all three variants of the JRFreight container bento boxes, and I wanted a display for it. This is the most complicated model I've made so far, could use some improvement, but I think it is good enough for what it is meant to be.
The car is modeled after コキ200系(KoKi200) and コキ107系(KoKi107) flatbed cars, the bogie is modeled after a FT-3 bogie.
Features
- Everything can be printed without supports, longest bridge is about 20mm.
- Everything is friction fit, parts can be glued but not required. (It is recommended to glue the parts to make the model stable)
- Different color parts can be printed separately then assembled, no need for MMU.
- Made to be printable on a Prusa Mini sized bed.
- Containers not included, sorry. 😅
Issues
- E2/E3 mesh seem to be broken, but PrusaSlicer appears to be able to fix the problem and the prints look fine.
- C8 is small and difficult to print to dimension. Maybe it can be redesigned to make it easier to print or fit easily without having the print to turn out really good.
- D4/D5 fishplates are very tricky to assemble and breaks easily, could use some rework.
Possible Future Changes/Remix Ideas
- Piping and break handle. They are not modeled, but holes are available in the model for them.
- Working coupler. Current model contains only the shape, it doesn't really work as a coupler. It will be interesting to make a working and printable coupler. (Maybe for another model train project)
- Containers. It is for the Awajiya/淡路屋 bento boxes, but I guess it would be nice to have a printable container for people who doesn't have all three bento boxes. 😄
- L-Gauge Wheels. The gauge in this model is very close to Lego gauge, so it is possible to change the wheels to make it fit on Lego tracks without changing anything else.
- There're holes below the bed for additional parts to be mounted. Things such as piping and compressed air tank could be added for more realism.
Print/Assembly Instruction
The model is separated into 5 parts: Bogie, Wheels, Flatcar, Rail, Roadbed. Some parts are optional.
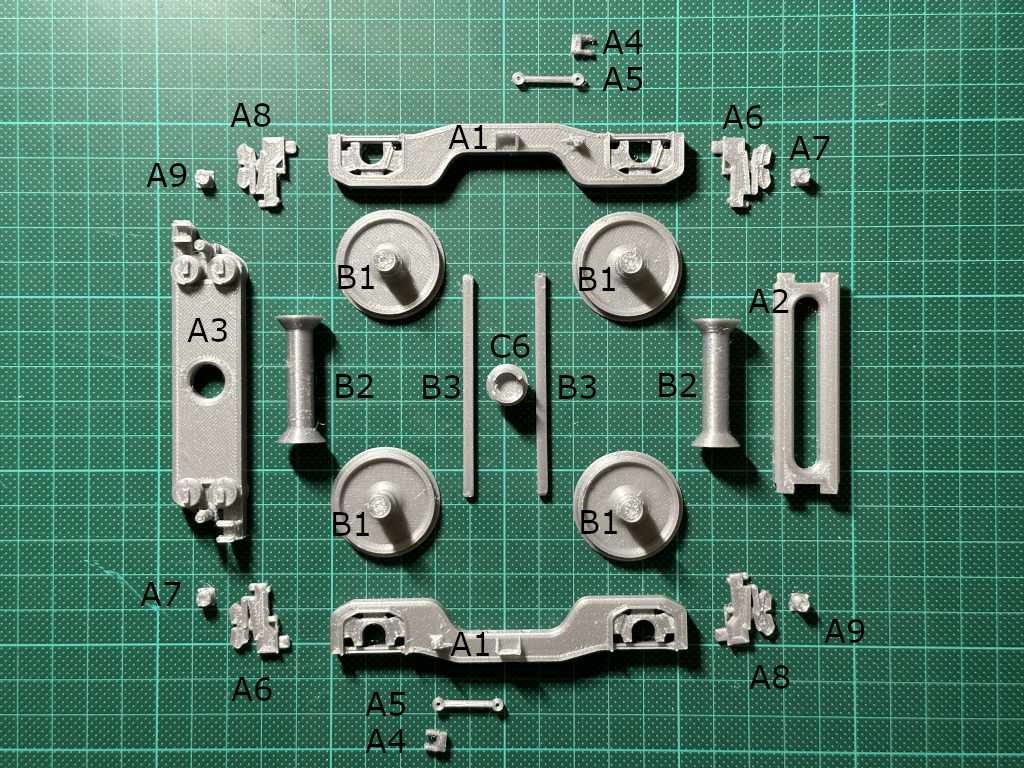
A, B - Bogie assembly
Parts to print (for two bogies):
- 4x A1_FT3Side
- 2x A2_FT3Bottom
- 2x A3_FT3Top
- 4x A4_FT3OuterLinkageCap
- 4x A5_FT3LinkageBar
- 4x A6_FT3BreakAssemblyA1
- 4x A7_FT3BreakAssemblyA2
- 4x A8_FT3BreakAssemblyB1
- 4x A9_FT3BreakAssemblyB2
- 8x B1_FT3Wheel810mm
- 4x B2_FT3AxelCenter
- 4x B3_FT3AxelCore
Filament color suggestion:
- All parts suggested to be printed in light matte gray.
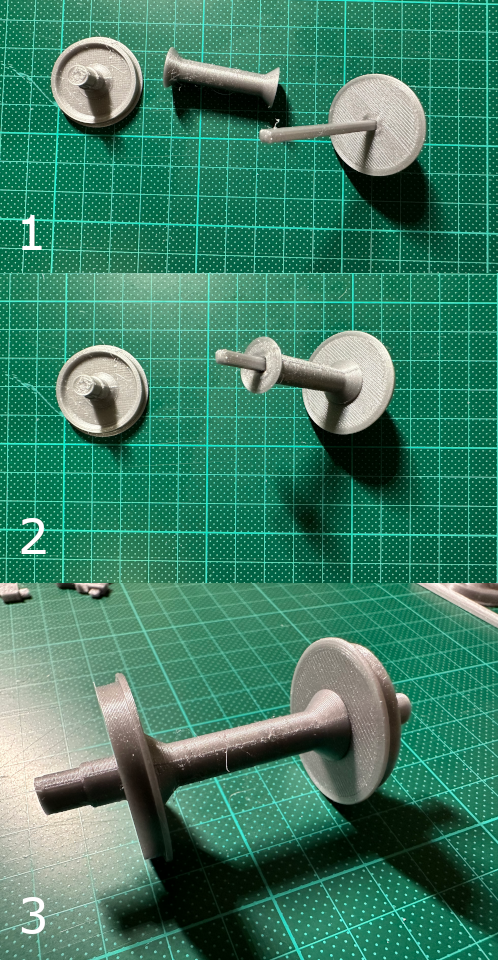
Wheel subassembly steps:
- Insert B3 into one of B1
- Insert B2 onto B3
- Insert another B3 onto B2, one wheel subassembly complete.
- Repeat for other 3 sets
- Subassembly is complete.
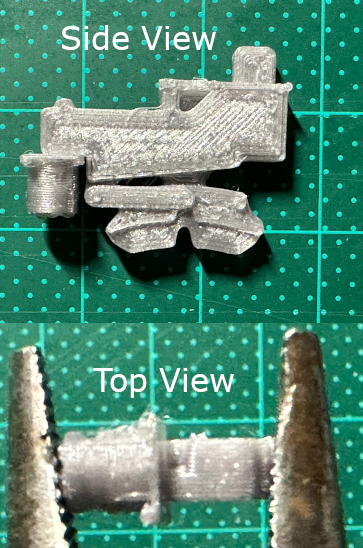
Break subassembly steps:
- Press A7 onto A6.
- Note that A7 is very similar to A9, there should be a small gap as shown in the picture, if not you may be using the wrong part and it might not go on.
- From the top A7 should be centered, if it's not, you may be using the wrong part.
- Press A9 onto A8.
- Repeat for all 8 sets.
- Subassembly is complete.
Bogie assembly steps:
🤓ℹ It will be a lot easier to assemble if all connecting notches/pins are cleaned prior to start assembly.
- Press break subassemblies into the four side holes on A2.
- ⚠The side with details should face outwards.
- ⚠The side notch of A2 should be flush with top surface
- You may glue them on if they don't fit tightly onto A2
- Press A2 into one of A1
- Note the direction, the bottom of A2 will be flush with A1's bottom
- Insert two wheel subassembly into A1
- Press another A1 onto the assembled part.
- There are the two notches on A2 and the two wheels you need to line up to assemble it.
- Set the assembled part aside once done
- Linkage bar. Press A5 into A4, do it for all four sets
- For best result, you want to have the bridge of A5 facing inward. Inward side would be the side of A4 with the mounting hole.
- ⚠Be careful with A4 as it could break when excessive force is applied.
- Press assembled A4/A5 onto A3
- ⚠Note that A4's mounting hole should face inward
- ⚠Be careful when push into A3 as it could break when excessive force is applied.
- Mount A3/A4/A5 assembly onto the prior assembled bogie parts
- ⚠Make sure the linkage bar(A4/A5) is in the correct orientation when mounting the subassembly.
- You can use glue to make the connection permanent. This is strongly recommended if that parts are loose fit.
- Push A4 onto the pins on A1, do it for all four pairs
- ⚠Be careful when pushing as the parts could break. Suggest properly clean the pins prior to performing the assembly.
- You can use glue to make the connection permanent.
- Bogie assembly is complete.
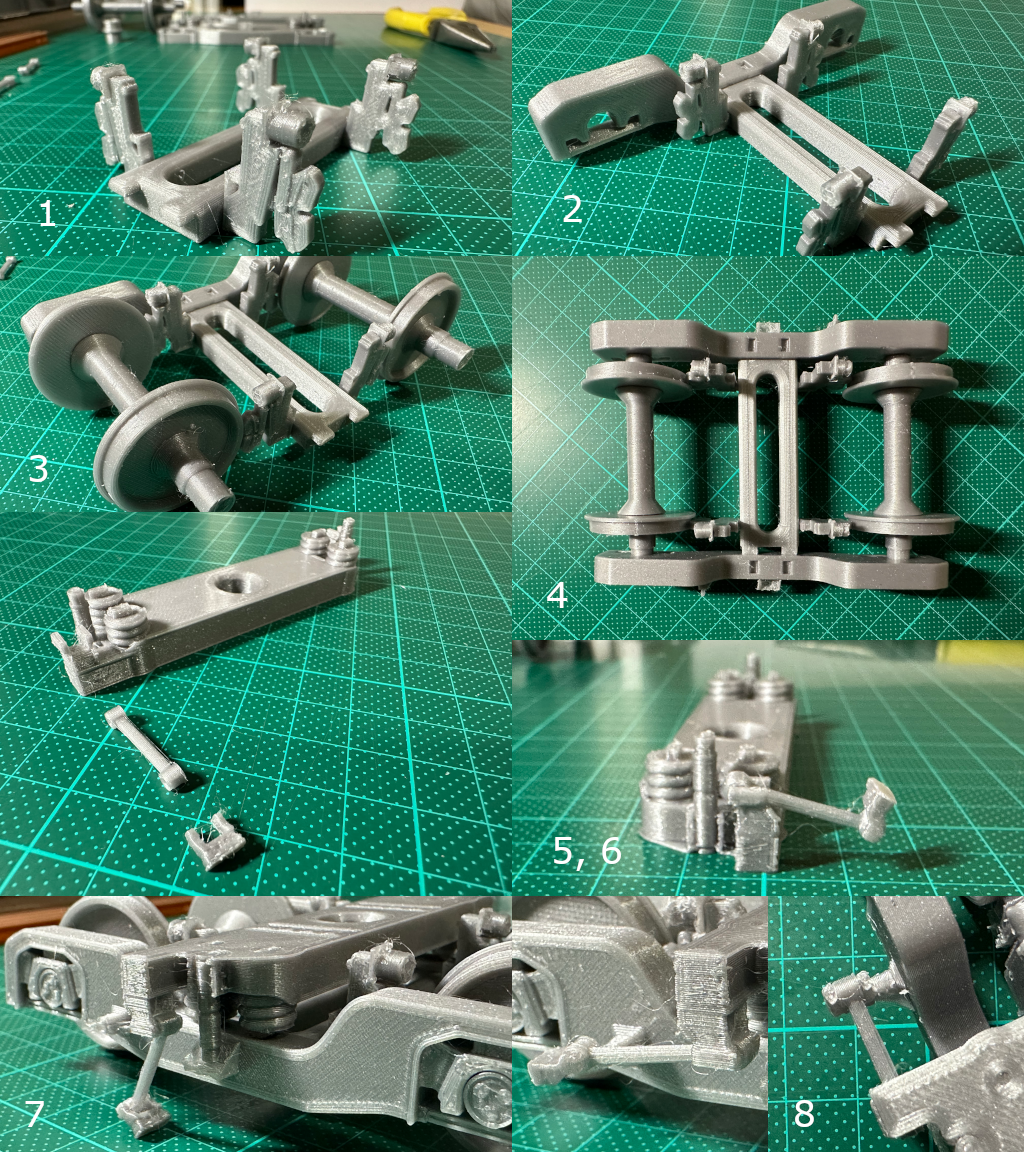
C - Flatcar assembly
Parts to print:
- 1x C1_BedMain_Center, print flat side down
- 1x C2_BedMain_Near, print flat side down
- 1x C3_BedMain_Far, print flat side down
- 2x C4_BedLowerPlate_Center, print flat side down
- 4x C5_BedLowerPlate_Side, print flange side down
- 2x C6_BogieConnector
- 2x C7_SolidCoupler, print with coupler pointing up
- 12x C8_ContainerPin, print with brim if needed
- 2x C9_Ladder (optional), print with flat side down(as shown in picture)
- 1x C10_Handrail (optional), print with flat side down
Filament color suggestion:
- C1/C2/C3/C4/C5/C8 - Light matte blue, matte maroon, matte gray. (These are common colors for KoKi series cars.)
- C7 - Matte gray, matte metal black.
- C8 - Any color
- C9/C10 - Matte white or the same color as C1~C8, or same as C7 for a slightly more rusty look
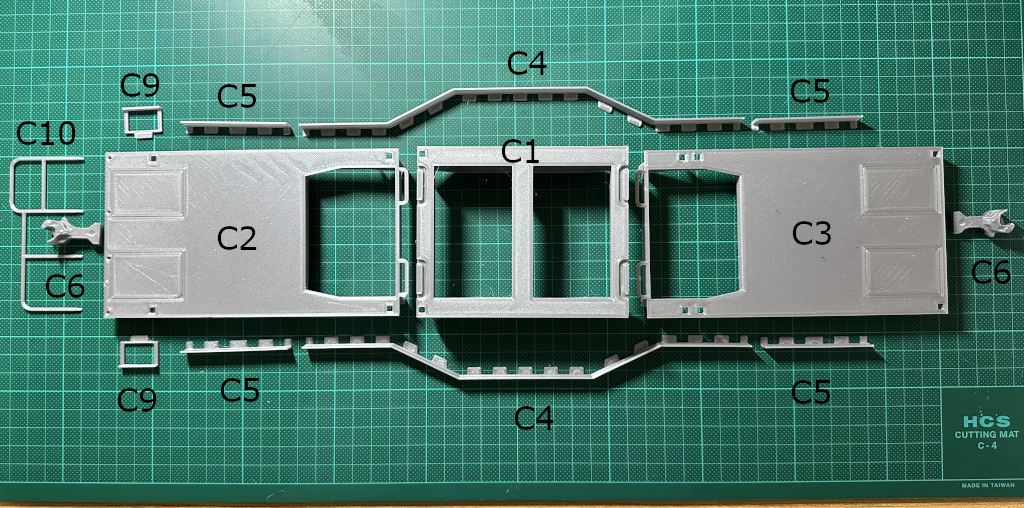
Correction: C6 in the image above should be C7
Assembly steps:
- Connect C1/C2/C3 together with the rings on C2 and C3. Rest it flat-side down on the table.
- Press C4 onto the assembly, one at a time.
- Suggest using clamps to push C4 into the assembly if it is really tight. (It is designed to be tight-fit.)
- Press C5 onto the assembly, one at a time.
- The assembly should be very sturdy at this point. Make sure C4 is pressed in all the way.
- Press C9 onto the assembly, foot peddle should face outward
- Press C7 into the assembly, one at a time.
- ⚠Note the orientation of C7, look into the mounting hole, match the dot with the groove.
- Flip the assembly over
- Press C8 into each of the square holes on the bed.
- ⚠The flanges of C8 should be facing towards the center of each container it is holding.
- It maybe difficult to push the pins into the hole depending on the quality of the print.
- Assembly complete.
- Leave C6/C10 for final assembly.
D, E - Rail assembly
Parts to print:
- 18x D1_ConcreteSleeper
- 36x D2_TiePlate
- 4x D3_Rail220mm
- 2x D4_Fishplate
- 2x D5_FishplatePinned
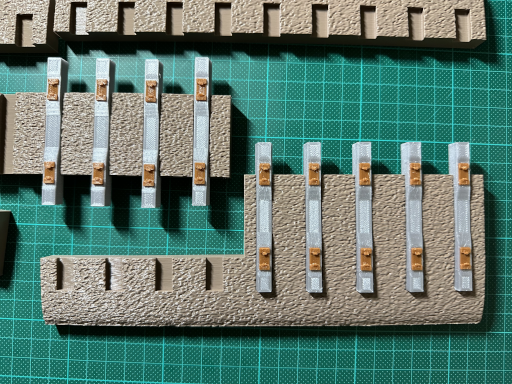
- 1x E1_RoadbedBodyCenter, print with side edge down with brim if needed
- 1x E2_RoadbedBodyNear, print with side edge down with brim if needed
- 1x E3_RoadbedBodyFar, print with side edge down with brim if needed
- 1x E4_RoadbedBodyNearLeft, print with outside edge down with brim
- 1x E5_RoadbedBodyNearRight, print with outside edge down with brim
- 1x E6_RoadbedBodyFarLeft, print with outside edge down with brim
- 1x E7_RoadbedBodyFarRight, print with outside edge down with brim
⚠Note that all Roadbed parts cannot warp, otherwise the sleepers will not fit!
Filament color suggestion:
- D1 - Light matte gray. Any color that have the appearance of reinforced concrete sleepers.
- D2/D4/D5 - Dark matte brown, rusty colors
- D3 - Dark matte brown, rusty colors. Optionally, do a color change for the top layer with metallic gray.
- E1/E2/E3/E4/E5/E6/E7 - Light matte brown or matte gray. Colors should be distinct from D1.
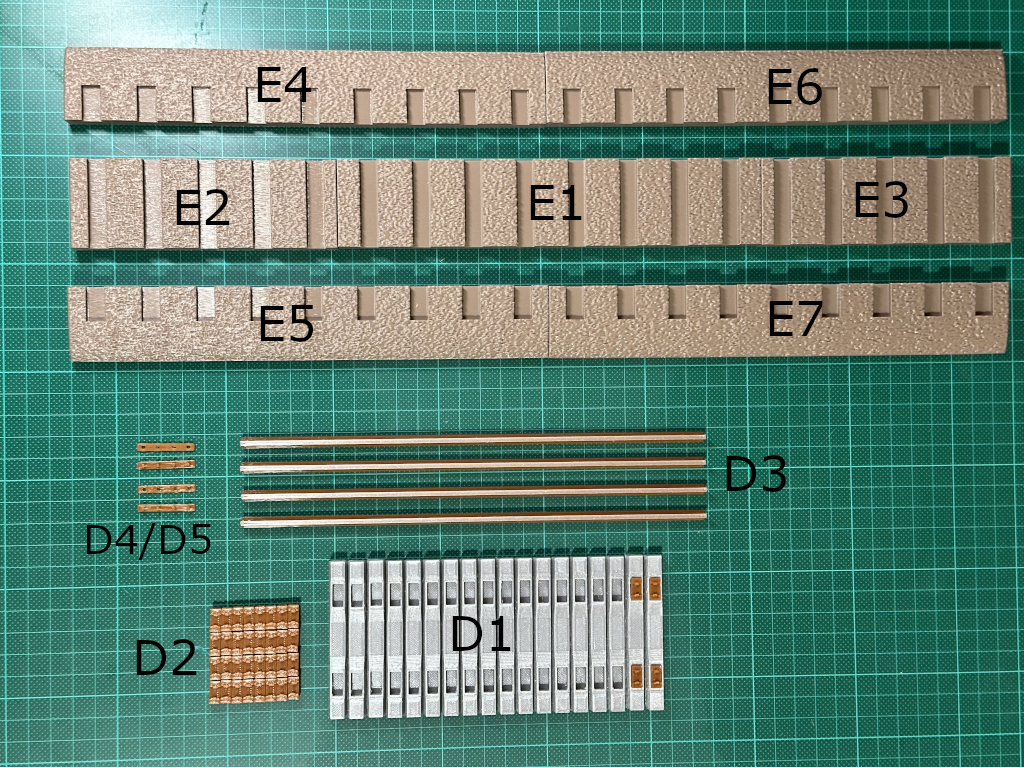
Sleeper subassembly steps:
- Push two D2's into D1.
- You may glue D2 into D1 if it's loose.
- Repeat step 1 for all 18 sleepers.
- Subassembly is complete.
Rail subassembly steps:
- Lay D5 on the table with pins facing upward.
- Push two D3's onto D5's pins.
- Press D4 onto D5's pins.
- ⚠IMPORTANT: Depending on the print quality, it maybe very difficult to push D4 into D5. If you're using tools such as pliers to force it in, WEAR EYE PROTECTION!!! (don't ask me how I know…🙈)
- You can use an exacto knife to enlarge the holes on D4 before assembling.
- You may skip D4/D5 altogether if you can't get it to fit, the rails will be hold in place by the rail ties.
- Subassembly is complete.
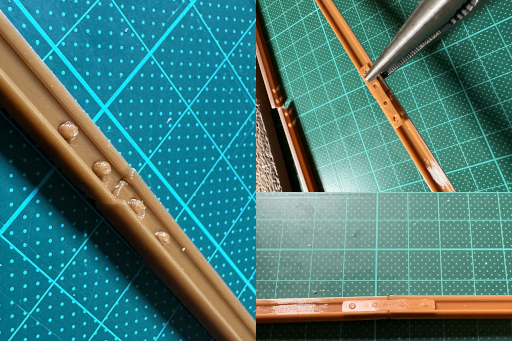
Assembly steps:
- Push all the sleeper subassemblies onto E1/E2/E3, roughly center them.
- ⚠If the sleeper is really difficult to push in, stop! Check the following,
- Any warp during printing of roadbeds will make it almost impossible to get the sleepers to fit. Make sure there's no warping during the print of these parts. (use brims)
- You may sand down or use exacto knife to slightly shave a bit off the sleepers.
- ⚠If the sleeper is really difficult to push in, stop! Check the following,
- Connect E2 and E5 with the sleepers.
- Connect E1 onto E2/E5 with the sleepers.
- Connect E3 and E7 with the sleepers.
- Connect step 3 and 4 together.
- Connect E4/E6 onto previously assembled parts, and push everything tight.
- At this point, the assembly should form a rigid slab. Lay the slab on the table.
- Thread the rails from the end into the ties.
- Assembly complete.
Final assembly
- Push C6's onto the bogies.
- Note the direction of C6, the bogie side connection should be taller than the flatbed side.
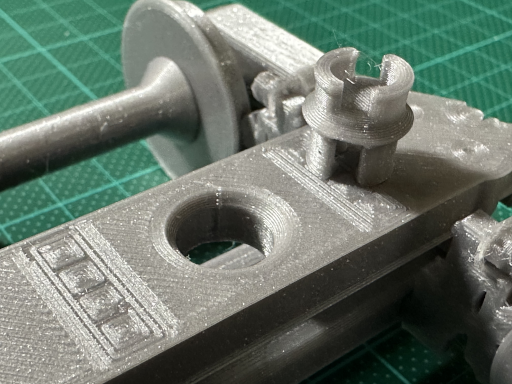
- Note the direction of C6, the bogie side connection should be taller than the flatbed side.
- Gently flip the bogie and push the assembly onto the flatbed connecting them with C6.
- Flip the flatbed car over and place it onto the track.
- ⚠Some parts of the bogie might fall off if you have not glued anything on.
- Push C10 onto the holes at the end of the car.
- Assembly complete.
- Place the bento boxes onto the car. 😎🍱🍱🍱